Guide to Obtaining API Access
As a QualiWare user looking to enhance your experience with in-product AI capabilities, you’ll need to acquire three key attributes: an API Key, the GPT Model Name, and the URL for API access. Here’s how to get started:
When integrating AI into your QualiWare product, you have the option to choose between OpenAI and Azure OpenAI. Each platform has distinct features and privacy practices. Your decision should align with your organization’s specific needs for AI capabilities and data privacy. With Azure OpenAI, customers get the security capabilities of Microsoft Azure while running the same models as OpenAI. Azure OpenAI offers private networking, regional availability, and responsible AI content filtering. For a detailed setup process, refer to the respective guides for OpenAI and Azure OpenAI.
- OpenAI Privacy Policy: openai.com/privacy
- Azure OpenAI Privacy Policy: Data, privacy, and security for Azure OpenAI Service
With OpenAI:
Step 1: Create an OpenAI Account
- Visit OpenAI: Go to the OpenAI signup page.
- Sign Up: Fill in your details to create a new account, including your email and a secure password.
- Email Verification: Check your inbox for a confirmation email from OpenAI and click the link to verify your account.
Step 2: Generate Your API Key
- API Dashboard: Once logged in, navigate to the API section on the OpenAI dashboard.
- Create API Key: Click on ‘Create new API key’. Assign a name to the key for easy identification.
- Copy Your API Key: After the key is generated, copy it securely. This is a crucial credential that will be used to authenticate access to the AI services.
Step 3: Obtain GPT Model Name
- Select the Model: While logged in go here, then press “Show all models”. As a QualiWare customer, you’ll be using a GPT (Generative Pre-trained Transformer) model.
- Model Name: Find the specific GPT model desired for Qualiware integration (e.g., “gpt-4”) and note down the name.
Step 4: Endpoint URL
The endpoint URL for making API calls to the GPT Models at OpenAI is consistent across all users and will look like this:
- Standard Endpoint:
https://api.openai.com/v1/chat/completions
Safeguarding Your API Key
- Security: Keep your API Key confidential to prevent unauthorized use.
- Regenerate if Needed: If you believe your API Key has been exposed, regenerate it immediately via the OpenAI dashboard.
Monitoring and Support
- Usage Tracking: OpenAI offers a dashboard to track your API usage. This can be helpful to stay aware of the AI utilization.
- Customer Support: For any queries or technical support, you can reach out to OpenAI’s support team.
With Microsoft Azure OpenAI:
Integrating Azure’s OpenAI Service into QualiWare requires a few key steps. This guide will walk you through obtaining the necessary credentials and deploying a GPT model within Azure.
Prerequisites
Before you start, make sure you have the following:
- An Azure Subscription: If you don’t have one, you can create one for free here.
- Access to Azure OpenAI Service: This service is currently available by application only. Apply for access by completing the form at Azure OpenAI Service Access Application.
- Deployment of a GPT Model: You can choose the
gpt-4models for deployment in your Azure OpenAI Service resource. Refer to the Azure OpenAI Service deployment guide for detailed instructions.
With the prerequisites checked off, you’re all set to connect Azure OpenAI with QualiWare. The following steps will guide you through the credential gathering and system configuration necessary to activate the AI functionalities within your operational environment.
Step 1: Locate Your Azure OpenAI Credentials
- Navigate to the Azure portal.
- Find your OpenAI service resource.
- In the Resource Management section, locate the ‘Keys & Endpoint’ area.
- Here you will find your ‘Endpoint’ and two keys: ‘KEY1’ and ‘KEY2’.
Step 2: Copy Your Endpoint and API Key
- Copy the ‘Endpoint’ URL. This is the base URL for your API calls.
- Select and copy either ‘KEY1’ or ‘KEY2’. These are your API keys, and you can use either one. Azure provides two keys to allow for key rotation without service interruption.
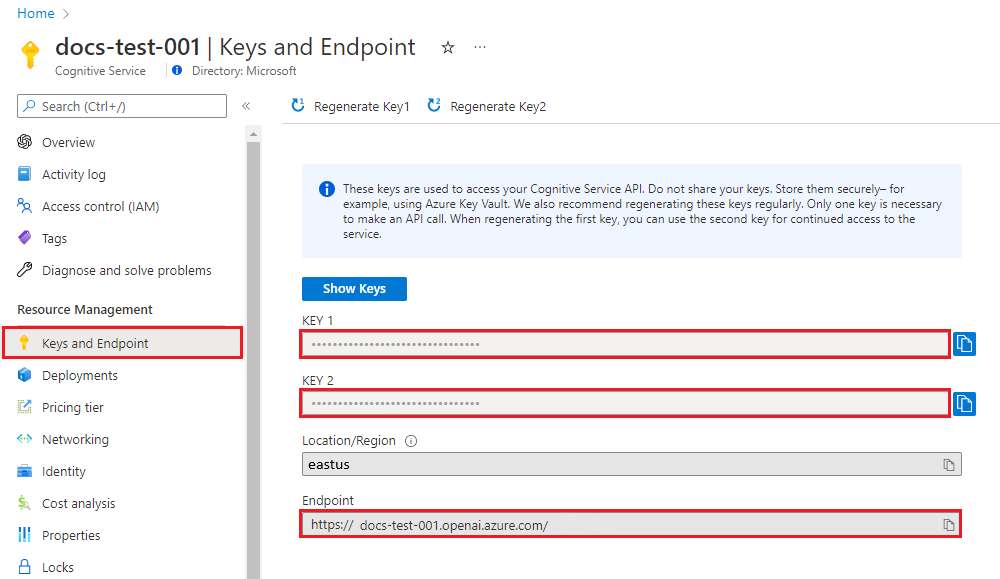
Step 3: Endpoint Equivalence in QualiWare
- Understand that the ‘Endpoint’ from Azure corresponds to the ‘URL’ field in QualiWare’s settings.
- When setting up QualiWare, paste the copied ‘Endpoint’ into the ‘URL’ field to link it to Azure OpenAI.
Step 4: Access the Model Deployments
- In the Azure AI dashboard, find the
Model deploymentoption on the left-side menu. - Click on
Deployments. This will navigate you to the deployments overview page. - On the deployments page, you will see a list of your models. Locate the model you wish to deploy; its name will be listed under the
Model namecolumn.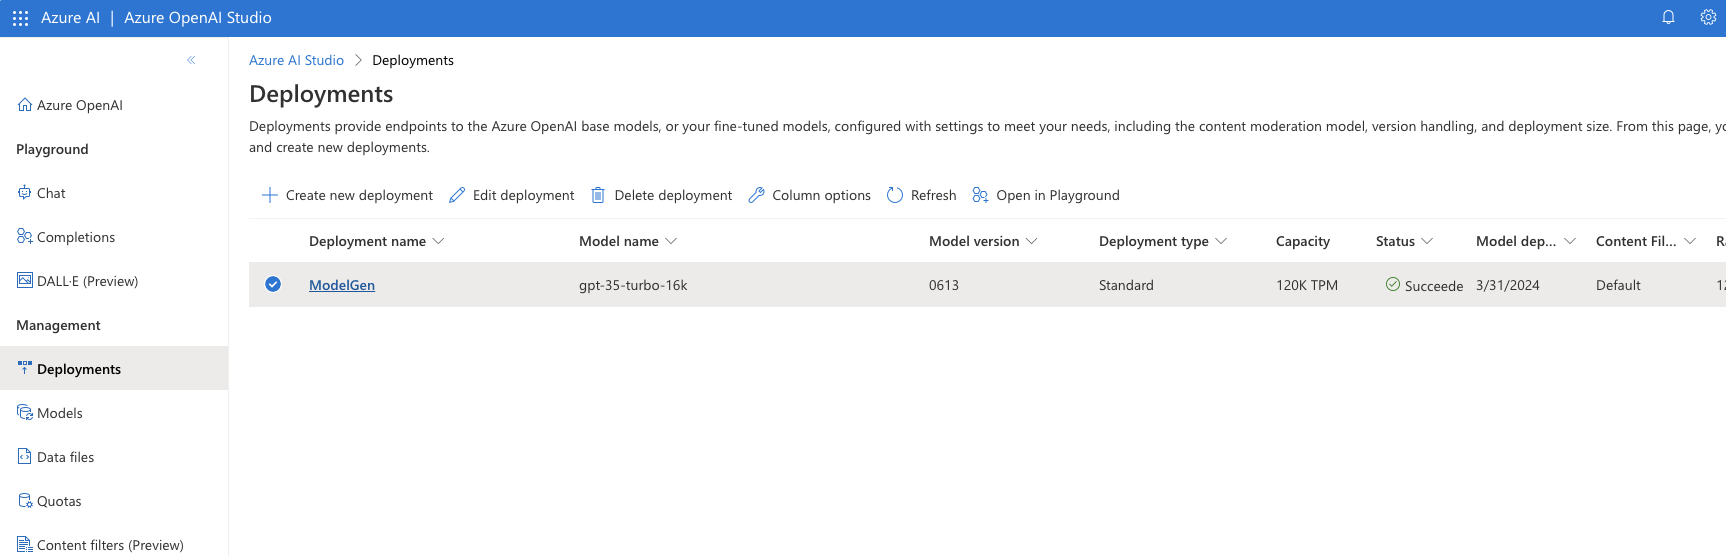
- In the screenshot you can see the Model name of the deployment is “gpt-35-turbo-16k”
- Click on the model name to copy it. You will use this name when setting up your properties in the QualiWare interface.
Integrating AI Attributes into QualiWare
After acquiring the API key, Model name, and URL, the next step is to integrate these into your Qualiware environment. Here’s how you can do it:
Step 1: Access Repository Administrator
Navigate to the Repository Administrator interface by visiting your QualiWare URL followed by the specific path to the RA. It will look something like this:
[yourQualiWareURL]/QEF/WebModules/RA
Replace [yourQualiWareURL] with the actual URL you use to access QualiWare, such as company.qualiware.com. So the full link to the RA would be:
company.qualiware.com/QEF/WebModules/RA
Step 2: Locate Your Repository
In the Repository Administrator, locate the repository to which you want to add the AI capabilities. Each repository can be configured separately to use different AI models or keys if needed.
Step 3: Find and Edit Properties
Expand the repository options and look for the “Properties” section. This is where you will input the configuration details for the AI integration.
Step 4: Set the Properties
- To configure the properties, follow these steps:
- Add a New Property:
- Click on the Add Property button. This action allows you to create a new property line.
- Enter Property Details:
- For each property, enter the details in the properties section. First fill out the Name, then the Value where you replace
yourAIModelURL,NameOfAIModel&YourAPIKeywith the actual values you obtained from OpenAI or Azure AI. - ⚠️ Note: The Name must match exactly as shown below – including capitalization – or the setup will fail.
a. API URL:
- Name:
QualiAI.Url - Value:
yourAIModelURL
b. Model Name:
- Name:
QualiAI.Model - Value:
NameOfAIModel
c. API Key:
- Name:
QualiAI.ApiKey - Value:
YourAPIKey
- For each property, enter the details in the properties section. First fill out the Name, then the Value where you replace
- Repeat for Each Property:
- Please note that each property should be added separately. Use the Add Property button for each new property entr
- Add a New Property:

Step 5: Test the Integration
Once you have added the AI configuration, save the changes and test the integration within Qualiware. Attempt to use a feature that utilizes the AI to ensure it’s working as expected.
- If you encounter any issues, double-check the property values for any typos or formatting errors.
- Refer back to the documentation for both OpenAI and Azure AI if you need to confirm any details.
By following these steps, you can effectively integrate AI capabilities into your QualiWare environment, leveraging the power of OpenAI or Azure AI models.
Remember to handle the API key with care and to ensure that only authorized personnel have access to the Repository Administrator for making such changes.