HTML Tile

The HTMLTile template is used on one or more HTMLDesktop(s) on the collaboration platform.

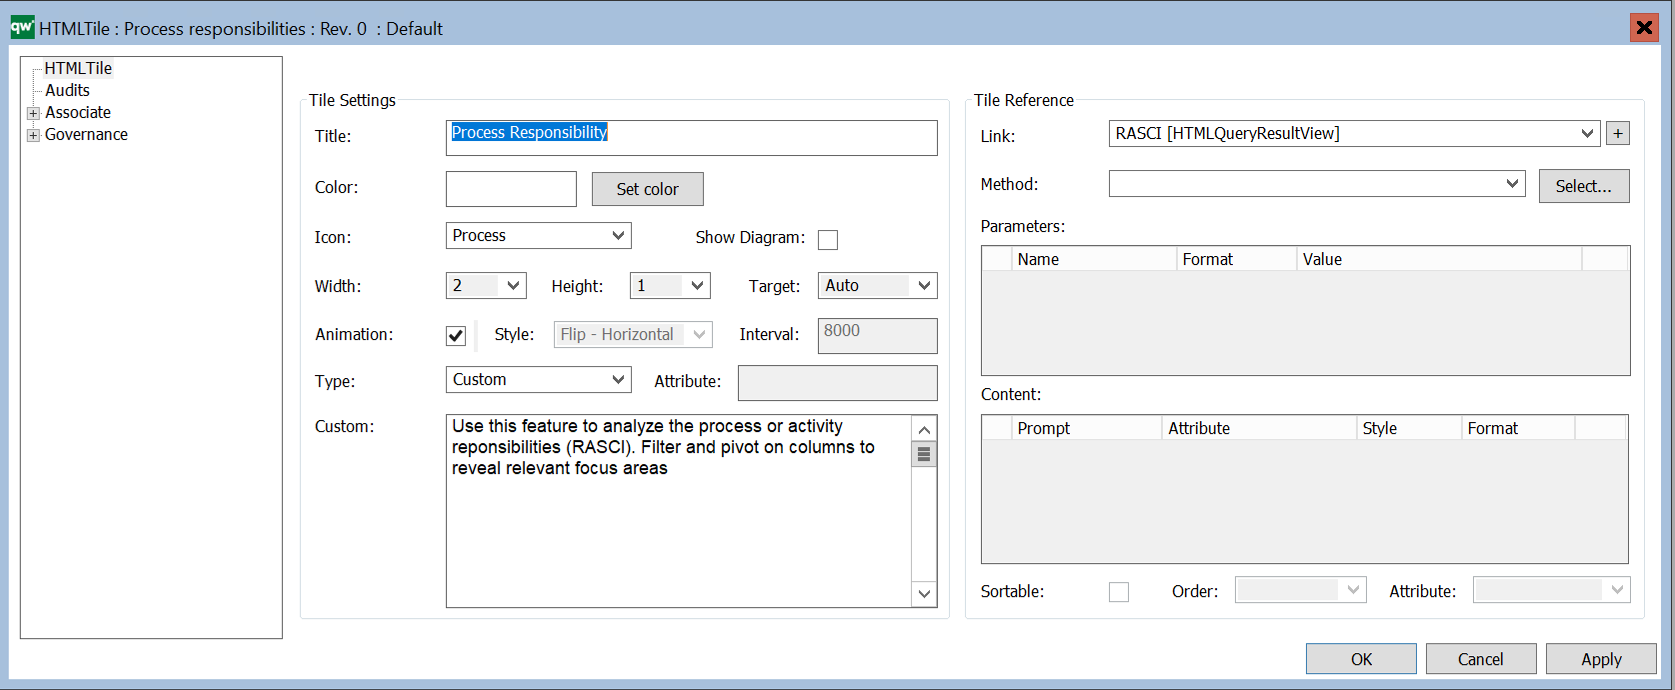
It is possible to configure the appearance and nature of the tile via the HTMLTile-template.

Among many things you can specify the title, color, size, description text, as well as link it to other content in the repository, e.g. a diagram or a HTMLQueryResultView.

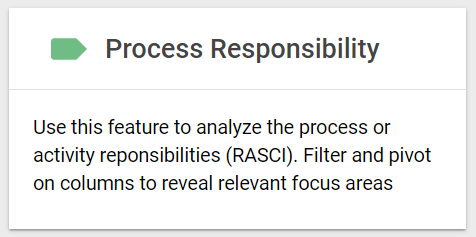
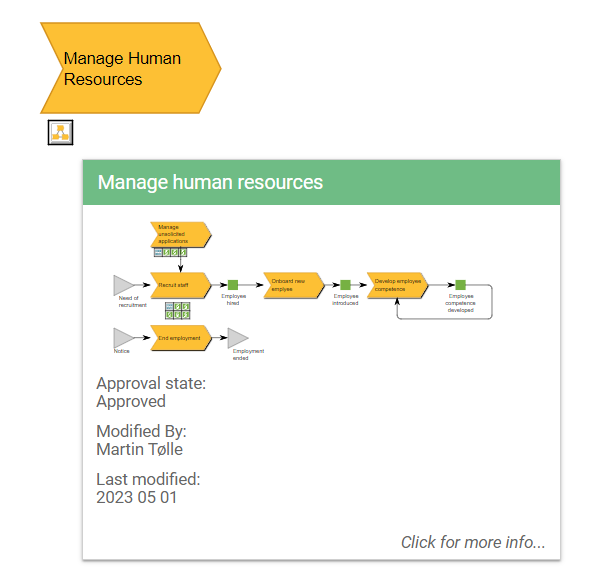
Example of a tile on the web:

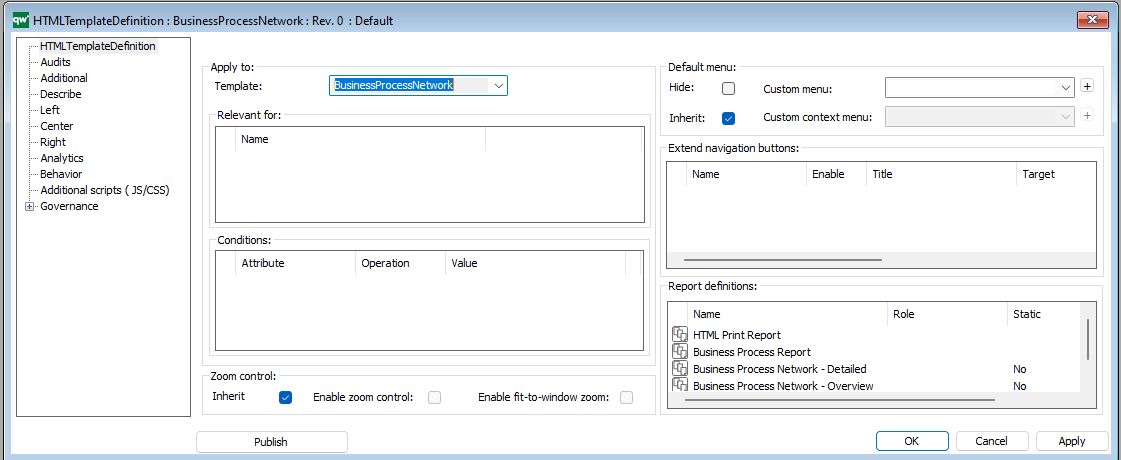
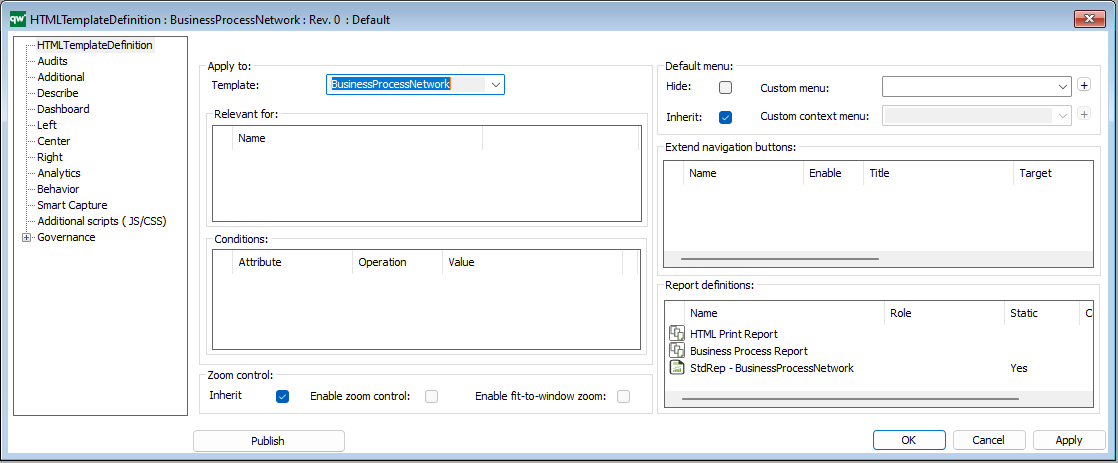
HTML Template Definition

The HTML template definition defines how and what information is displayed on the web for each template-type.

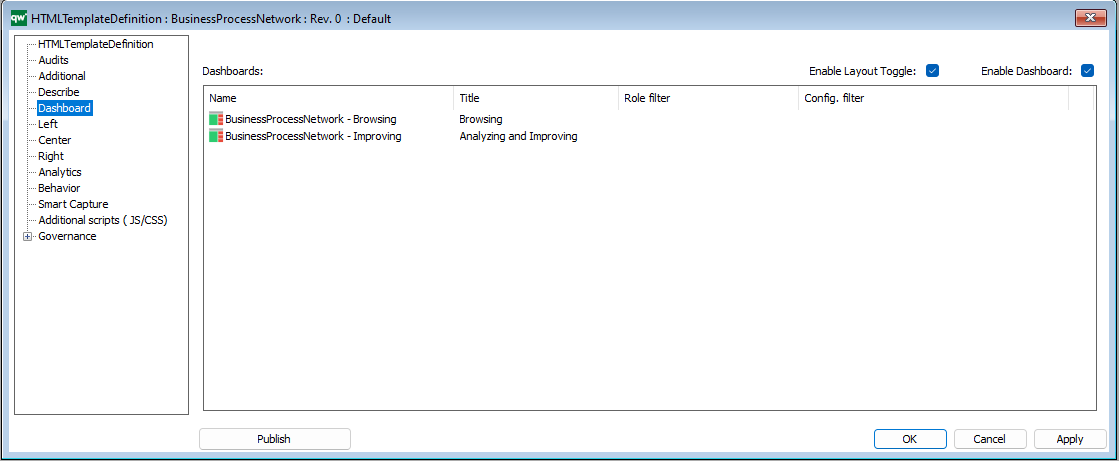
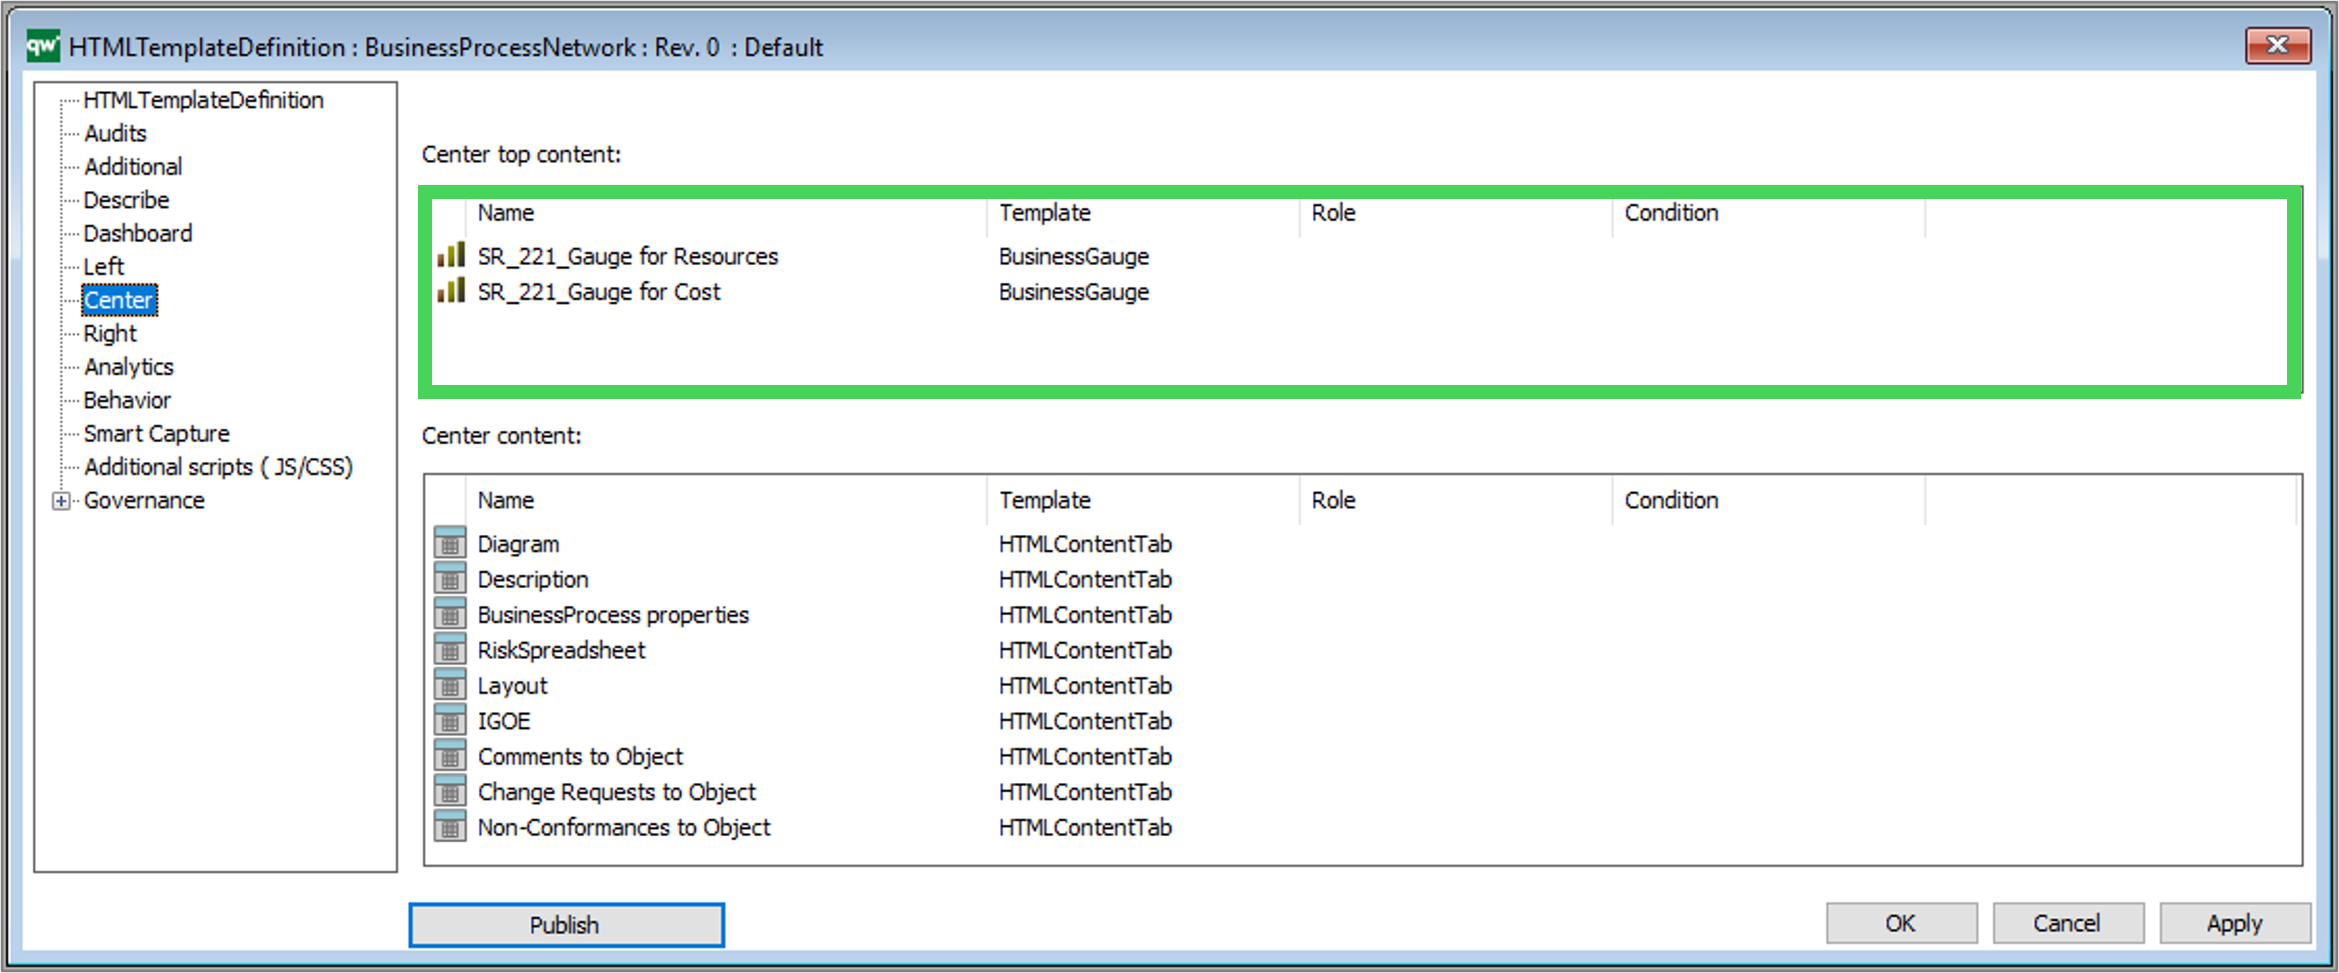
In QualiWare 10.8 a new Dashboard layout has been introduced. You can create one or multiple dashboard(s) for a diagram template-type. The dashboard(s) are associated on the Dashboard Tab:

The Dashboard are configured using the templates:

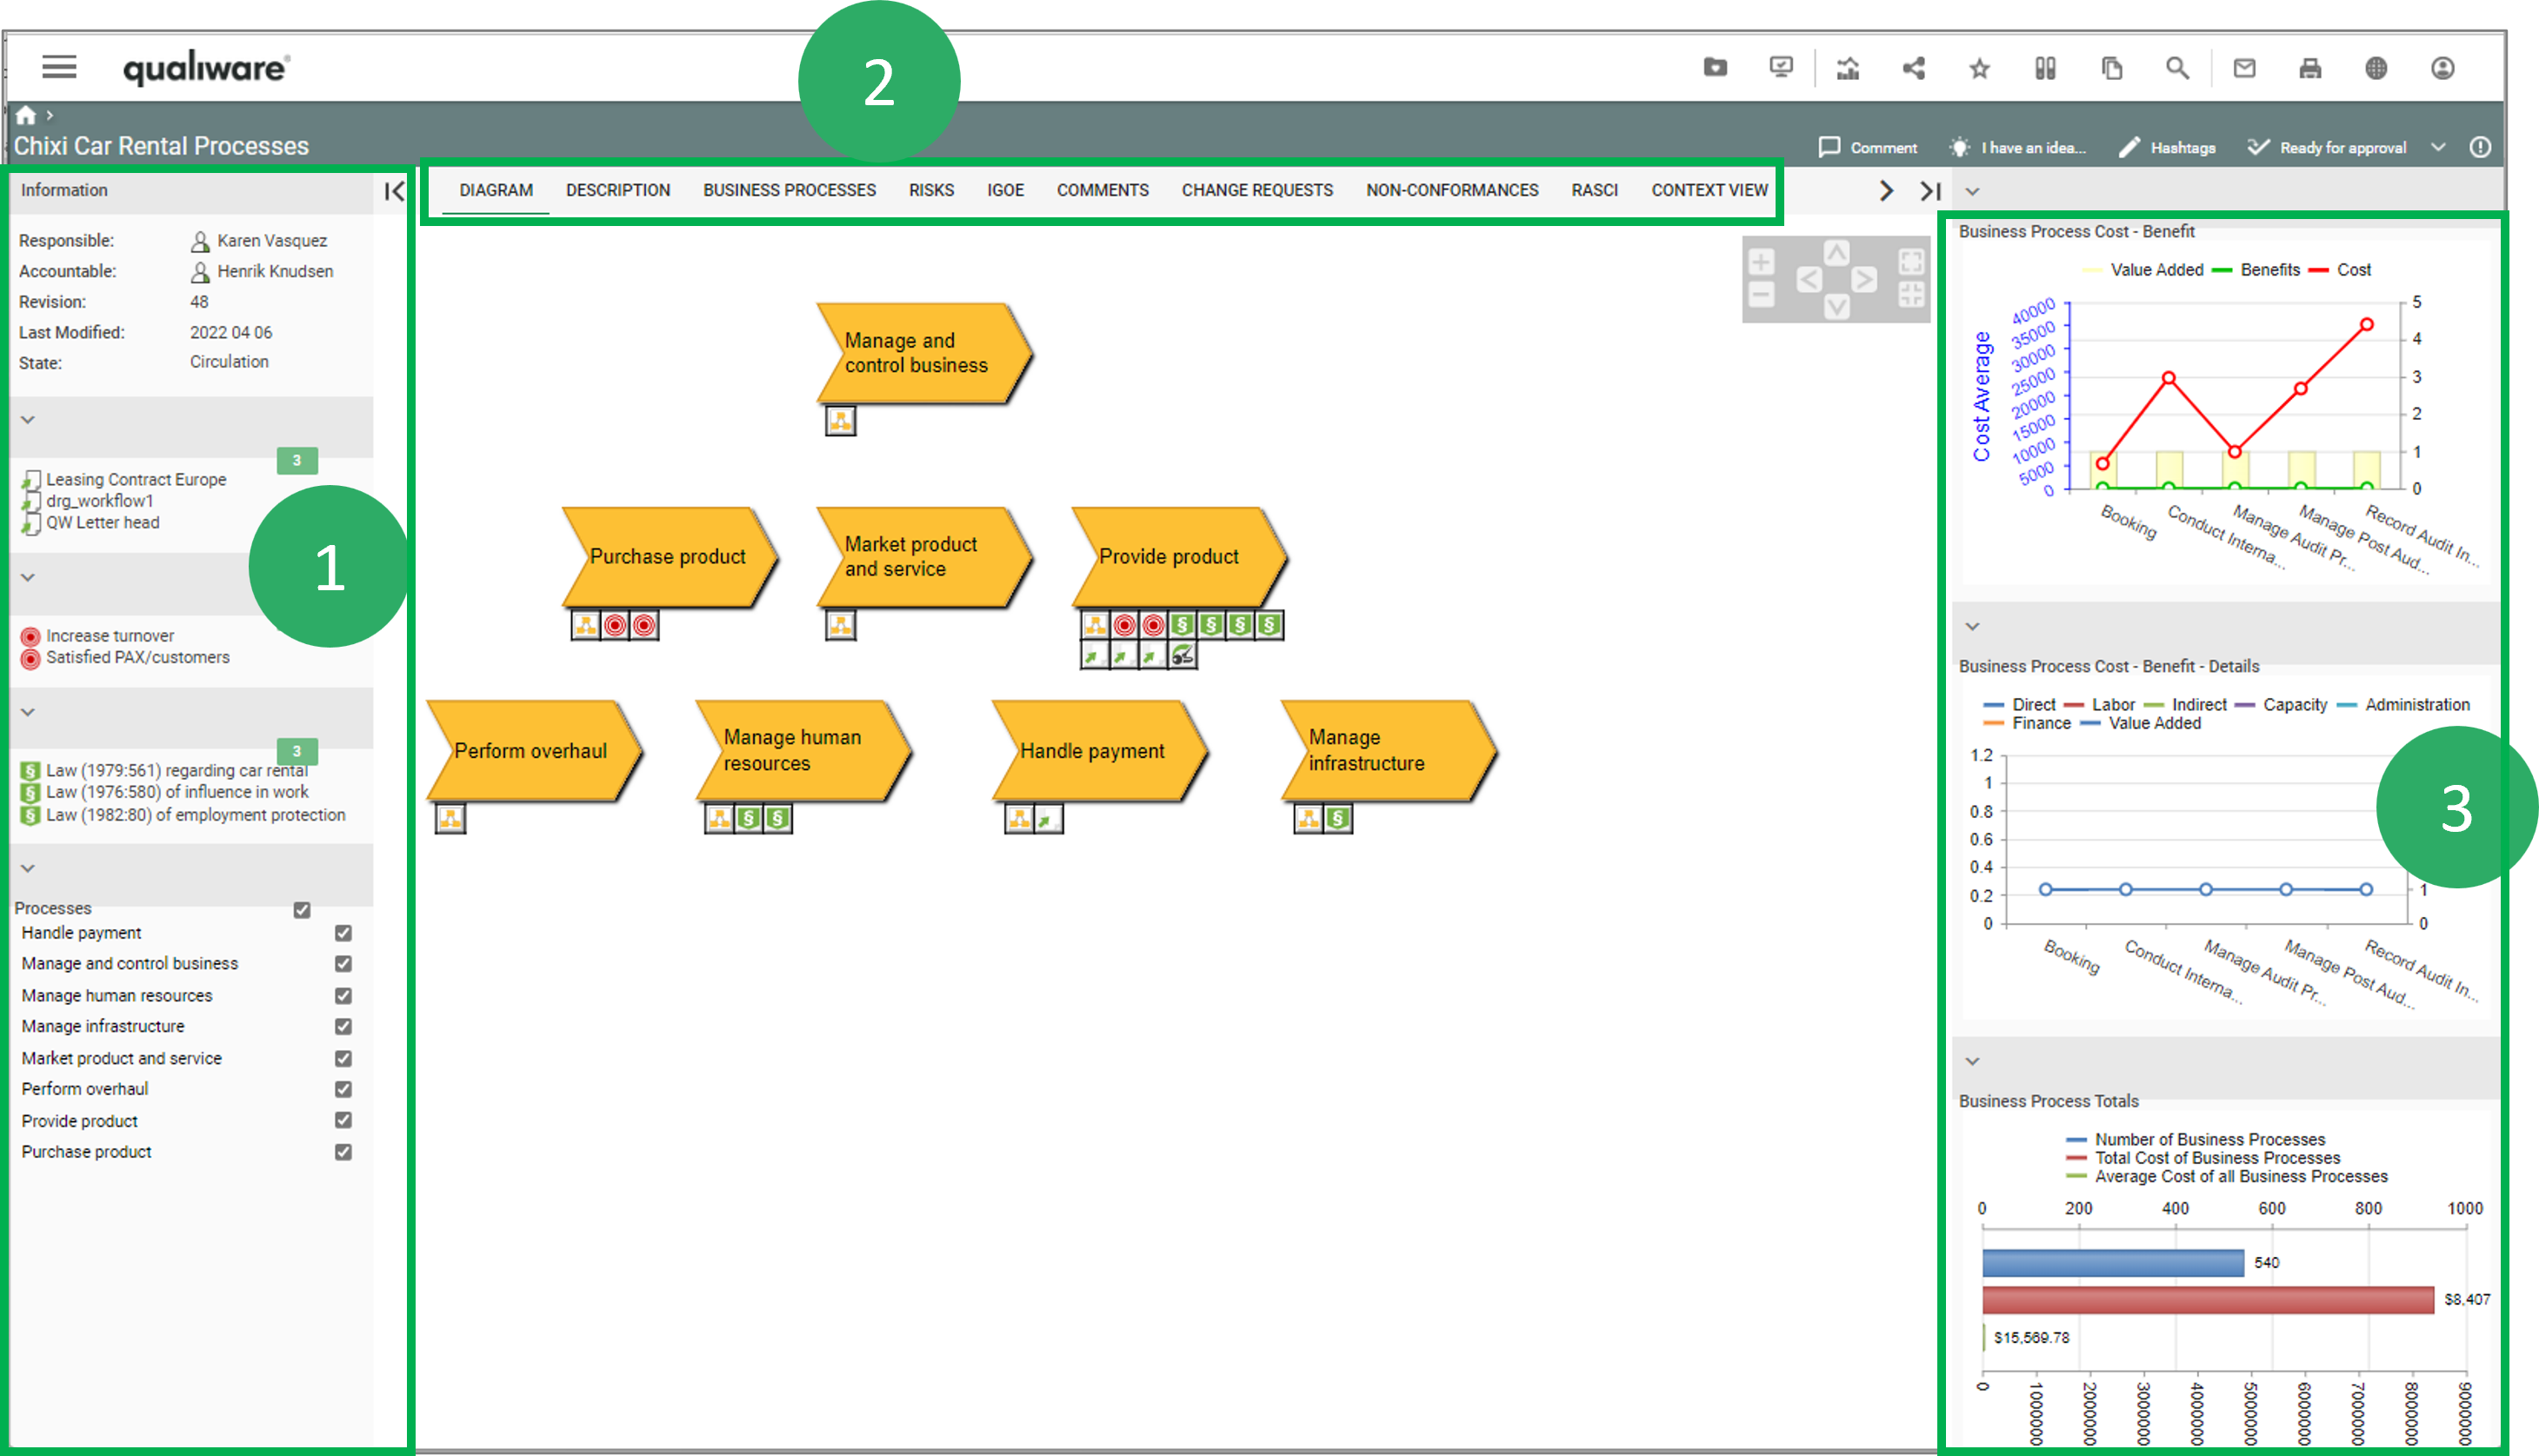
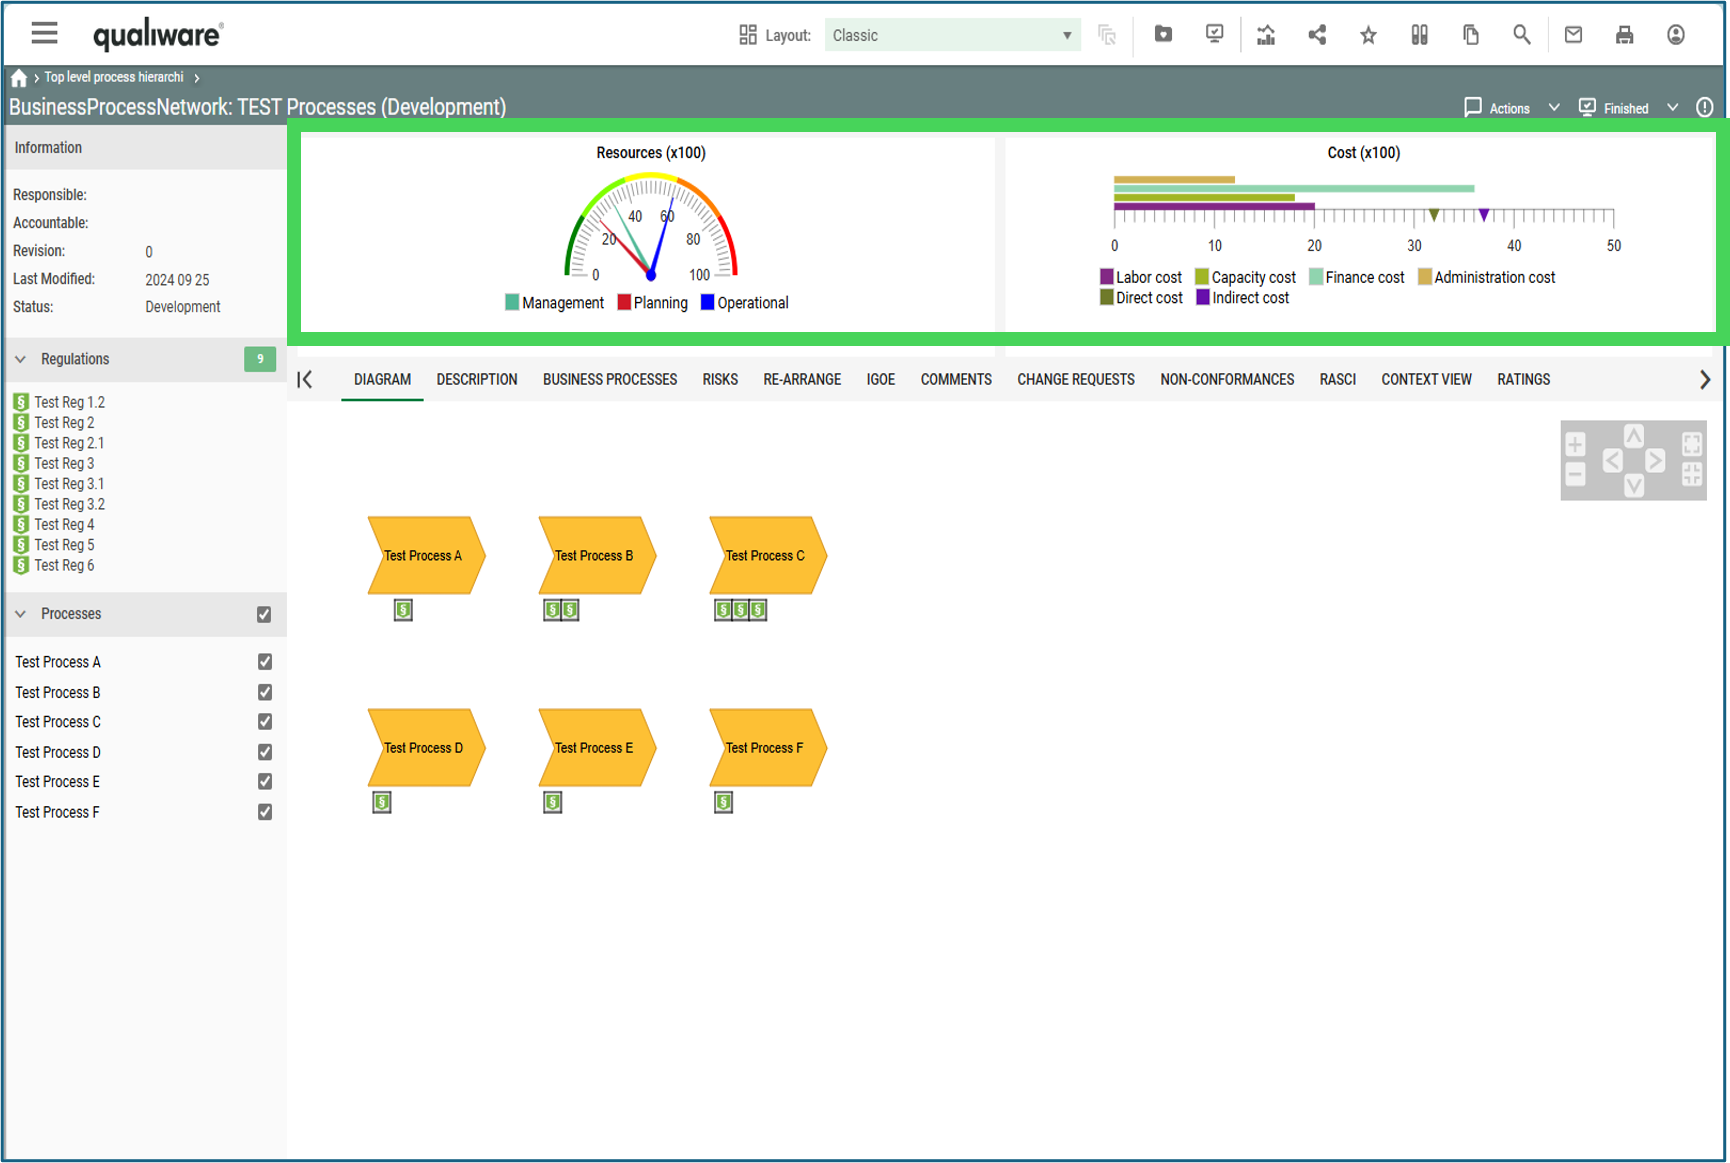
The “Left”, “Center” and “Right” tabs specifies the content on the classic diagram workspace, shown on the example below.

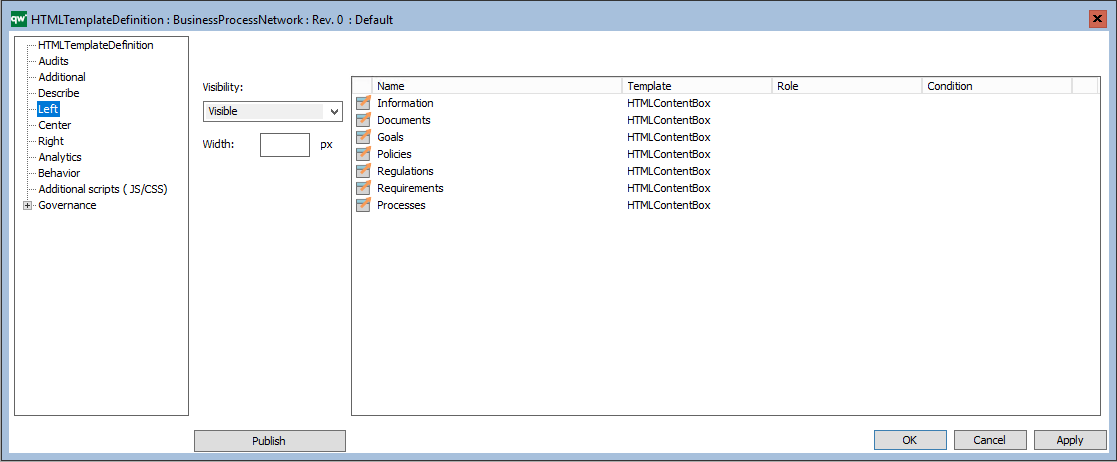
The left window (1) of a diagram workspace is configured on the Left tab, using HTMLContentBox and other HTML-templates:

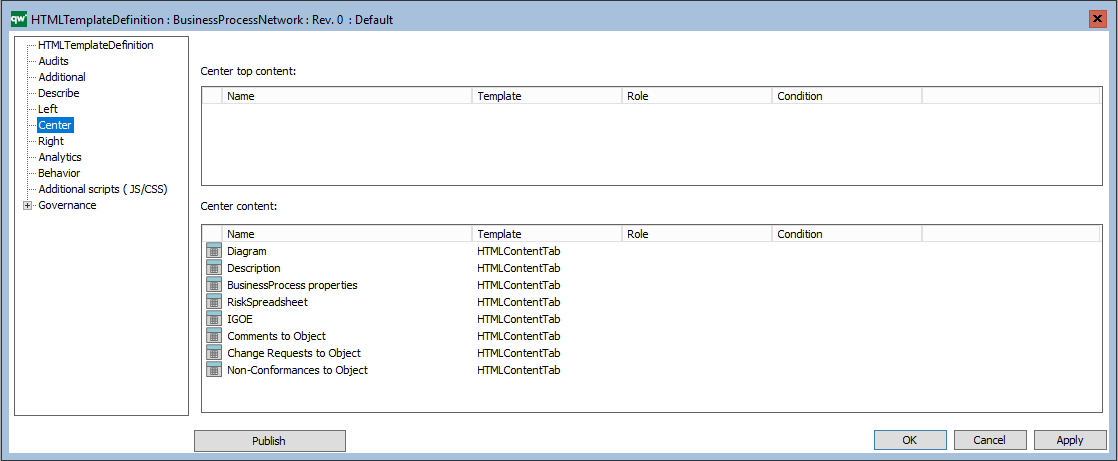
The Center tabs (2) of a diagram workspace in configured on the Center tab, using HTMLContentTab and other HTML-templates :

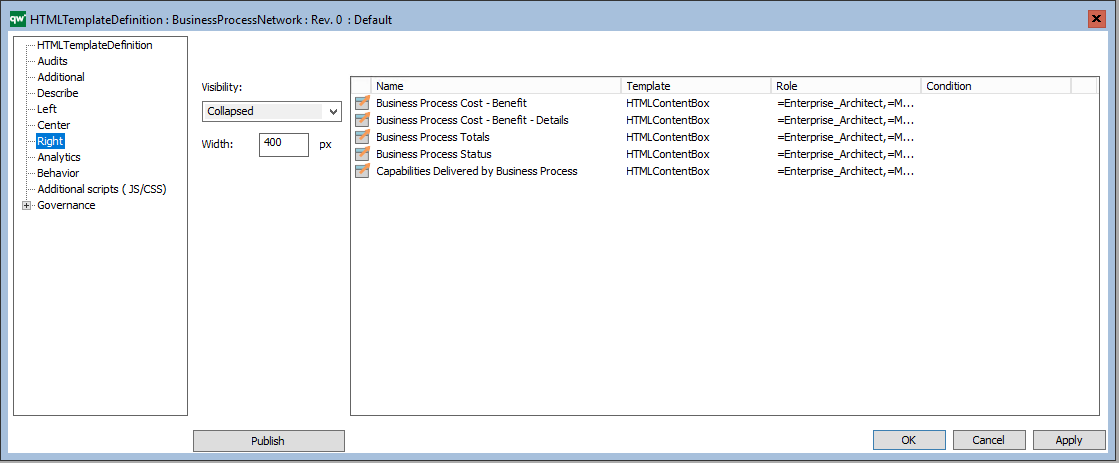
The right window (3) of a diagram workspace is configured on the Right tab, using HTMLContentBox and other HTML-templates :

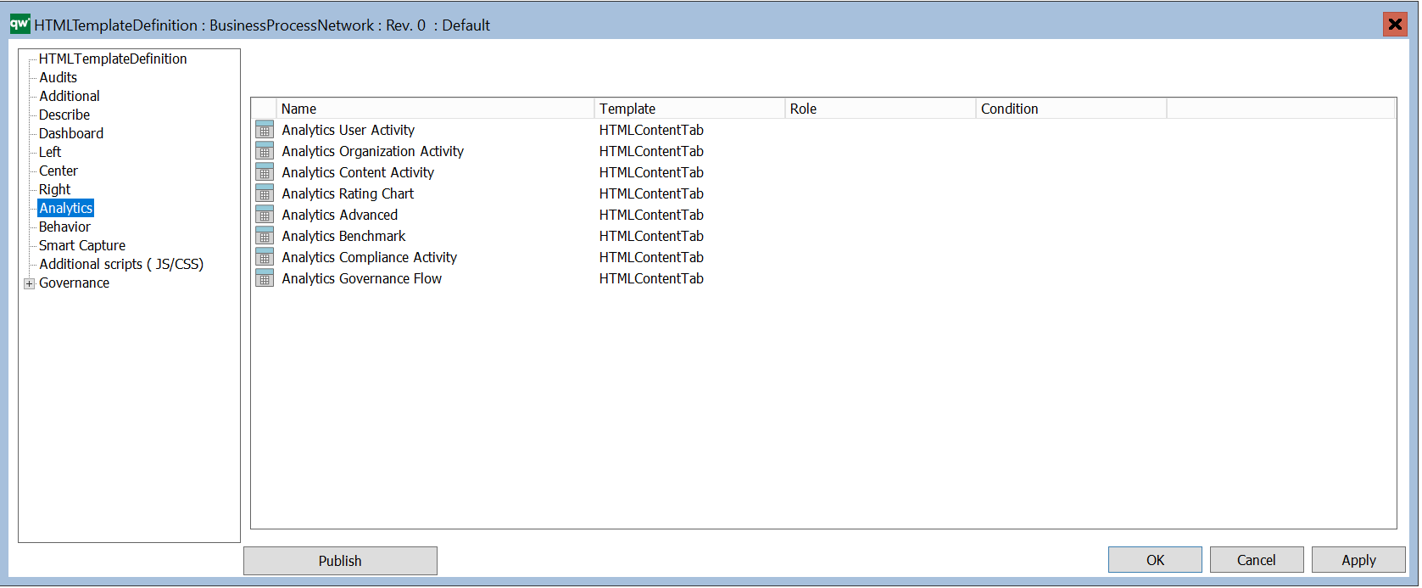
On the Analytics tab, you can configure which “Social Behavior Warehouse” tabs should be available on the model.

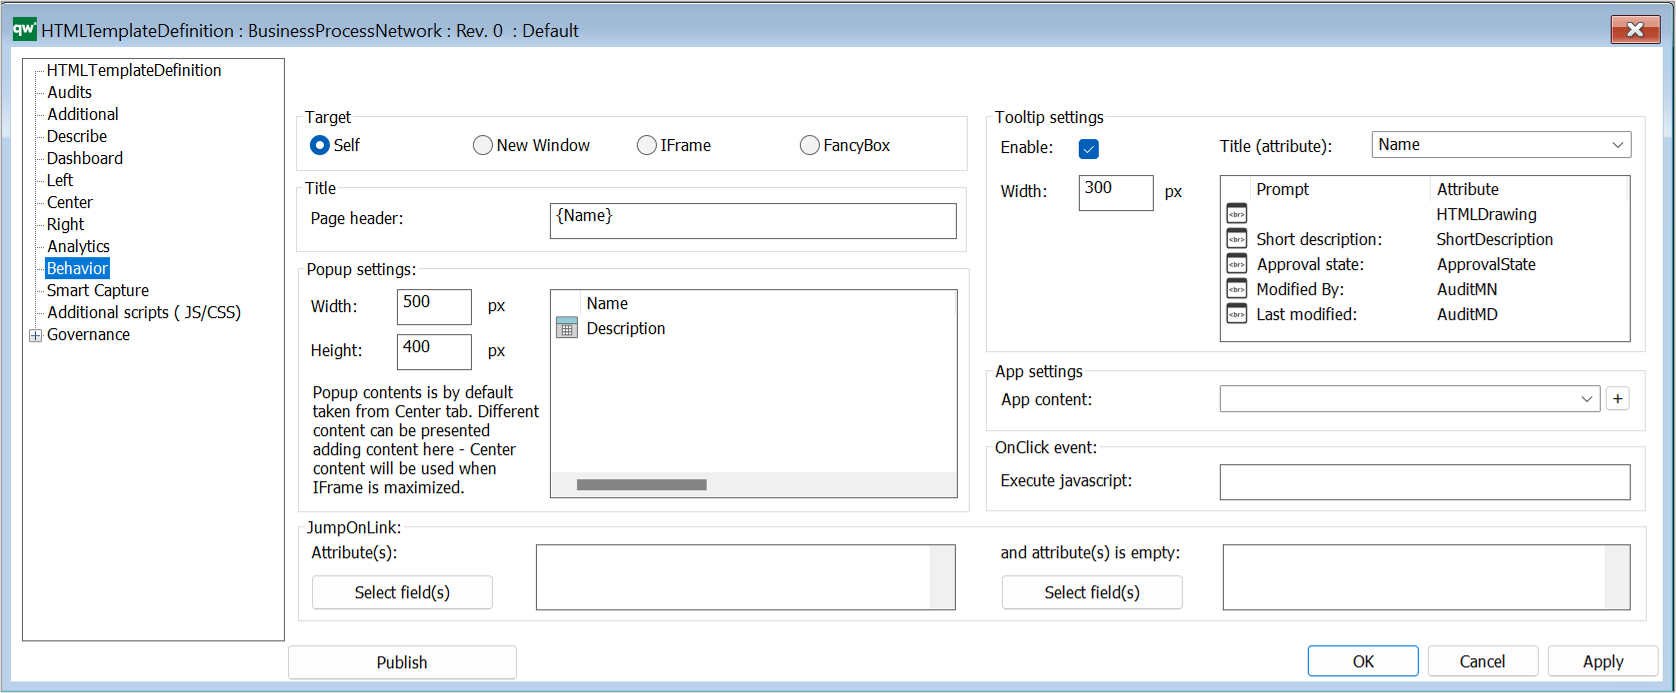
The Behavior tab, specifies the behavior of a template, e.g. how should a link to an object of the template behave when clicked.

Target: This is how the link will open when clicked.

  • Self: This will open the object page in the same browser window.
  • New Window: This will open the object page in a new browser window or tab depending on the browser setup.
  • IFrame: This will open the object in an iFrame pop-up window using the Popup Settings configuration.
  • FancyBox: This will open the object in a Fancybox pop-up window using the Popup Settings configuration.

Title: This specifies what should be shown as the title of the object being shown.

  • Page header: The header of the page or popup window of the object. This can be static or dynamic text. Dynamic text is indicated by curly braces and will be evaluated client side in JavaScript.

Popup settings:

  • Width: The width of the popup window.
  • Height: The height of the popup window.
  • Popup content: A list of HTMLContentTables or HTMLContentTabs contains information about what is shown in the popup window. If nothing is specified here, the HTMLPublisher will use the information specified in the Center tab of the template definition.

JumpOnLink: JumpOnLink functionality can be used to forward the user if certain criteria are met. This is typically used when e.g. a BusinessProcess can be broken down in to subprocesses. It allows the user to jump directly to one of the subprocesses without having to open the properties of the BusinessProcess first.

  • Attribute(s): This is an attribute that is part of the object that this template definition is for. When the user clicks on the object, this attribute will be used to calculate where the user is taken to on click.
    • If the attribute contains exactly one link then the user will be taken to the target of that link when clicking the object.
    • If the attribute contains more than one link, then jumping is disabled.
    • If more than one jump attribute is defined, then the whole set of resulting links are evaluated. If only one link is available in the set, then jumping happens. If more than one link is available in the set, then jumping is disabled.
    • E.g. BusinessProcess can be set up to jump on BreaksDownTo. When the user clicks a BusinessProcess the user will be redirected to the link in the BreaksDownTo attribute (if only one link is available).
  • And attribute(s) is empty:
    • If the specified attribute is not empty the JumpOnLink functionality will be ignored. The attribute specified here should be different than the attribute for JumpOnLink.
    • E.g. BusinessProcess can be set up to jump on BreaksDownTo when ShortDescription is empty. If ShortDescription has content then the BusinessProcess will follow the behavior specified in Target settings.

Tooltip settings: The tooltip is used to display information about the object when a user hovers the object link.

Example of a BusinessProcessNetwork tooltip appearing when a BusinessProcessNetwork is hovered on the web.

  • Enable: Enable or disable the tooltip feature.
  • Title (attribute): The attribute that should displayed at the top of the tooltip.
  • Width: The width of the tooltip window.
  • Tooltip content: A list of attributes to be displayed in the tooltip window.


App settings:

  • App content: This specified what should be shown in the app. It links to a HTMLContentTable.
    • If nothing is specified for the template then the app will look for the settings for DefaultDiagram/DefaultObject template definitions and use those.
    • If nothing is specified on the template definition for the template or for DefaultDiagram/DefaultObject the all attributes are shown.

OnClick

  • Execute javascript: This can be used to execute a JavaScript function when the object is clicked.

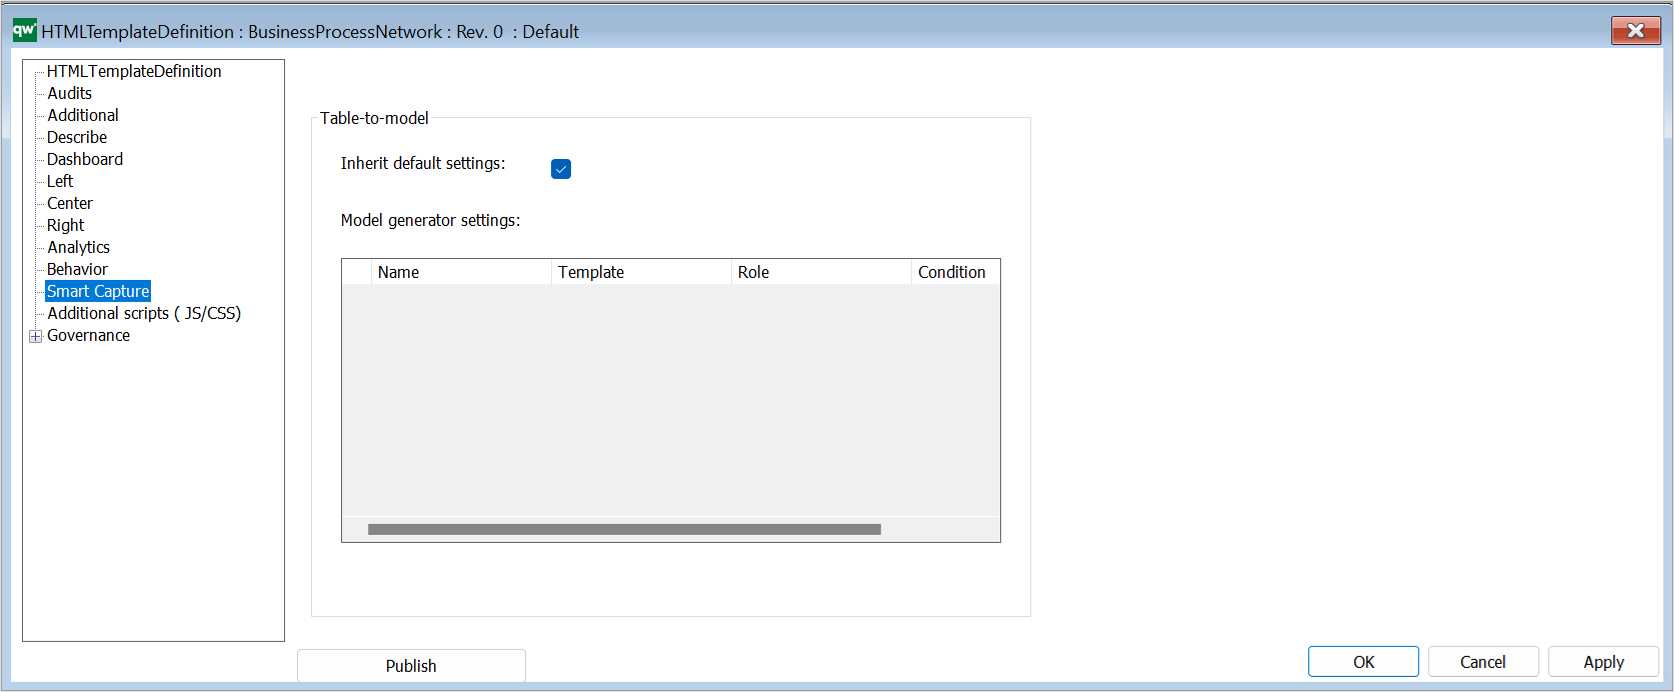
On the Smart Capture tab, you can link Model Generator Settings to the template definition. The settings are used for the table to model feature in the web-modeler (introduced in QualiWare 10.8).

Table-to-model

  • Inherit default settings: Tick the box to inherit the settings from the Smart Capture Settings on the HTMLPublisher
  • Model generator settings: Insert specific HTMLModelGeneratorSettings to the template definition

Once you have made changes to the template, you should click “Apply” and “Publish” to implement the changes on the Web.

The HTMLTemplateDefinitions are included in the HTMLPublisher.

HTML Query Result View

HTMLQueryResultView is a way to query for a list of objects to be displayed.

A HTMLQueryResultView (also known as QRV) is a table that is used to present the result of a query in the web solution. It is often accessed from the leftmenu, or in a HTMLContentTab.

An example of a QRV is the list of BusinessProcessNetworks available in the standard left menu.
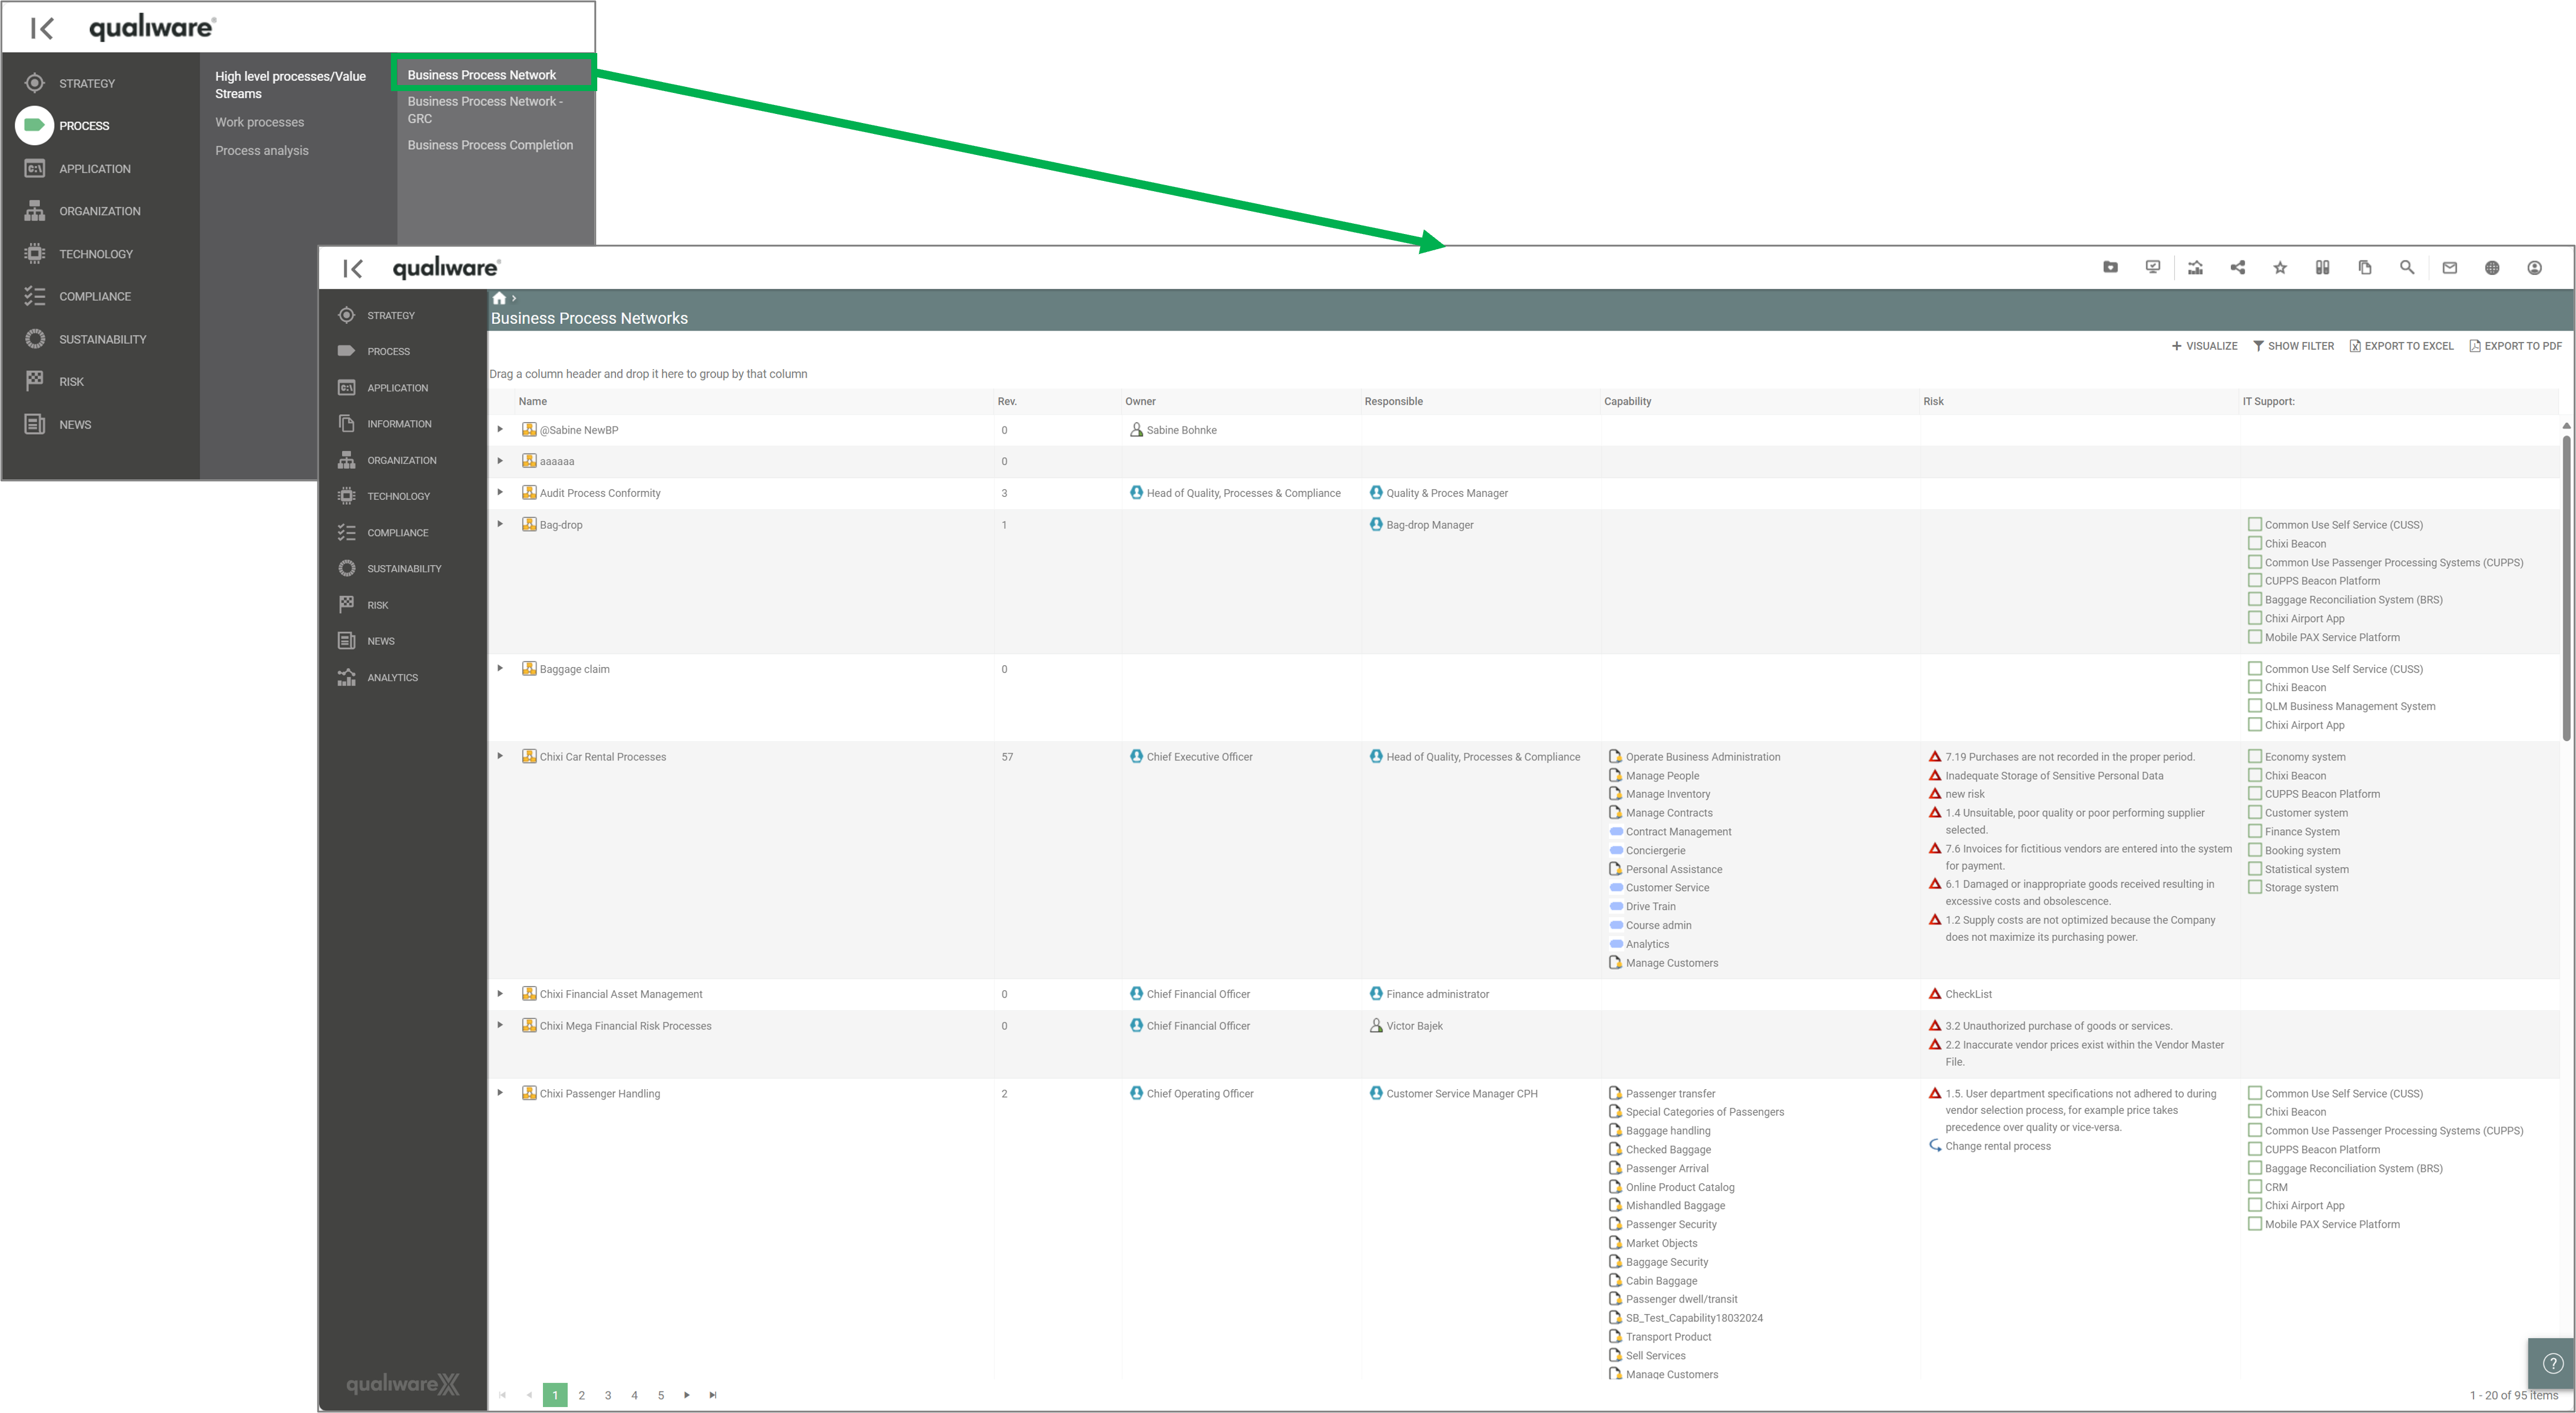
 

The QRVs are configured in the QLM windows client, using the HTML QueryResultView Template described below:

The template contains three ways of defining the view of the data: Explorer, Select, and MultiLink.

The Explorer is the essential part of the QRV, and it is descibed in detail below. The Select and MultiLink settings are used by Client Side WebForms.

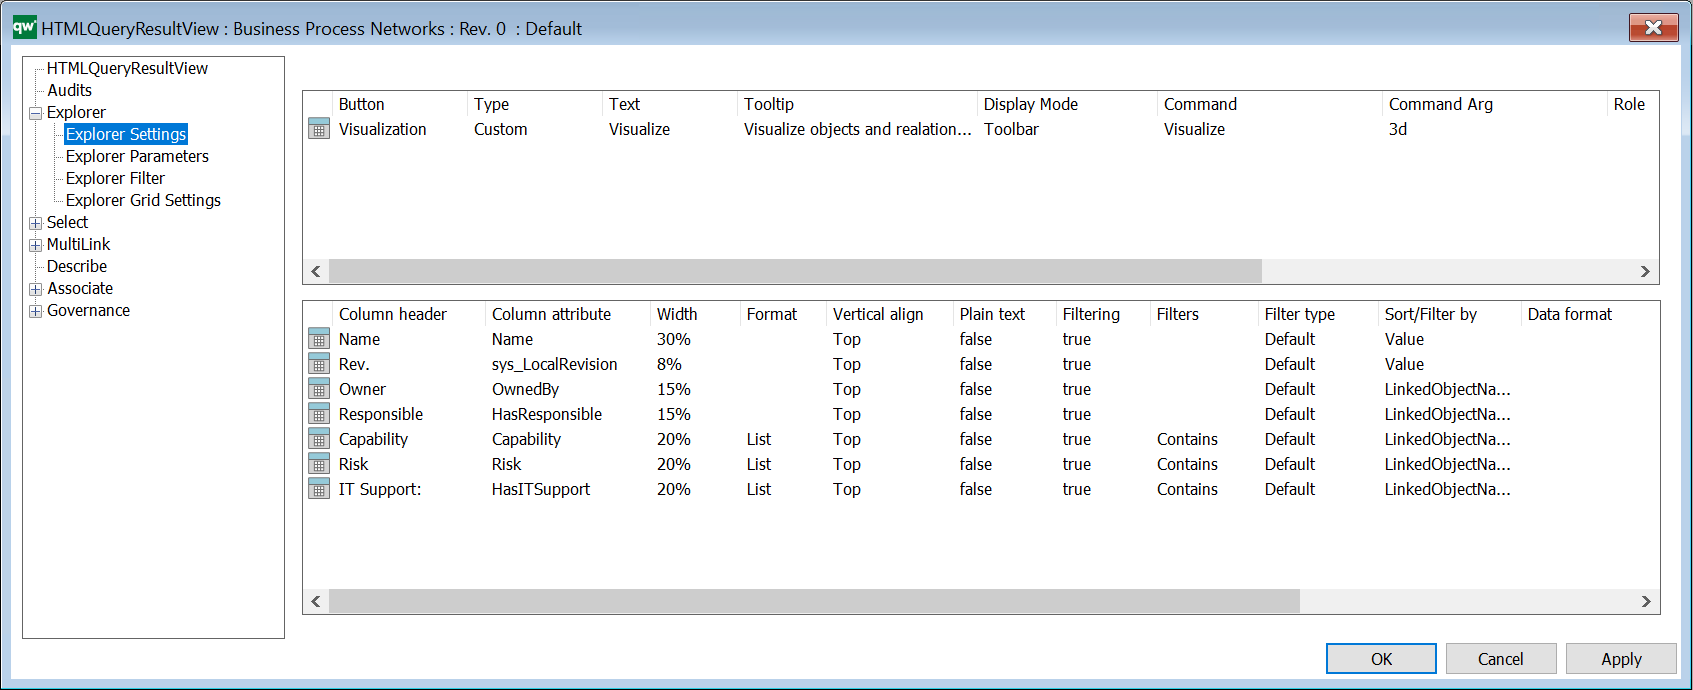
Explorer Settings
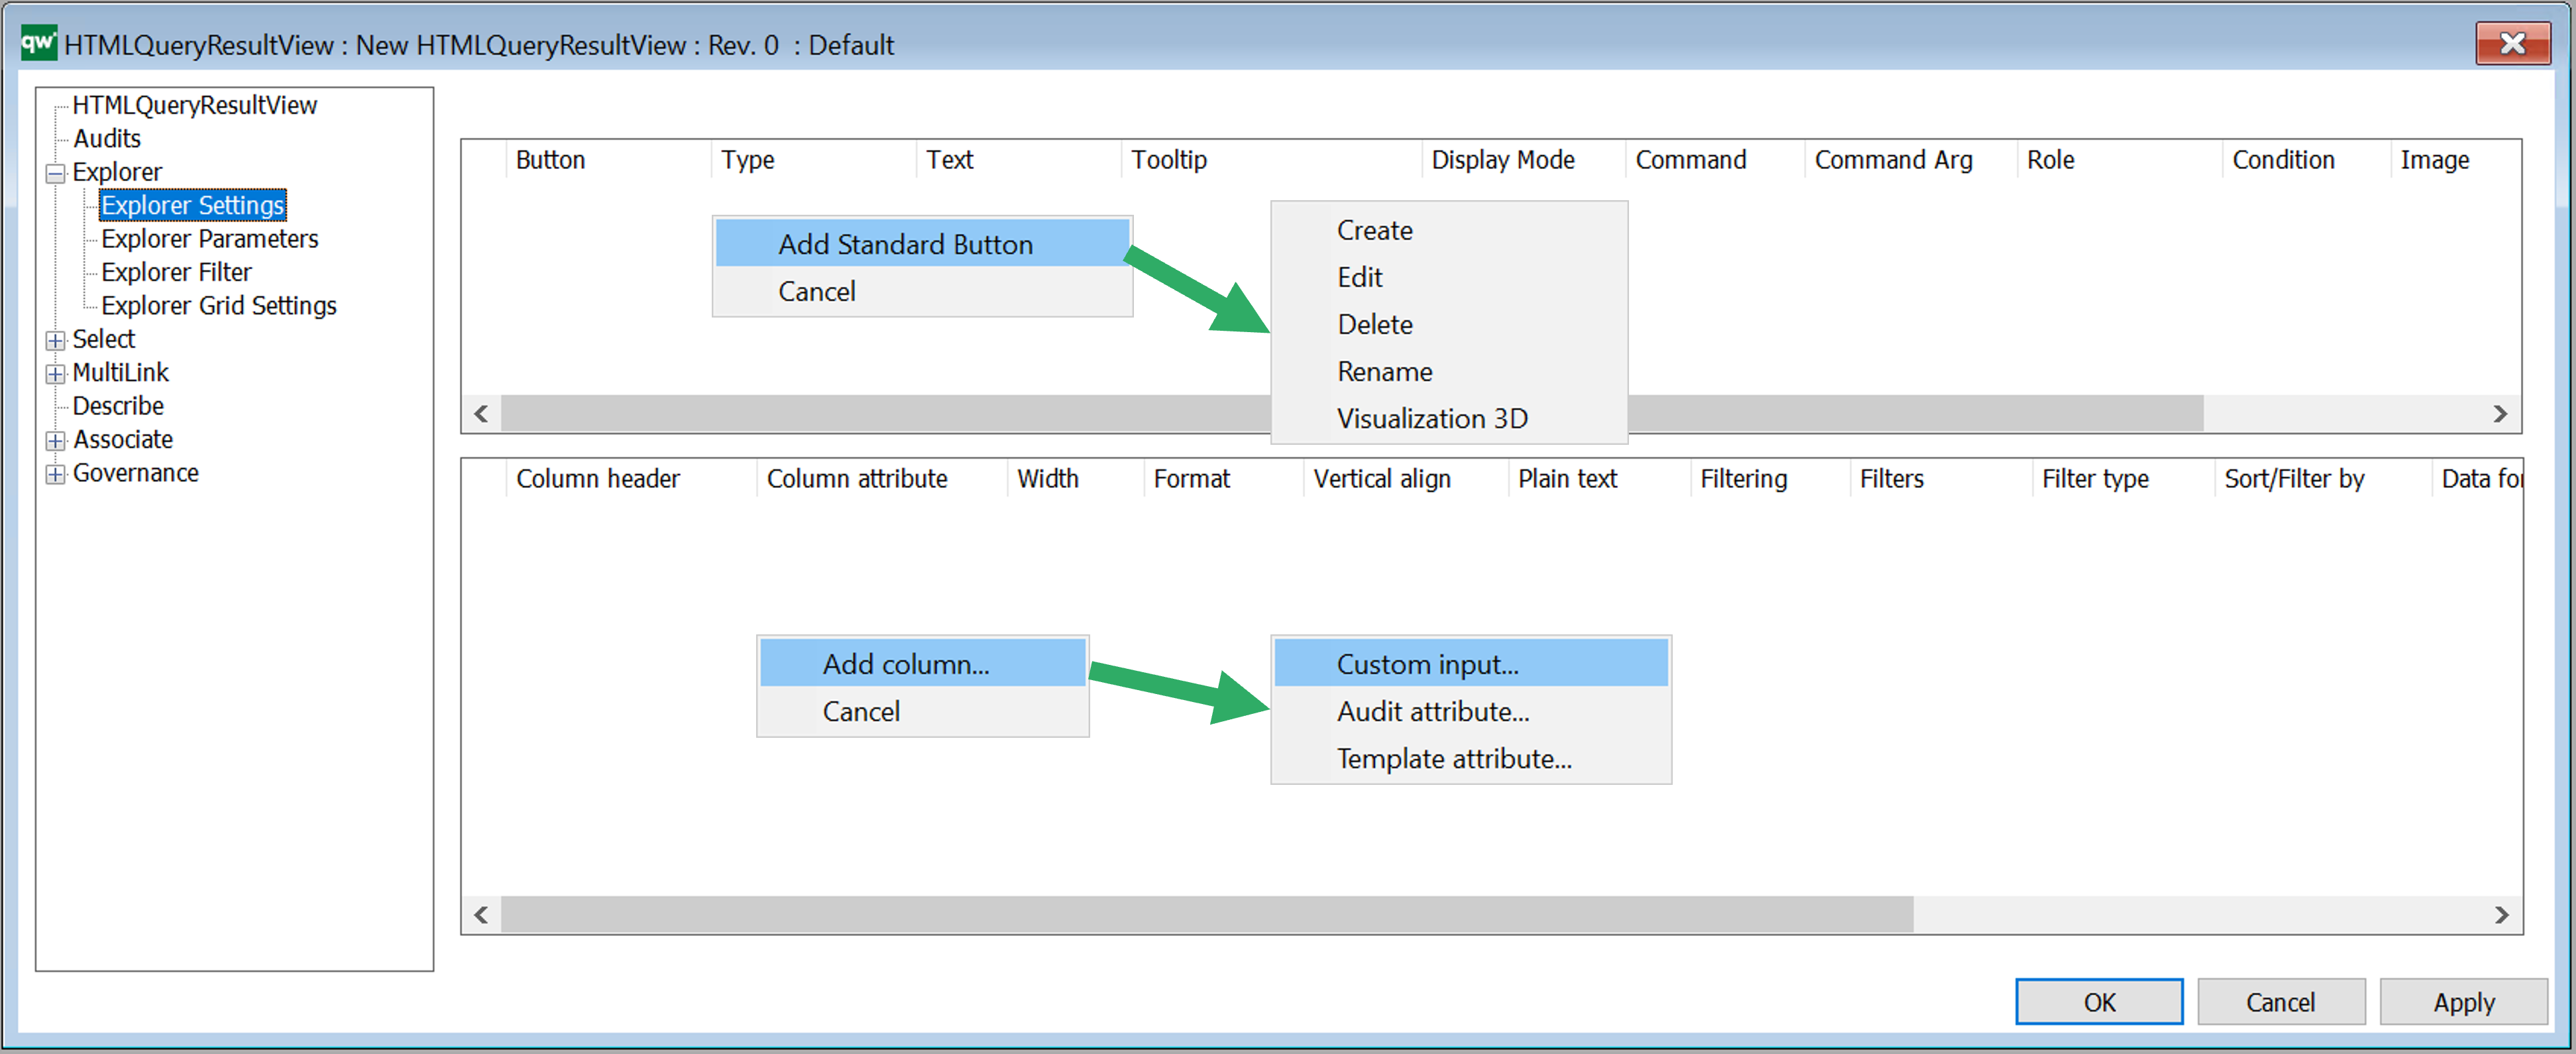
Explorer Settings are used to configure how data is displayed in a table on web. The Explorer QRV is a table meant for being displayed using the full size of the page. So the table will be the main content. It can also be used as an embedded content table for displaying content related to the main content, e.g. show an overview of Risks related to a BusinessProcessNetwork.

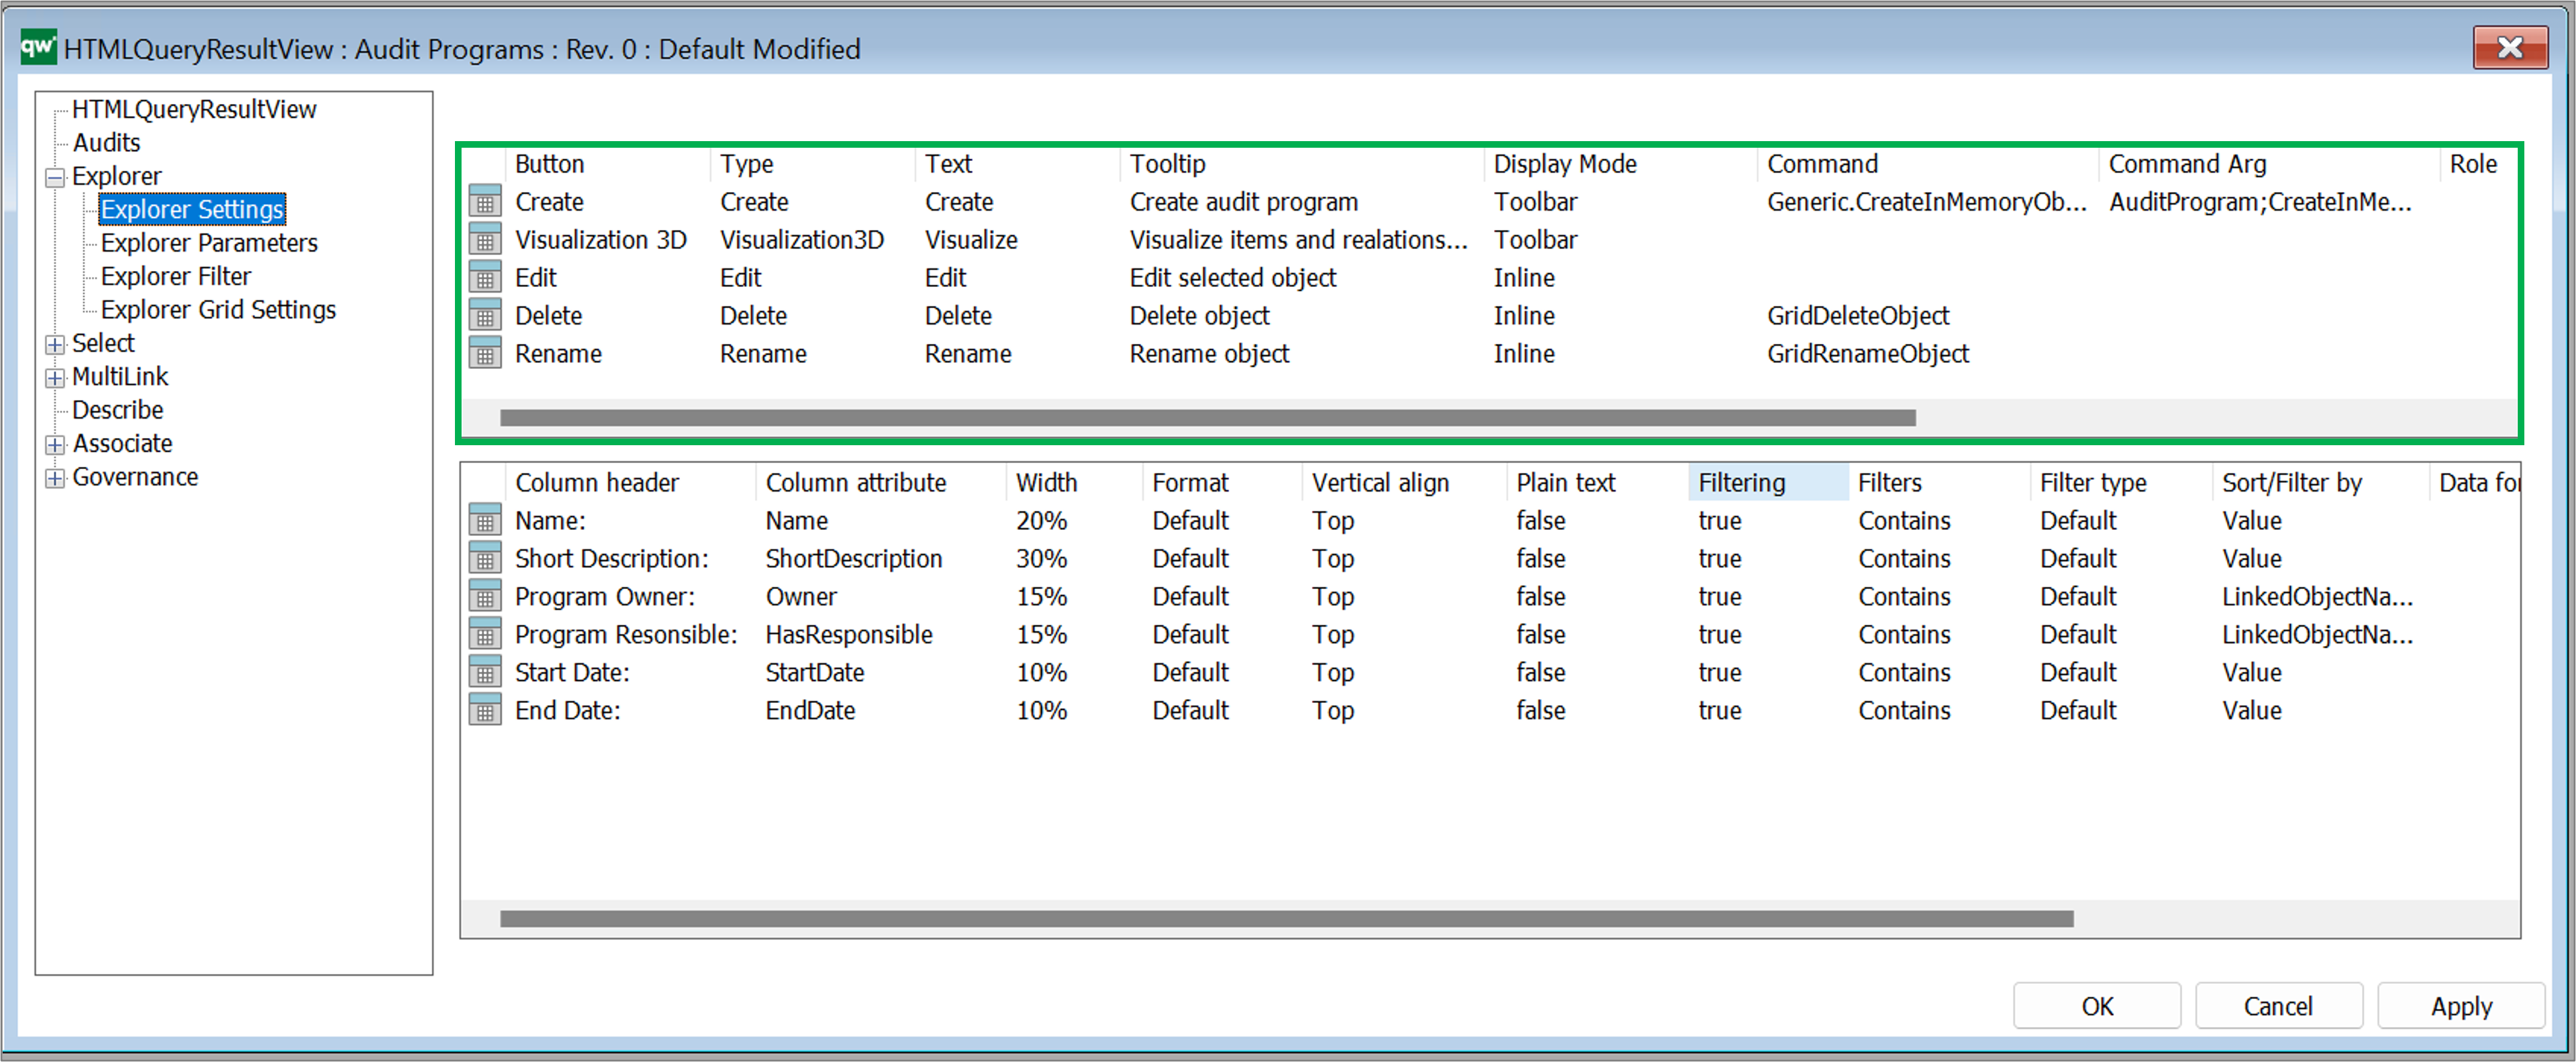
Buttons

Buttons can be used to add options for handling the content of the table. There is a set of standard buttons available to quickly add functionality for the most common actions. It is also possible to create custom functionality.

Available settings for buttons:

  • Buttons
    • Client Side Grid: Create, Edit, Delete, Rename, Visualization 2D, Visualization 3D, Cluster, Custom.
    • Server Side QRV: Create, Edit, Delete, Rename, Export, Custom (For Client Side Grid: Export functionality is handled by grid settings)
  • Text: The text displayed on the button.
  • Tooltip: Tooltip with more information to the user.
  • Display Mode: Where to display the button.
    • Empty value: Button is displayed same as Toolbar.
    • Toolbar value: Button is displayed in the toolbar of the QRV.
    • Inline: Button is displayed in a column in the right side of the QRV. One button is displayed per row (object) of the table.
  • Command: Command associated with the button
  • Command Arg:  Argument associated with the command
  • Role: You can configure the button to be available for one or more roles in the repository
  • Condition: You can specify a condition for when the button shoudl be available
  • Image: You can configure an icon for the button.
  • Export Type: Defines if it should be possible to export the content of the table.
    • Possible values: Csv, Excel, Custom

Standard buttons

  • Create: Enables the user to create a new object of the template associated to the QRV in the filter settings
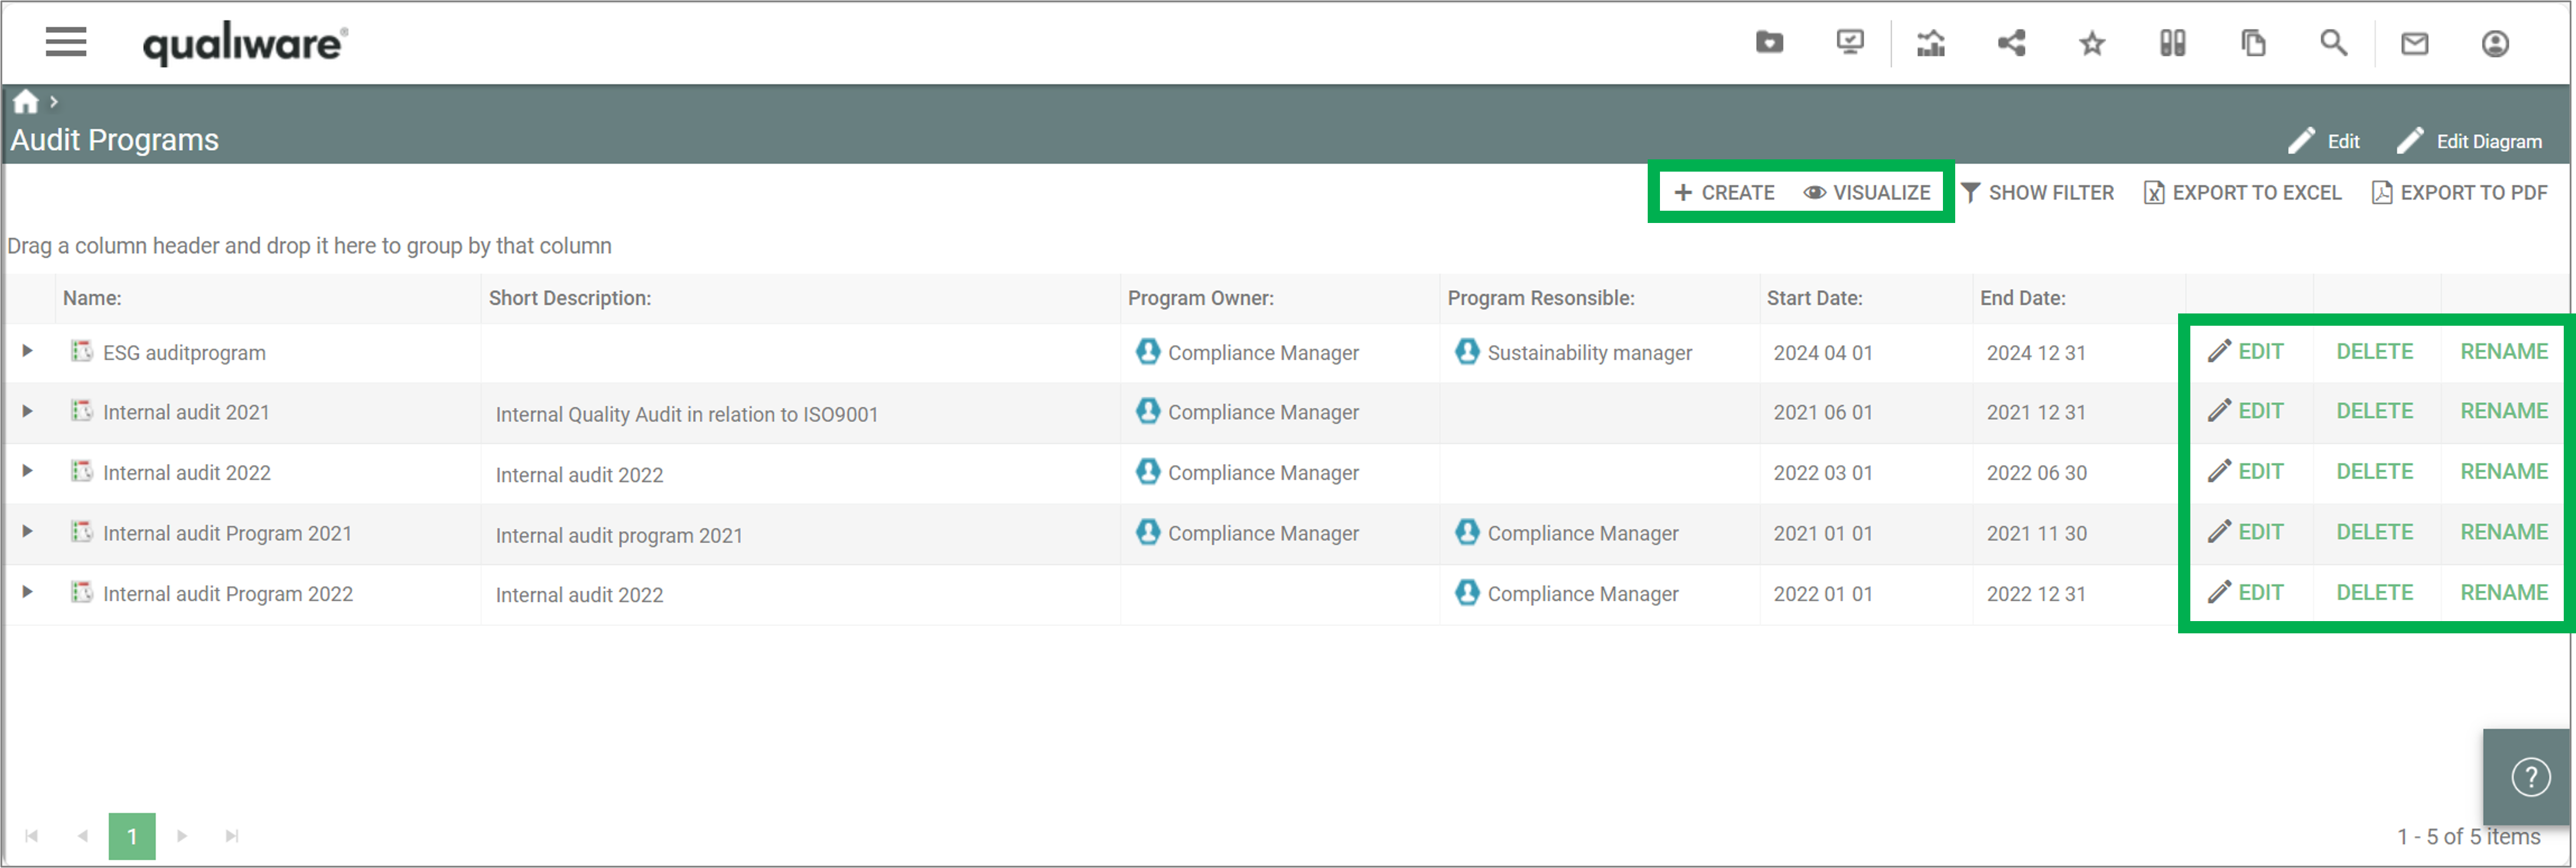
  • Edit: displays an Edit button to the right of each object in the QRV
  • Delete: displays a Delete button to the right of each object in the QRV
  • Rename: displays a Rename button to the right of each object in the QRV
  • 3D Visualize: add a visulisation button to the QRV.
Columns

Right click the window to add a column. Press F2 to get available option (see figure above).

  • Custom input…: choose this option to insert text ‘manually’
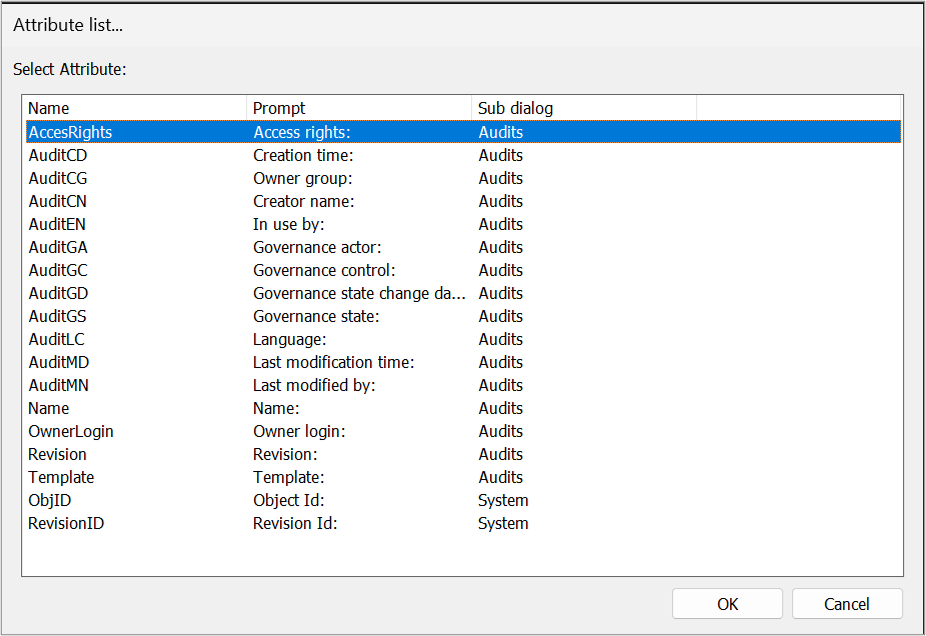
  • Audit attribute…: choose this to select an audit attribute from the attribute list
  • Template attribute…: select a template from the list to choose a template specific attribute for the Query
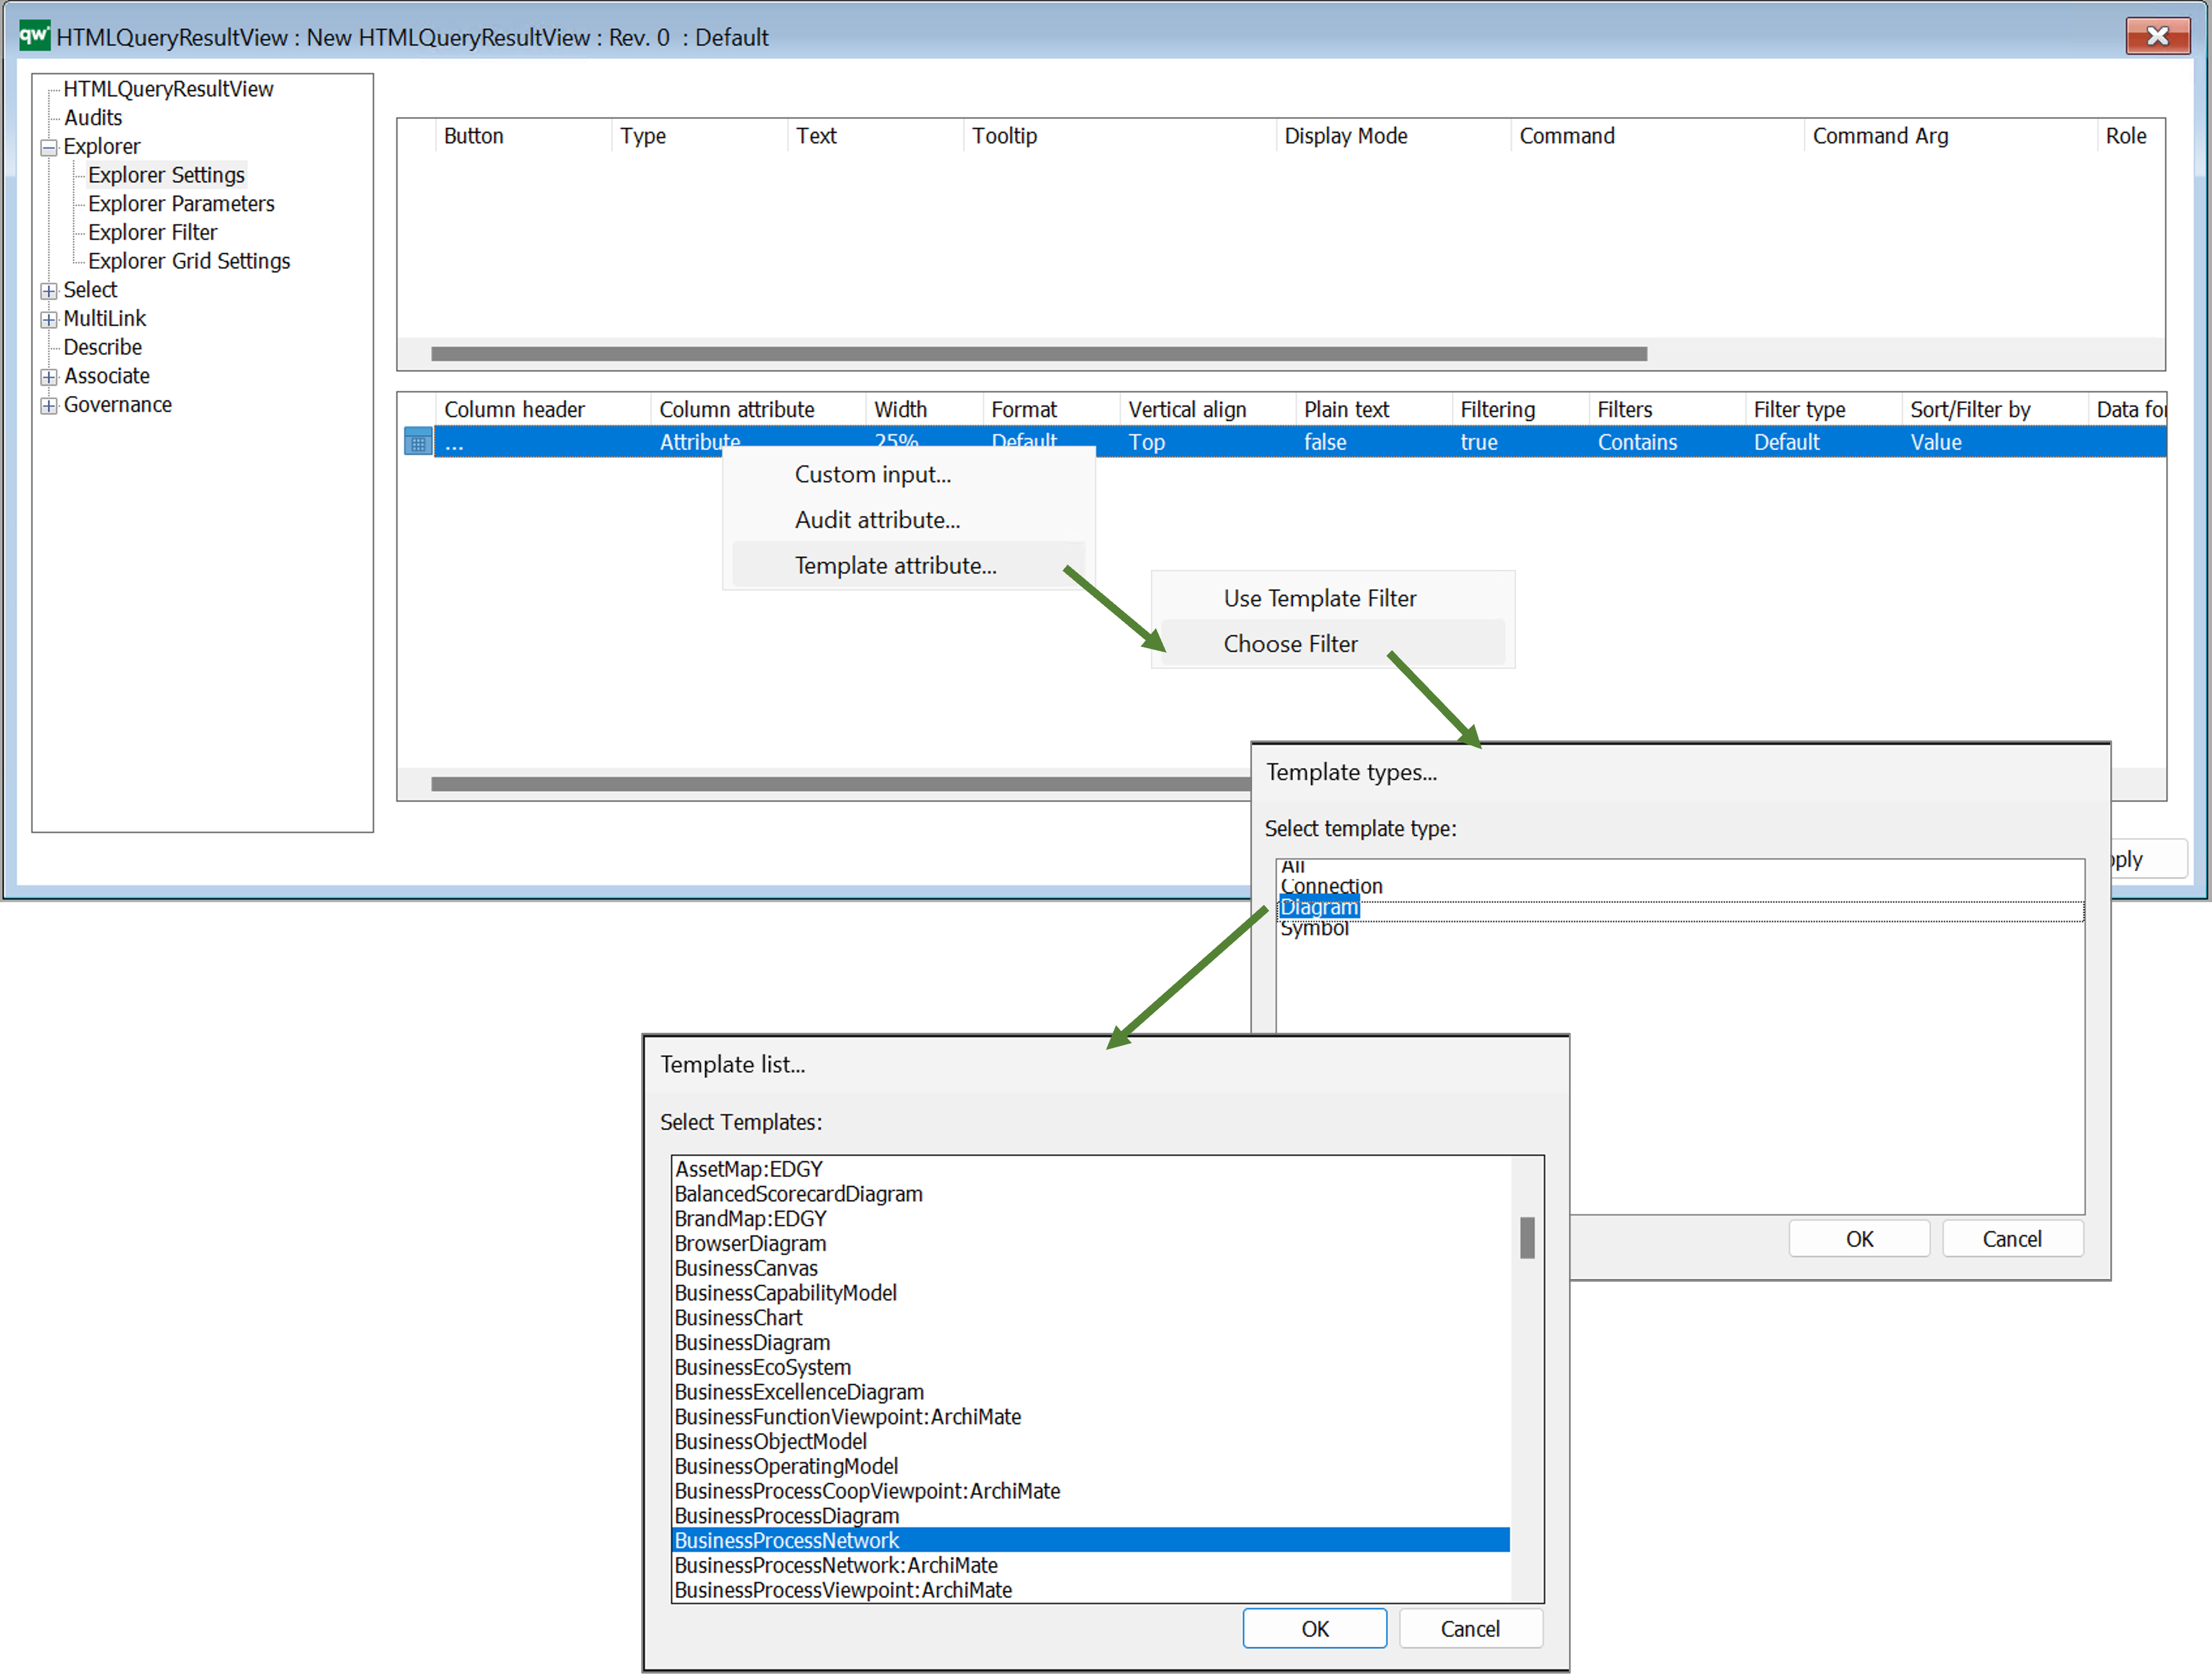
Once you have selected a template you will get the full list of attributes available. It is possible to expand the window to see and sort by attributes of the different sub dialogs of the object, see example below with the BusinessProcessNetwork
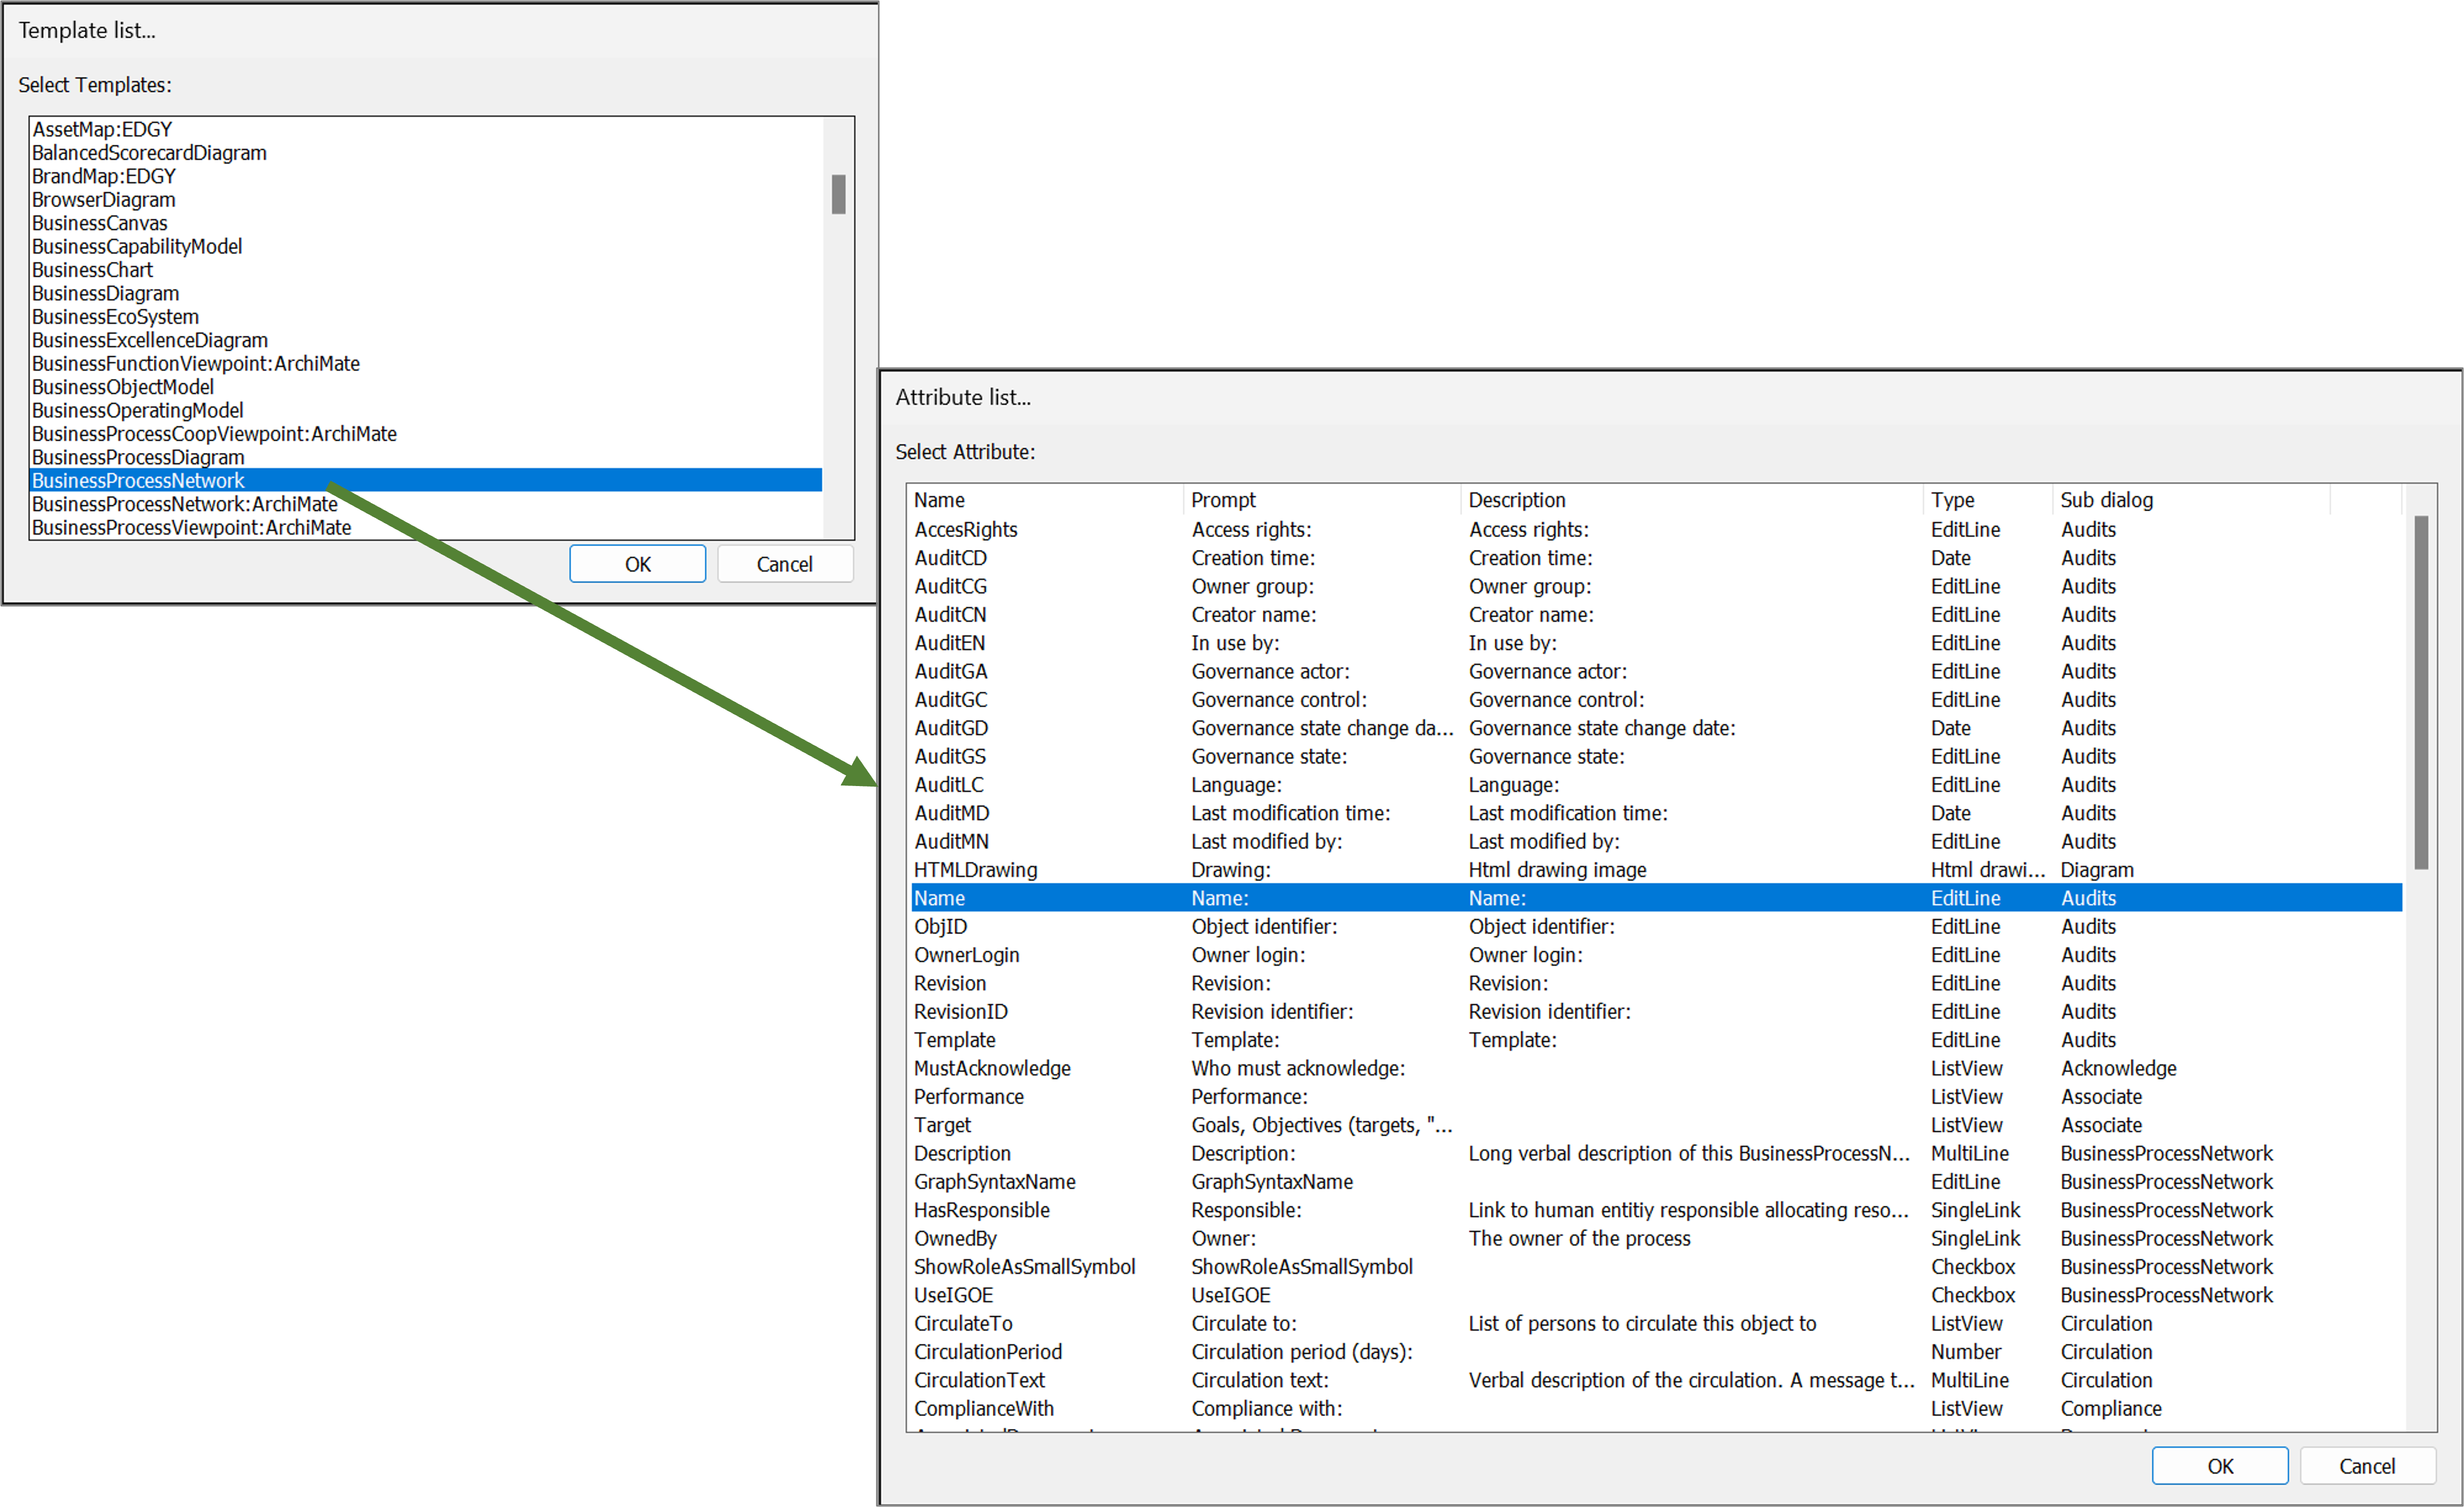
Once you have selected the attribute it will appear in the column list.
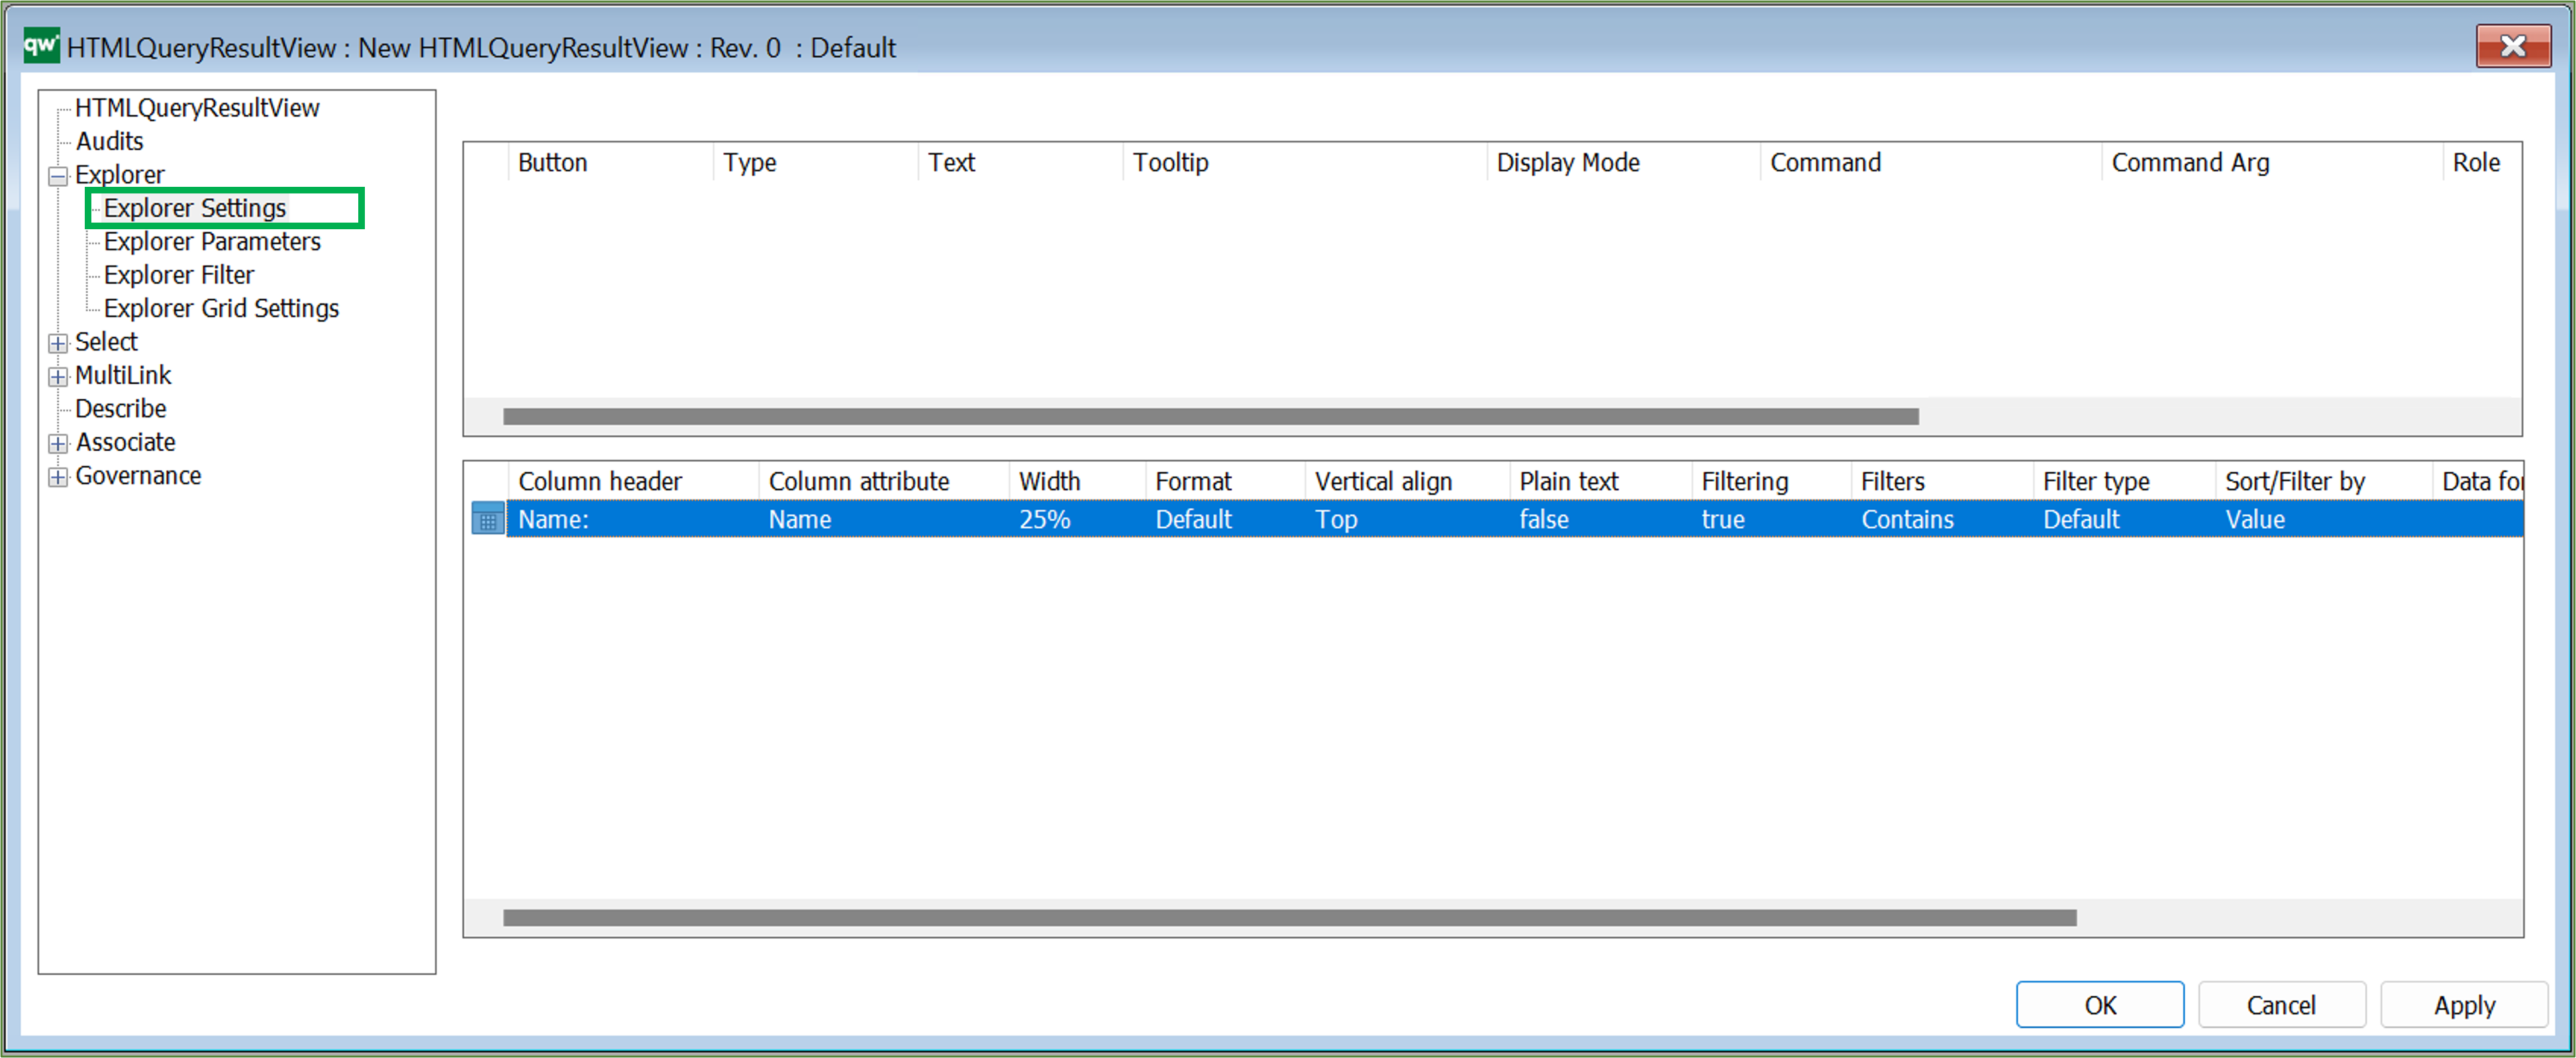
It is possible to configure which columns are in the table along with basic settings for content of the column is displayed.

  • Column header: The text of the header for the column.
  • Column attribute: The attribute of the column. This one is combined with the column filter in Explorer Filter to define the content for the column.
  • Width: Width of the column. It can be defined using pixels or percentages.
    • Using pixels can produce a horizontal scrollbar if total width of all columns exceed the content width.
    • Percentages will be the percentage of the total width of the table. If all column widths are defined in percentages, the total width of the table will not exceed 100%.
  • Format: If cells of the column can contain more than one link (MultiLink or multiple SingleLinks), then the format can be defined as List to diplay the links in list format.
    • Possible values: Default, List
  • Vertical align: Vertical alignment of the content of each cell in the column.
    • Possible values: Top, Middle, Bottom.
  • Plain text: If the content of each cell in the column should be displayed as plain text. This can be used in cases where the content is links. When content is plain text it is not clickable.
  • Filtering: specifies if the column is filterable
  • Filters:
    • Between; NotBetween; Contains; DoesNotContain; EqualTo; NotEqualTo; StartsWith; EndsWith; IsEmpty; NotIsEmpty; GreaterThan; GreaterThanOrEqualTo; LessThan; LessThanOrEqualTo
  • Filter type:
    • Default; Date; Number
  • Sort/Filter by:
    • Value; Auto; LinkedObjectName
  • Data format: Define the format for the content of the cells in the column.
    • For simple formats, define the format directly in this field.
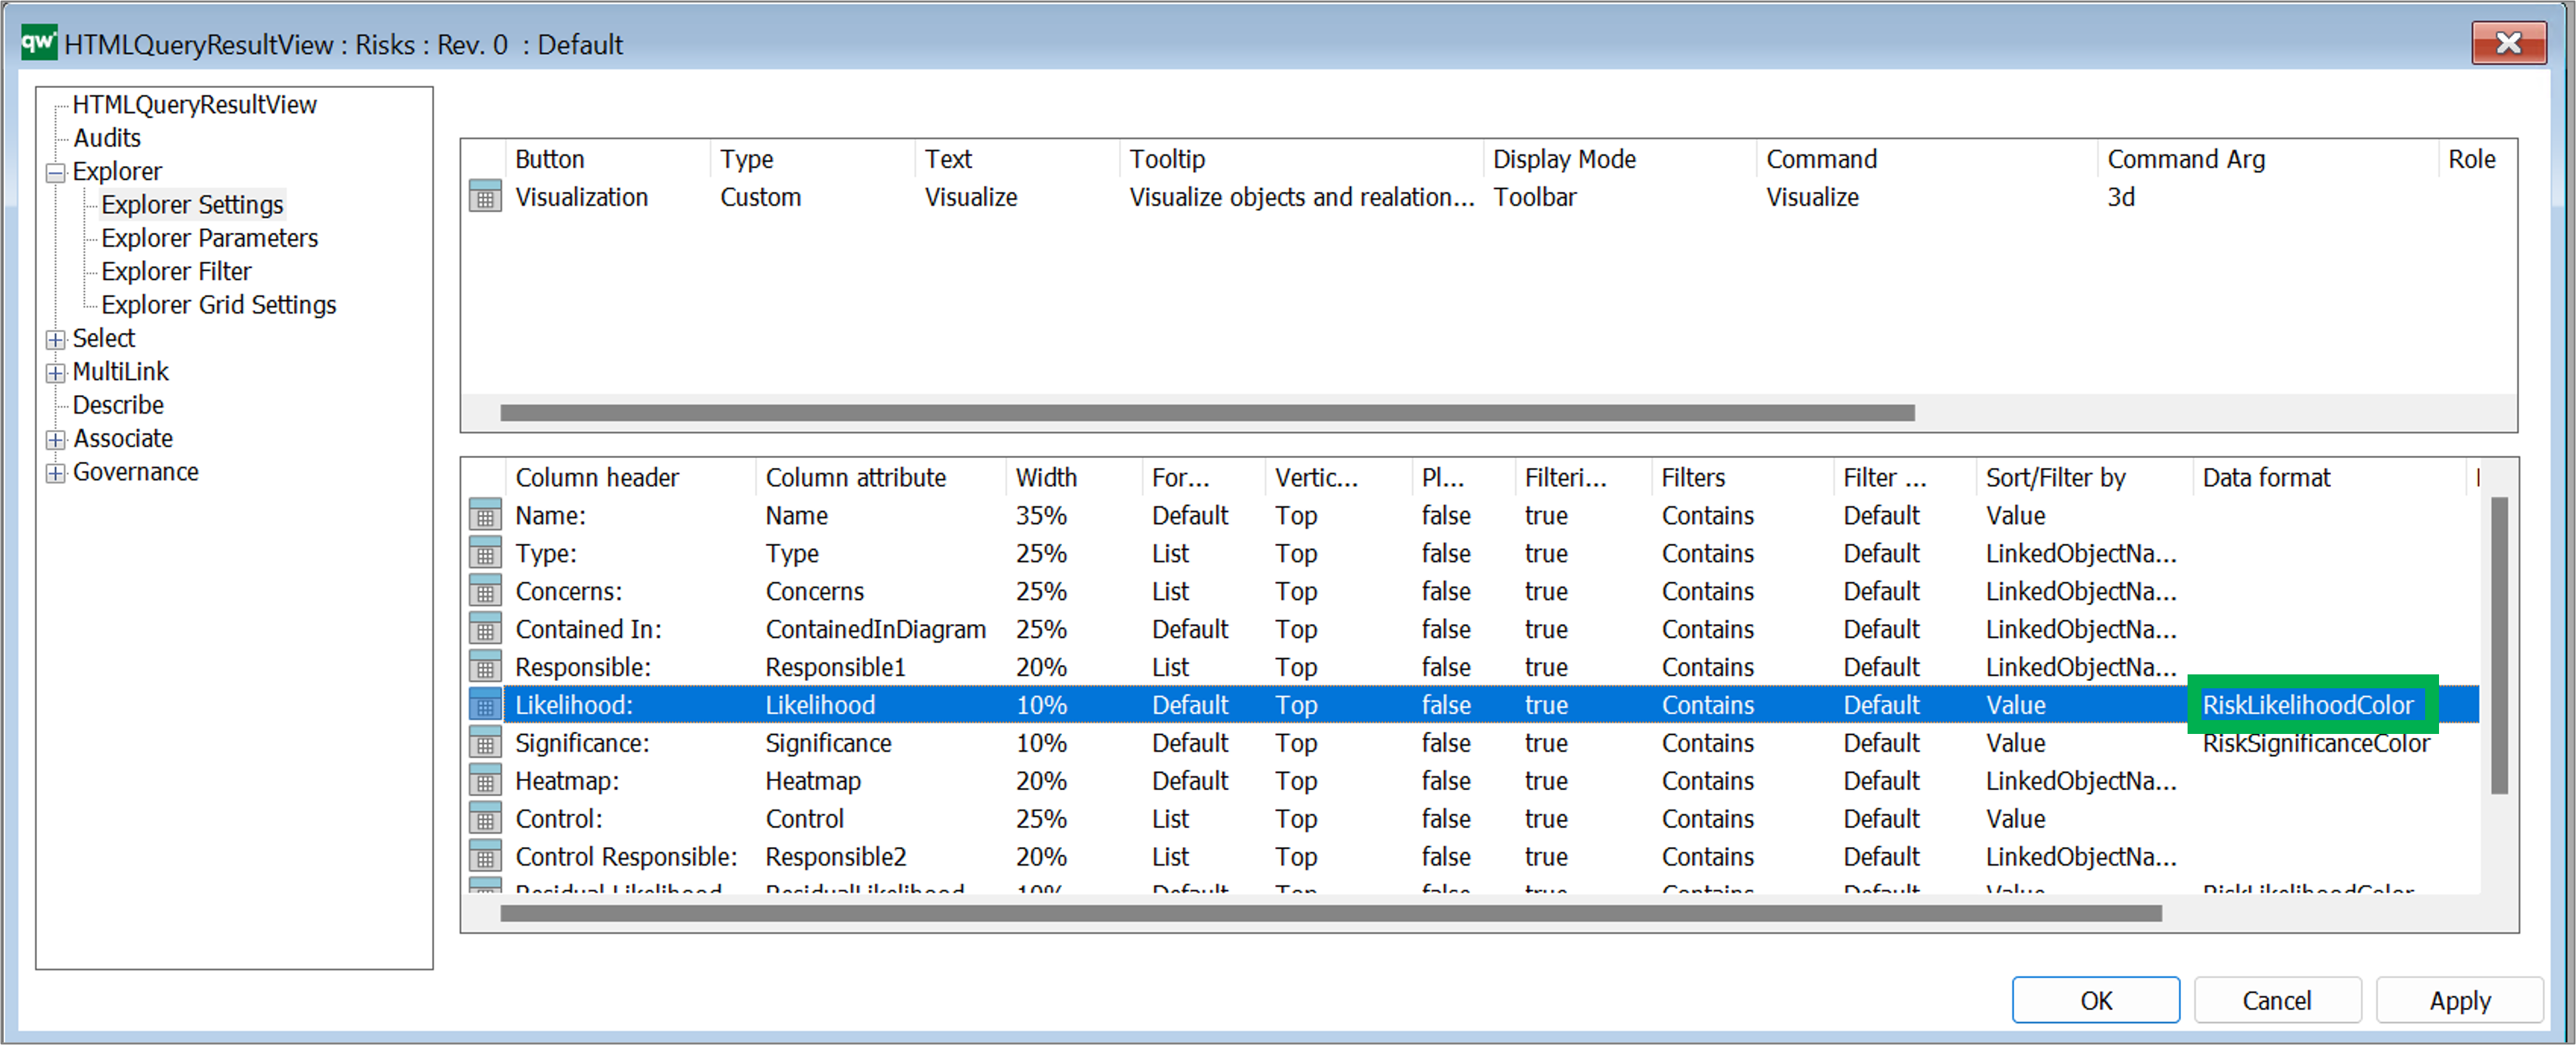
    • For advanced formatting, define which value mapping should be used. Read more about value mapping in the Explorer Grid Settings.
  • Script: You can insert a script
  • Link value / Ref. attr: 

Explorer Parameters
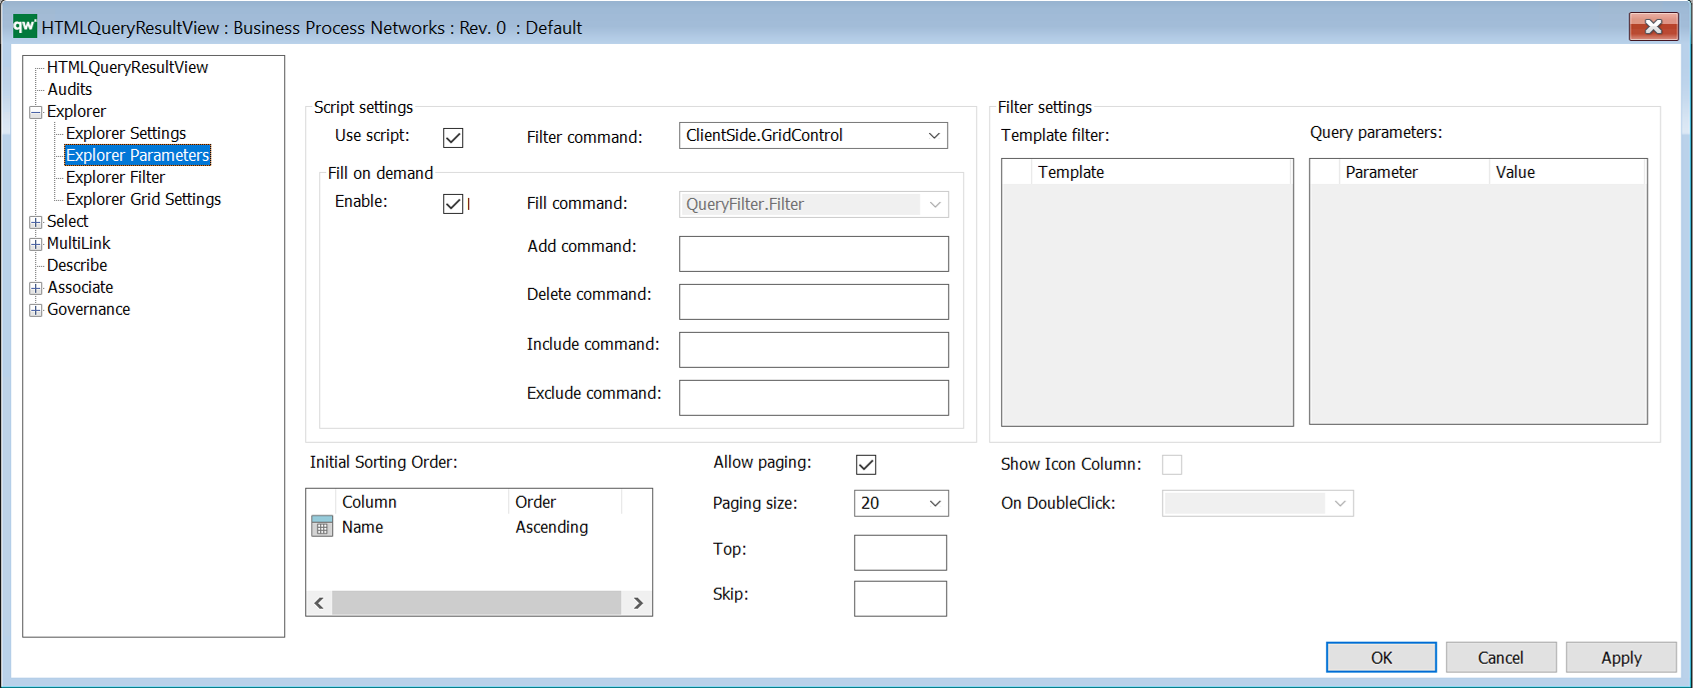
Parameter settings

  • Use script: Select to use script
  • Filter command:
    • Client Side options: Choose ClientSide.GridControl to display data in a client side table. This is the recommended setting. When choosing ClientSide.GridControl, the Explorer Filter options will be enabled.
    • Server Side options: There are a list of predefined commands available for fetching and displaying data in a server side table.
  • Fill command: Commands for the different actions. (Disabled for Client Side Grid)
  • Filter settings: Here you specify Template filter and Query parameters (Disabled for Client Side Grid.)
  • Initial sorting order: Defines the initial sort order of the data in the table. Available options are calculated from the columns set in Explorer Settings.
  • Allow paging: Allows dividing the result in multiple pages
  • Paging size: The number of items on each page of the table.
  • Show icon column: The first column of the QRV will show an icon for the object of the row. (Disabled for Client Side Grid.)
  • On doubleclick: Defines which action will be executed on double clicking a row. Options are calculated based on buttons defined for the QRV. (Disabled for Client Side Grid.)

Explorer Filter

Configure the filters for content of the table.

Row filter: Defines what each row of the table should represent.

  • Most simple filter is a template, i.e. show one Activity per row.
  • Advanced filter could be show one BusinessProcess where the current user is responsible for the BusinessProcess per row. The filter is used as a WHERE clause in a QSQL statement.

To add a column filter right click the window and select from the list of attributes defined in the Explorer Settings above.

Column filter: The column filter specifies content of a table column. Each column specified on the Explorer Settings tab should be present in the column filter.

Use right click to insert basic settings for the columns (it will loop already defined columns and insert one filter per column).
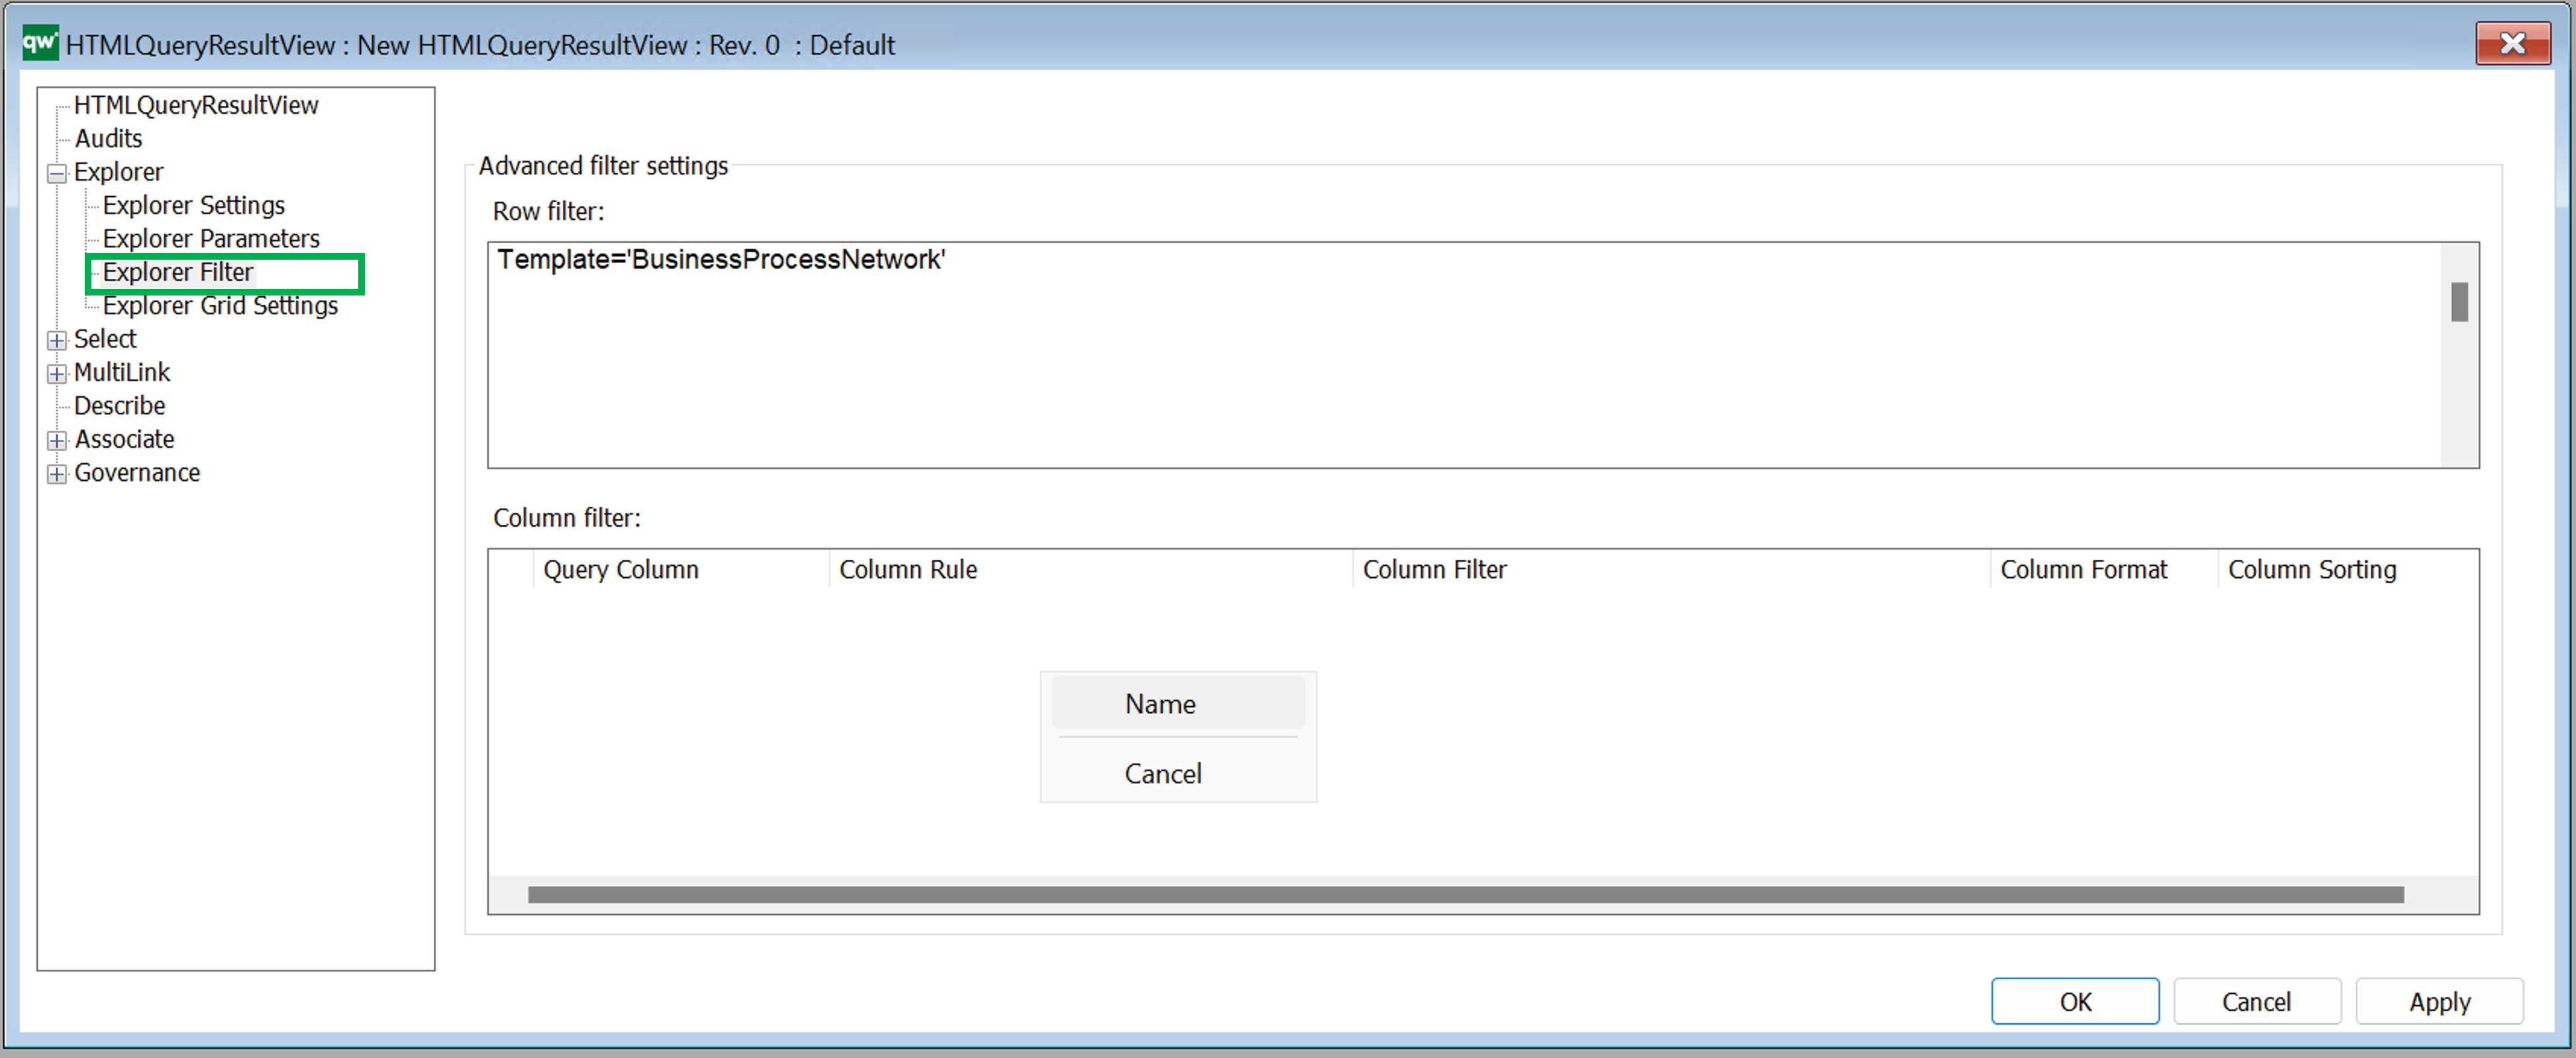
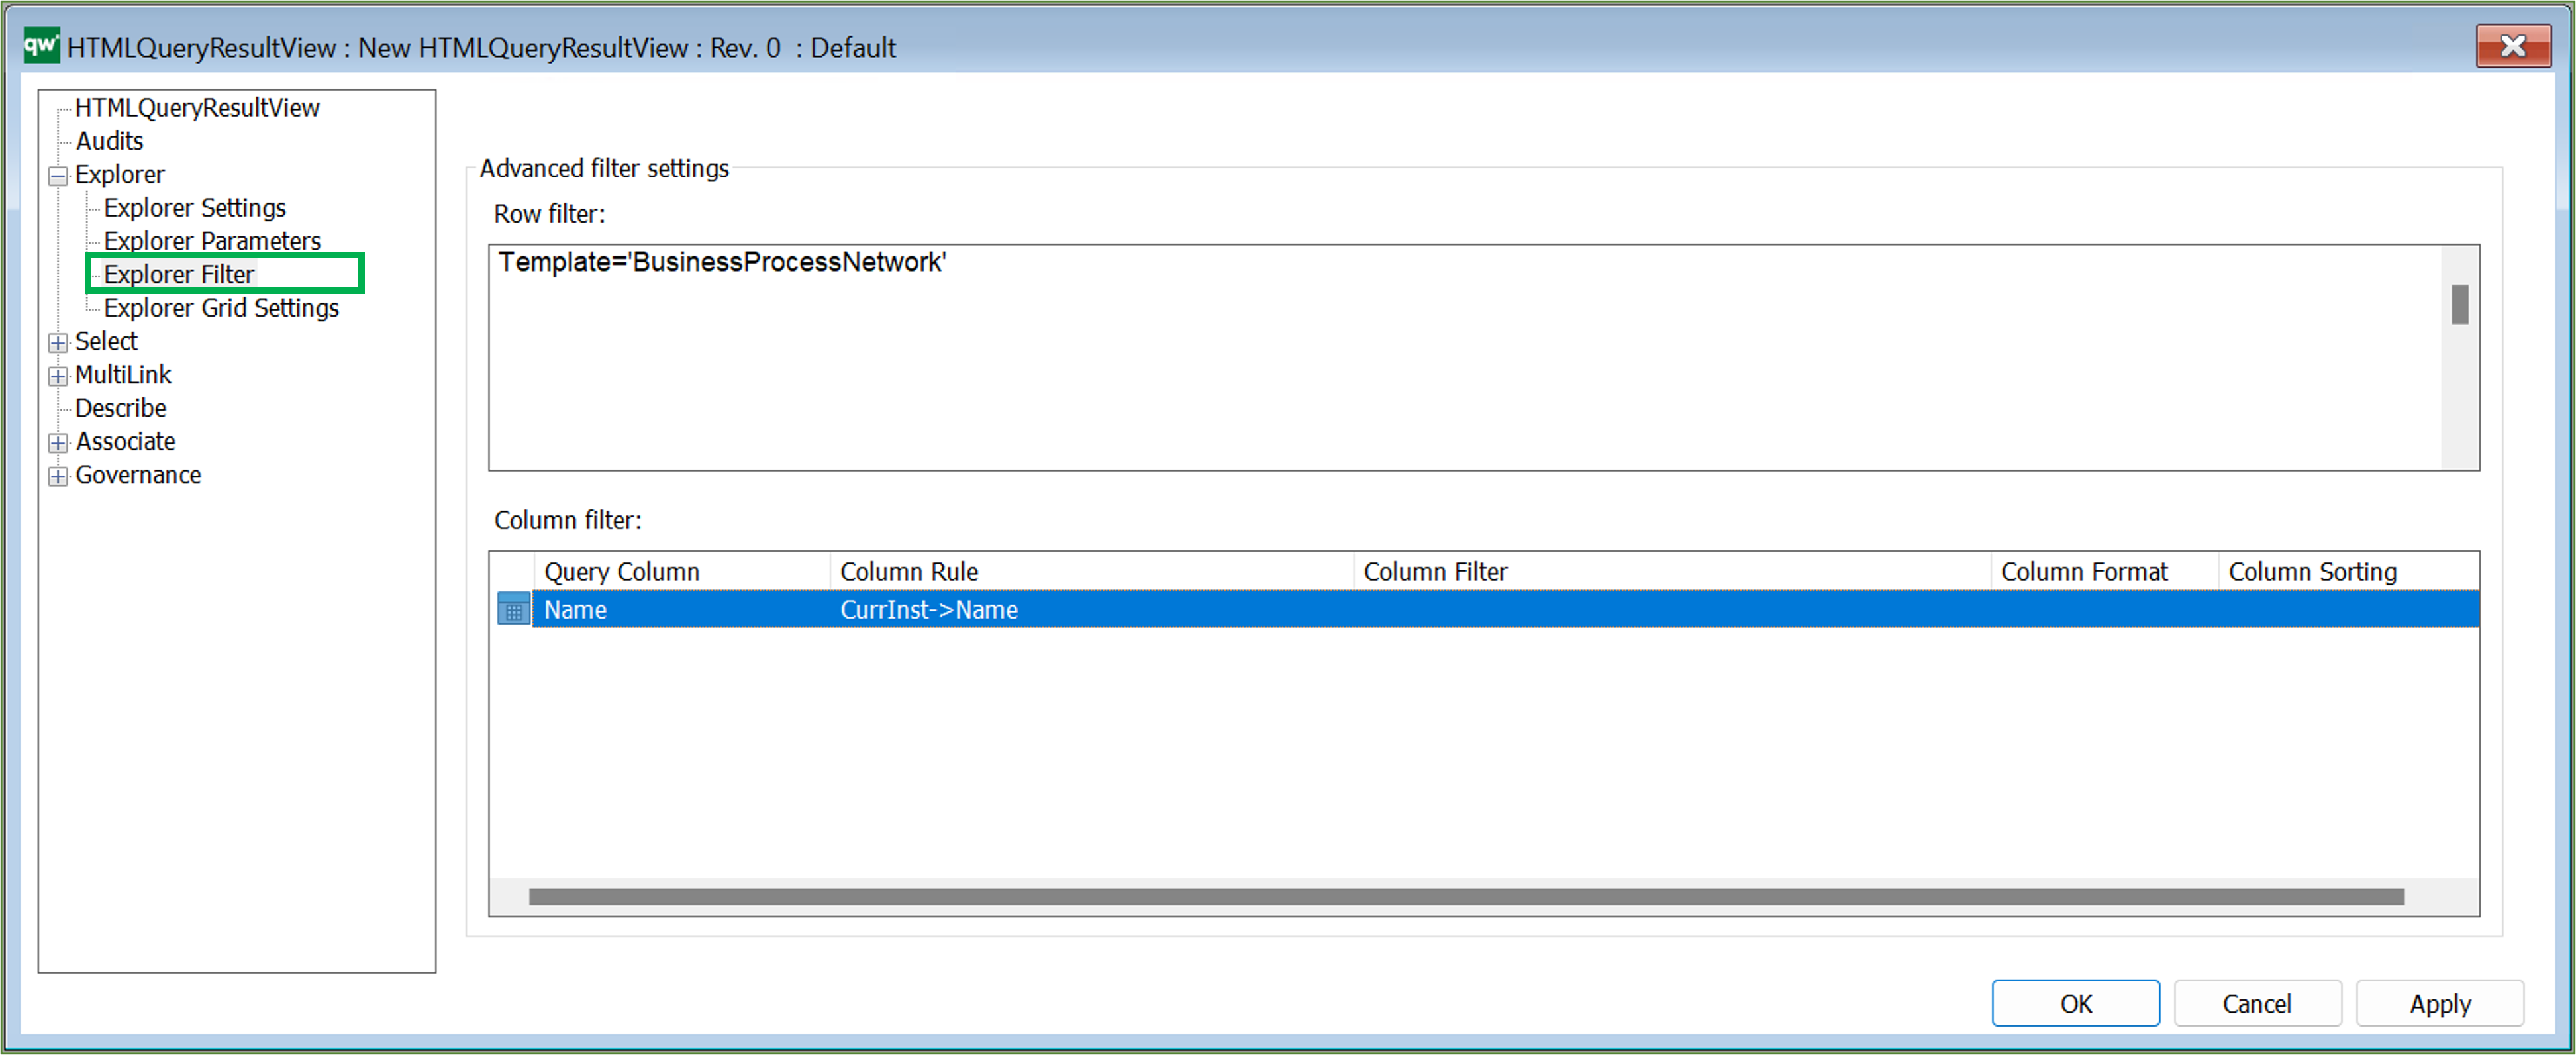
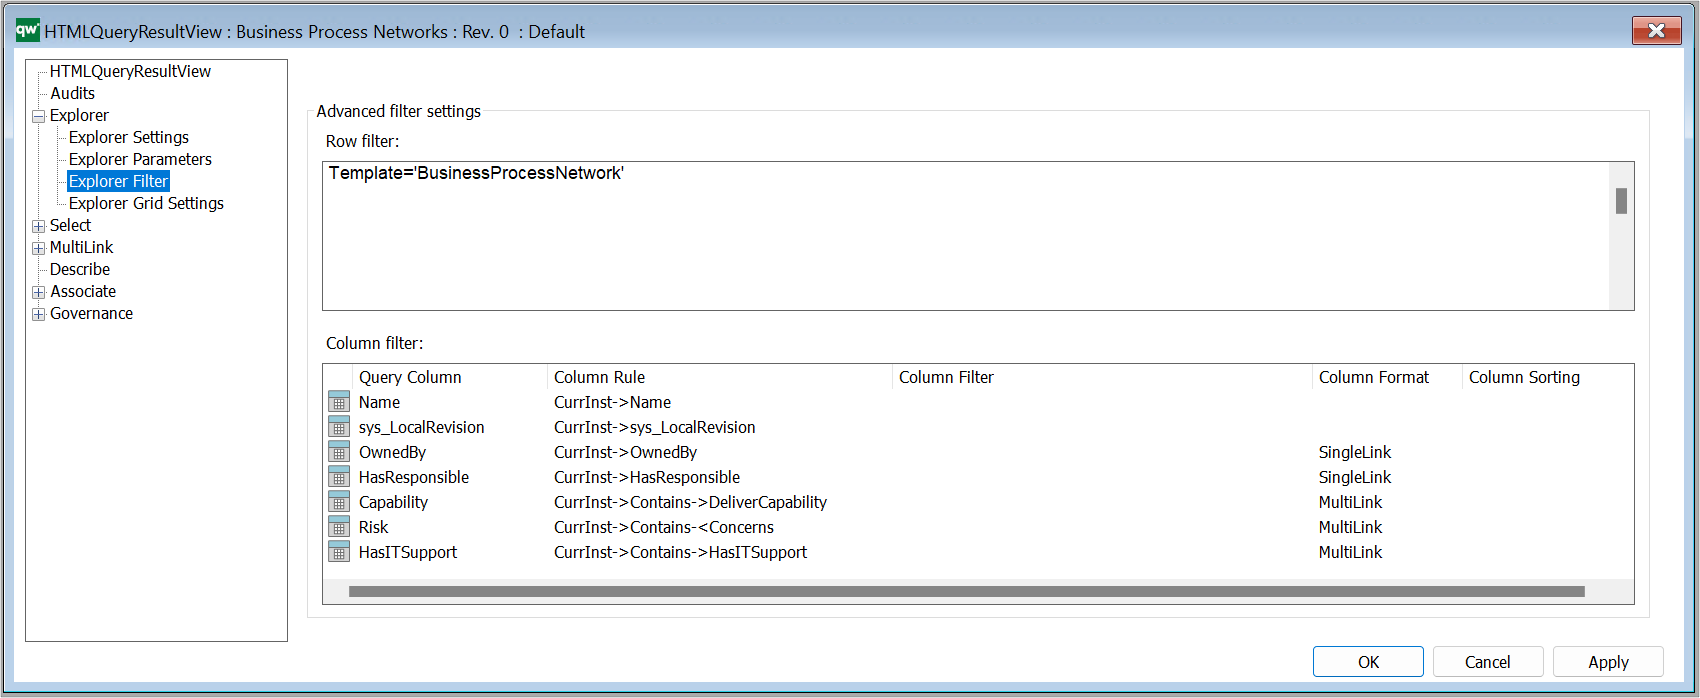
  • Query Column: This should match a column attribute from the Explorer Settings tab. This is what created the link to the column settings.
  • Column Rule: The content of the column. This can be a simple connection like an attribute on the object, e.g. Name. Or it can be a more advanced connection like an attribute on an object linking to the row object, e.g. CurrInst-<Concerns->HasResponsible.
  • Column Filter: This will filter the content specified in Column Rule. If Column Rule uses an advanced connection, it can be useful to filter on the template of the resulting content, e.g. only show ChangeRequests. Example: CurrInst-<Concerns=’ChangeRequest’ Having a Column Rule of CurrInst-<Concerns can result in a list of both ChangeRequests and Risks (and other templates) and that might not be what is wanted.
  • Column Format: The format of the content. This will have impact on how the content is displayed.
  • Column Sorting: If the content of a cell contains multiple links, then the sorting can be set to define in which order the links will be shown.

Example of a QRV from the standard, showing all BusinessProcessNetworks in the repository:
Explorer Grid Settings

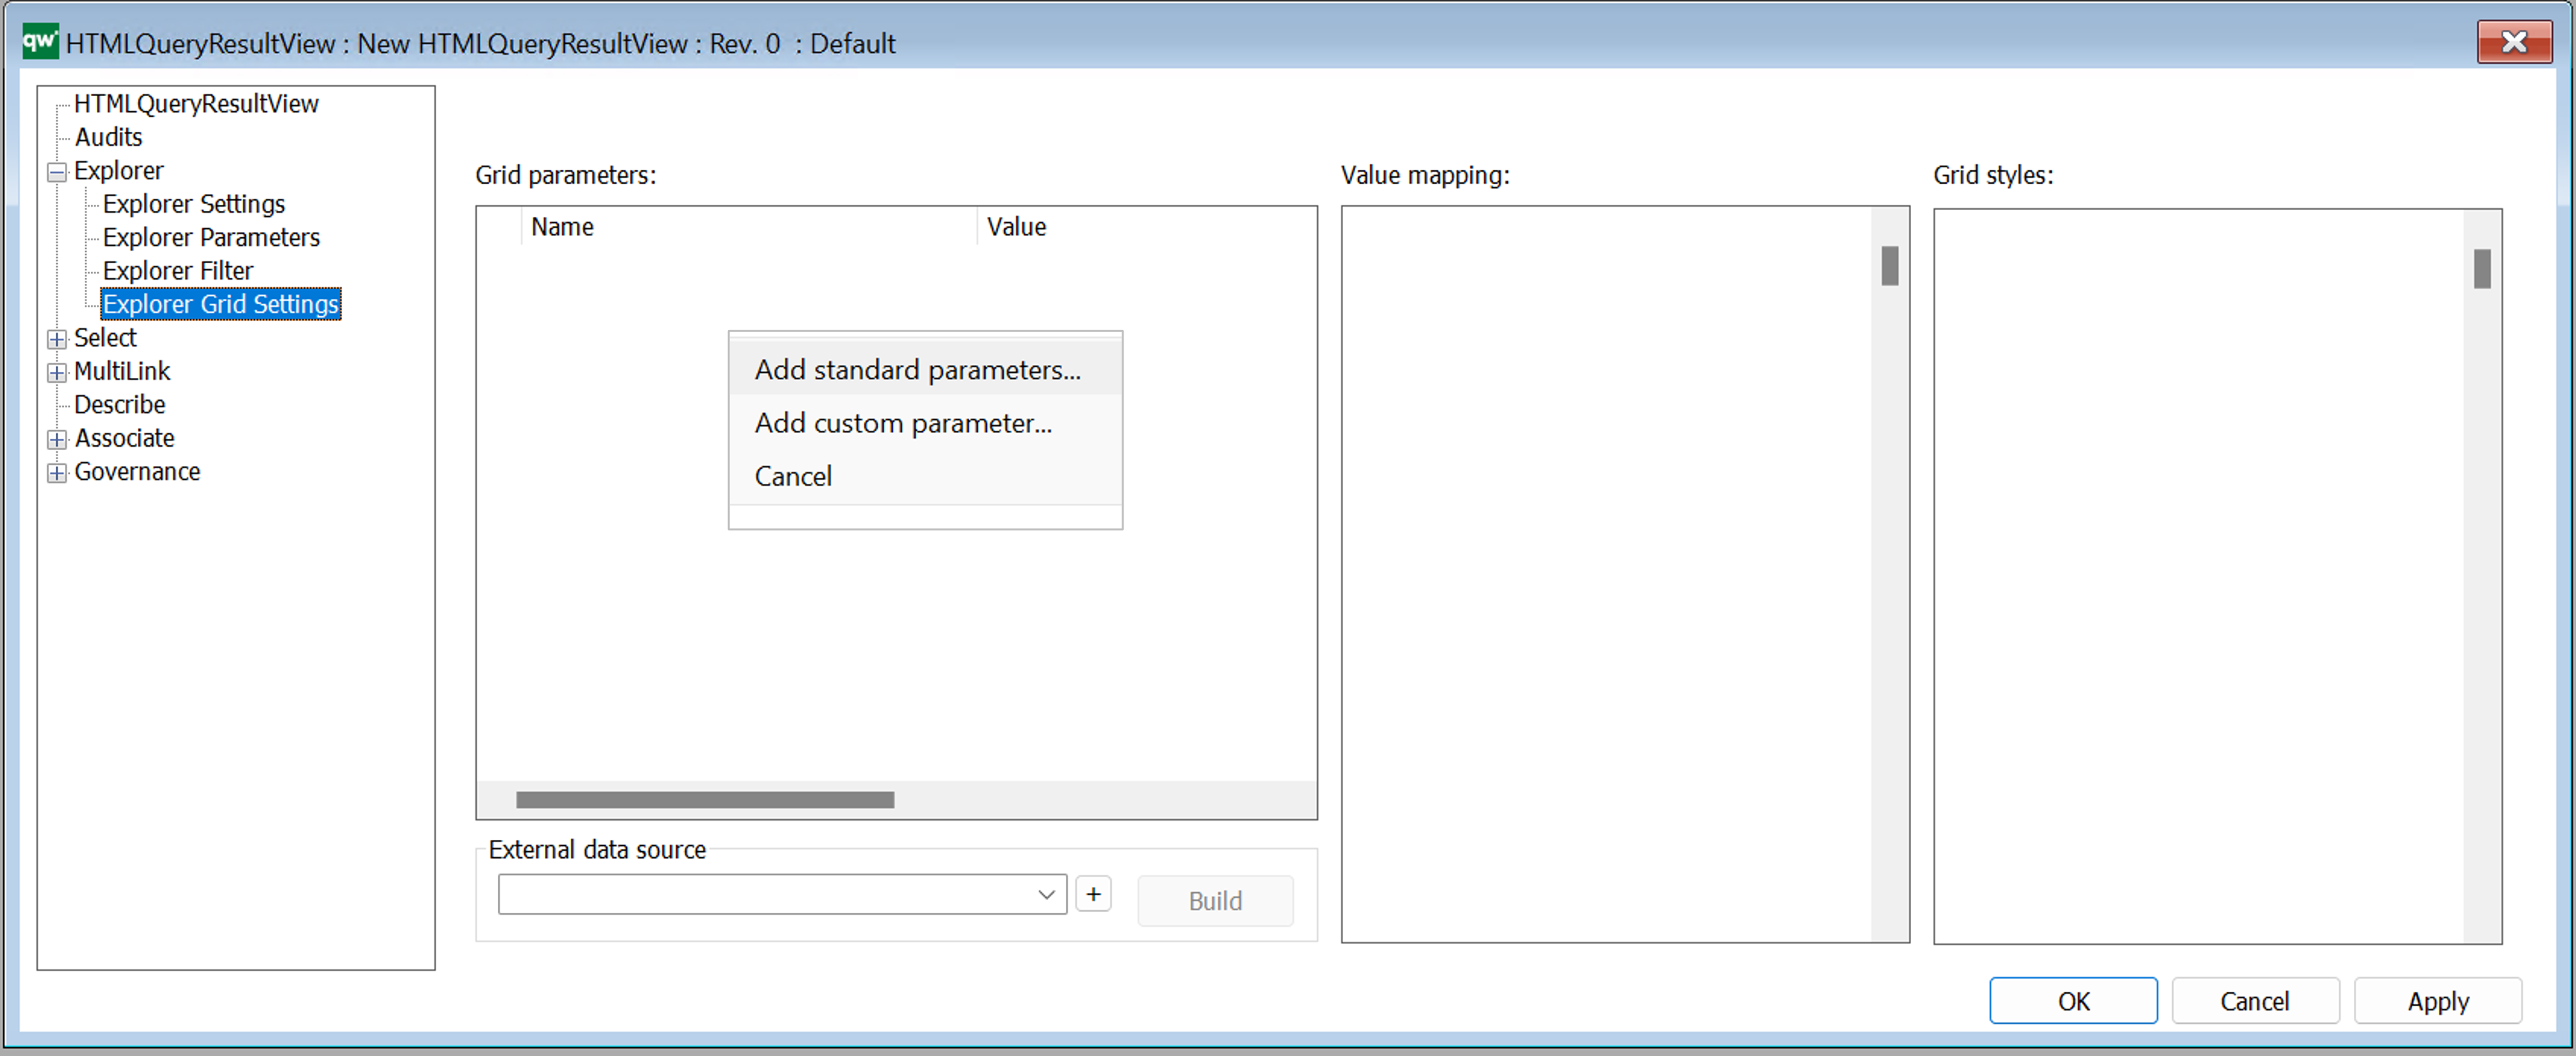
Grid parameters

Configure settings for how the table is displayed and if further options should be available to the user.

Right click the window to add standard parameters.
Standard Grid parameters (standard settings).
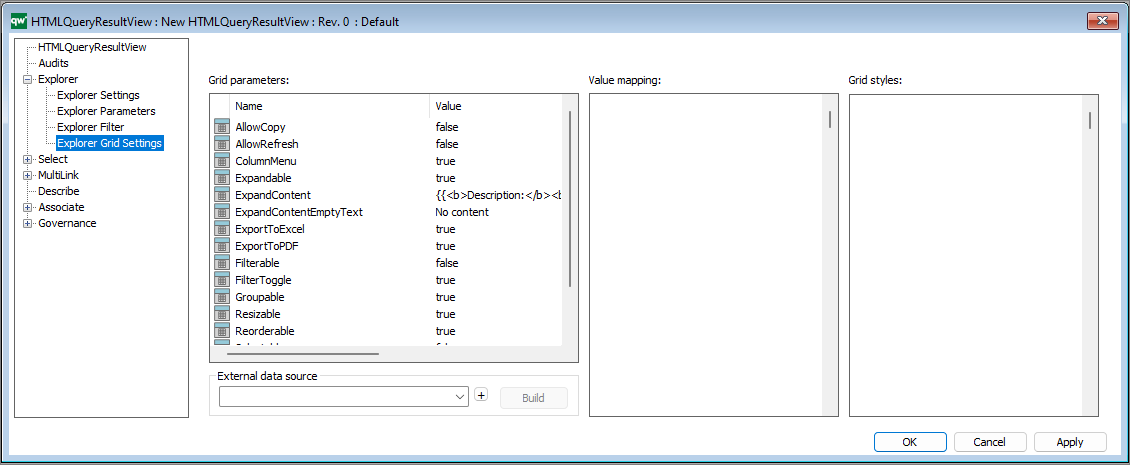
  • AllowCopy: If it should be possible to copy content of the table.
  • AllowRefresh: If a button should be shown to allow the user to refresh content of the table.
  • ColumnMenu: If a column menu for sorting and show/hide column should be available to the user.
  • Expandable: If each row should be expandable to display more information about the row object.
  • ExpandContent: The content that will be shown when expanding the row. Simple markup can be used to format the information.
  • ExpandContentEmptyText: If content is not available when expanding the row, this text will be displayed.
  • ExportToExcel: If button for exporting the content of the table to Excel should be available.
  • ExportToPdf: If button for exporting the content of the table to PDF should be available.
  • Filterable: If it should be possible to filter each column of the table. Each column will have an input in the column header for defining a filter.
  • FilterToggle: If it should be possible to show/hide the filter inputs for the columns.
  • Groupable: If it should be possible to group columns by dragging and dropping a column to the top area of the table.
  • Resizable: If the width of the columns should be resizeable.
  • Reorderable: If it should be possible to reorder the columns by dragging and dropping a column. The order of the columns will be reset when reloading the table.
  • Selectable: If rows should be selectable.
  • Sortable: If the columns should be sortable by clicking the column header.
  • TableValued:

It is possible to adjust the values by pressing F2 and write e.g. true or false to enable/disable the different parameters.

I.e. the parameters determines what is enabled in relation to the QRV list on the web-view, including the content in the toolbar in the upper right corner.

(The Visualize button in the toolbar is added through the standard buttons under the Explorer Settings.)

Value mapping

In some cases it wil be necessary to map content of a cell before it is shown in the cell. This is useful when content of a checkmark or radio button should be displayed. Content of checkmarks and radio buttons are saved as empty, 0 and 1 in the database which is not useful information to a user. Value mapping can be used to display empty and 0 values as No, False, or similar and 1 as Yes, True, and simliar.

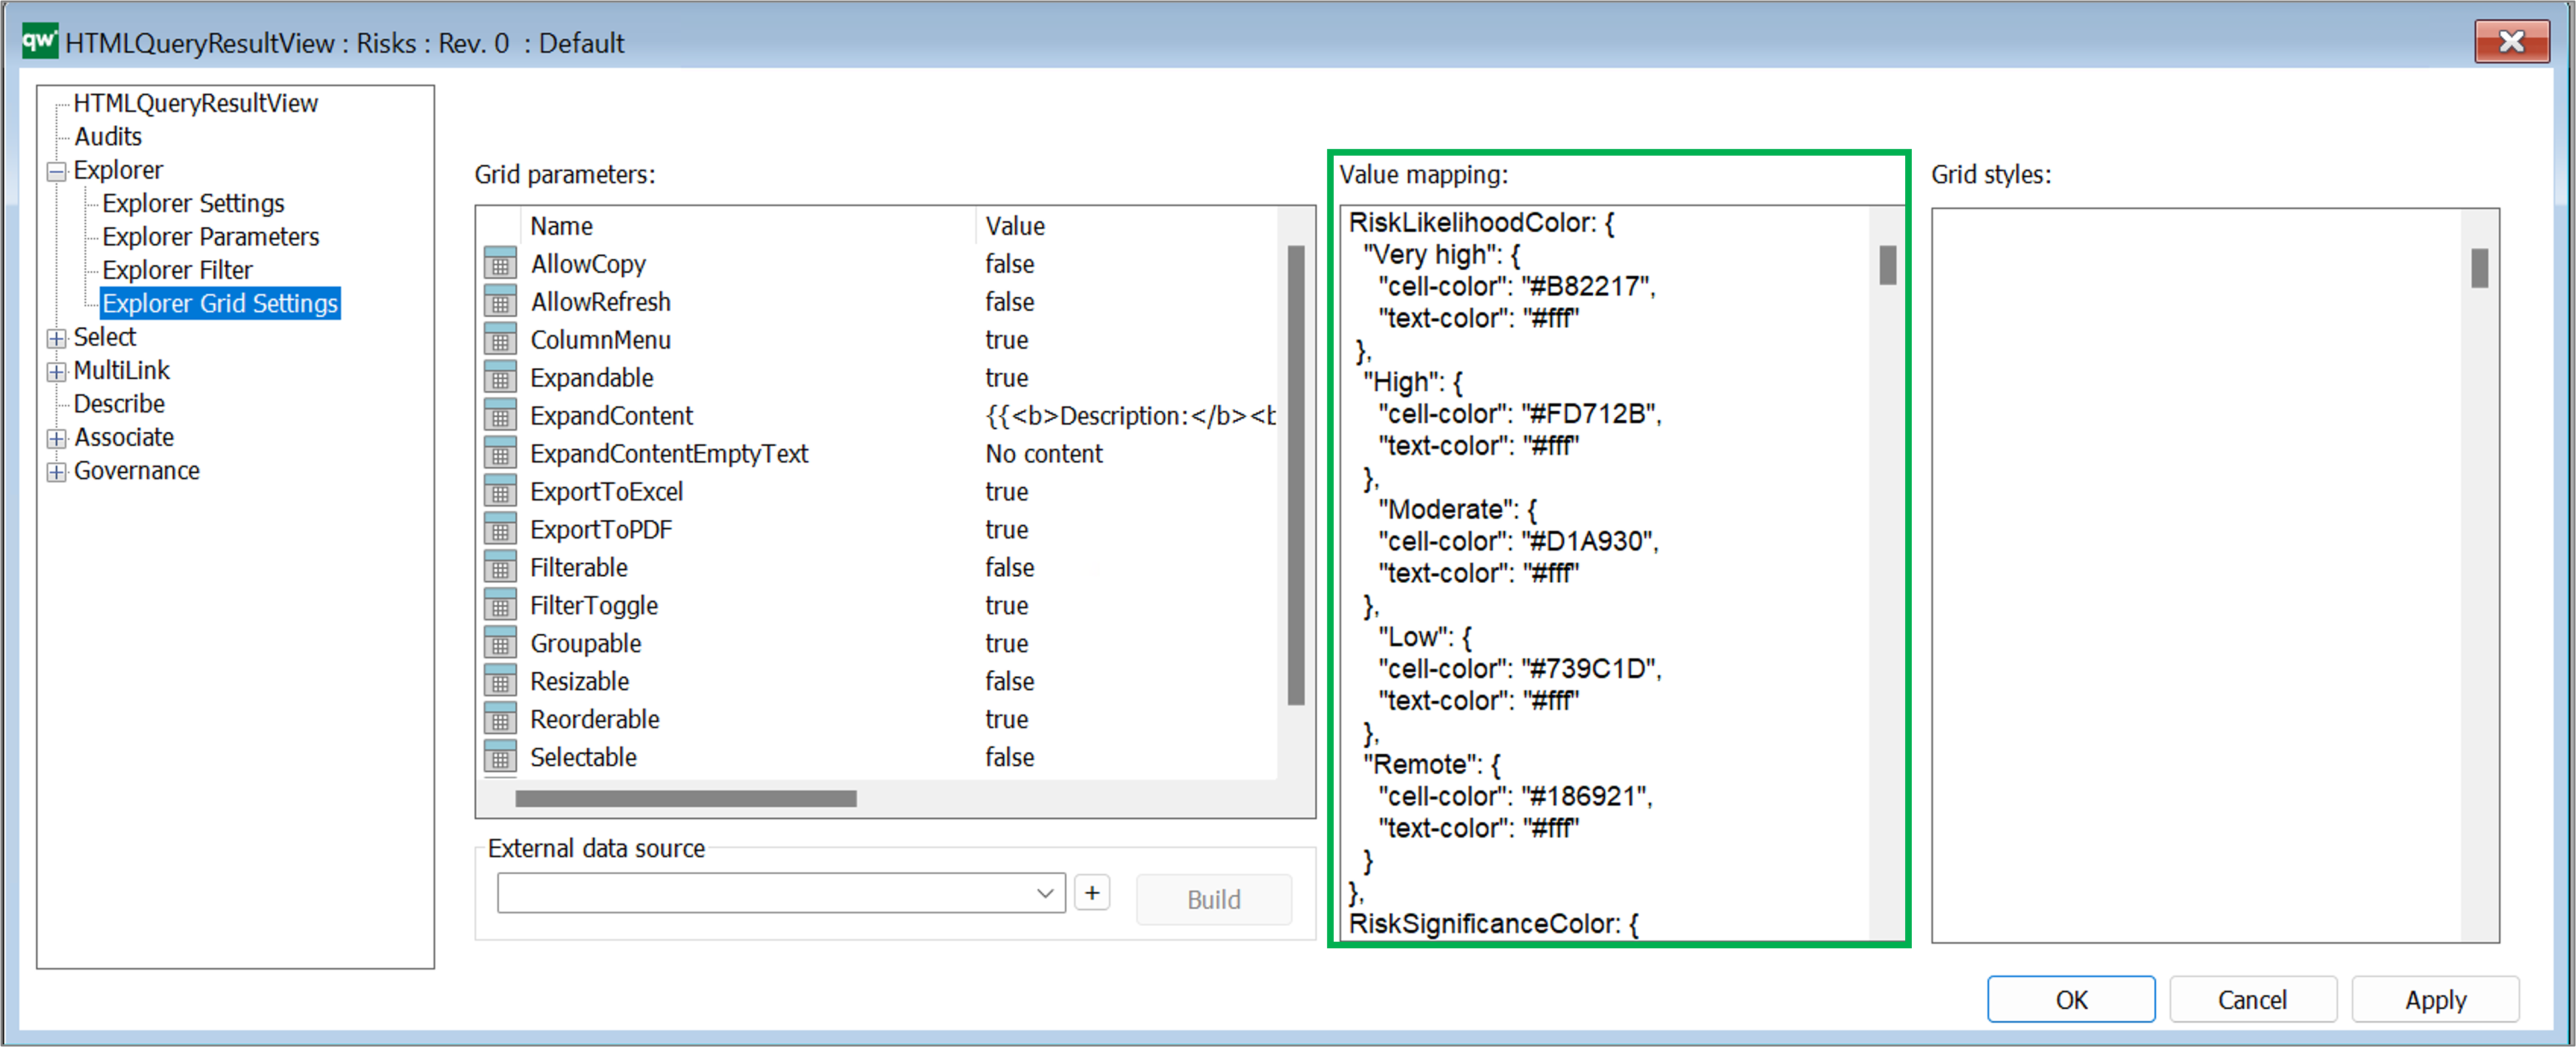
Value mapping is defined as a JSON object and can contain mapping information for multiple columns of the table.

Example of a value mapping used to color risk likelihood according to their value:
Once the value mapping have been defined they can be related to the coloumns in Explorer Settings view:
Grid styles

If specific styling is needed based on on values in the table but values are not needed to be formatted, then grid styles can be used to define styles for the grid. Grid styles use standard CSS.

External data source

It is possible to define an external data source (GenericQuery) for defining more advanced way of getting data to be displayed in the table. When using an external data source, most settings in the QRV object will be set when using the Build button. The Build button examines the settings of the linked GenericQuery and defines settings for the QRV object.

If the GenericQuery is updated, then the QRV object should be rebuilded by using the Build button. The rebuilding will update columns defined by the GenericQuery but will attempt to keep any settings that have been changed in the QRV object. E.g. grouping columns, width of column and similar.

When using an external data source, some settings will be disabled in the QRV object. These settings will be controlled by the GenericQuery.

Read more about GenericQuery for setting up how to fetch data in that way.

HTML Publisher

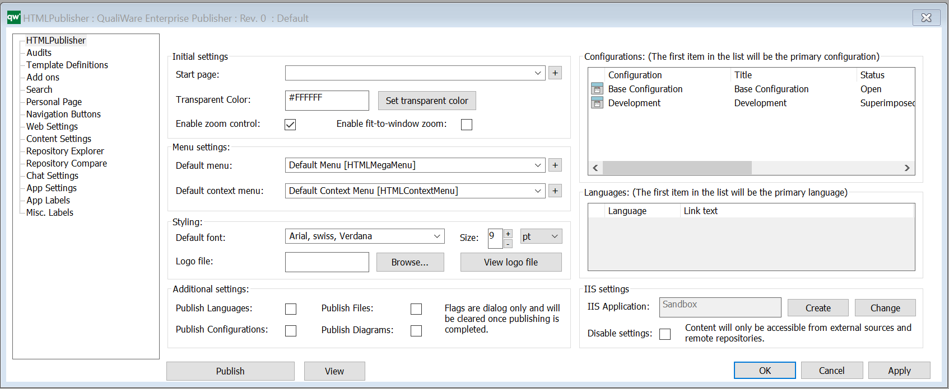
The HTMLPublisher Template contains all settings regarding the configuration of the Web. It collects all the settings for the collaboration platform on the web.

The HTML publisher setting can be accessed in QLM via the HTML icon on the Standard toolbar in QLM.

or by using the shortcut CTRL+H.

The HTMLPublisher collects all settings for the web.

From the HTMLPublisher tab, it is possible to specify:

  • Menu settings
  • Styling, including Logo in the top left corner
  • Available Configuration(s) on the web
  • Languages
  • Additional settings and IIS settings

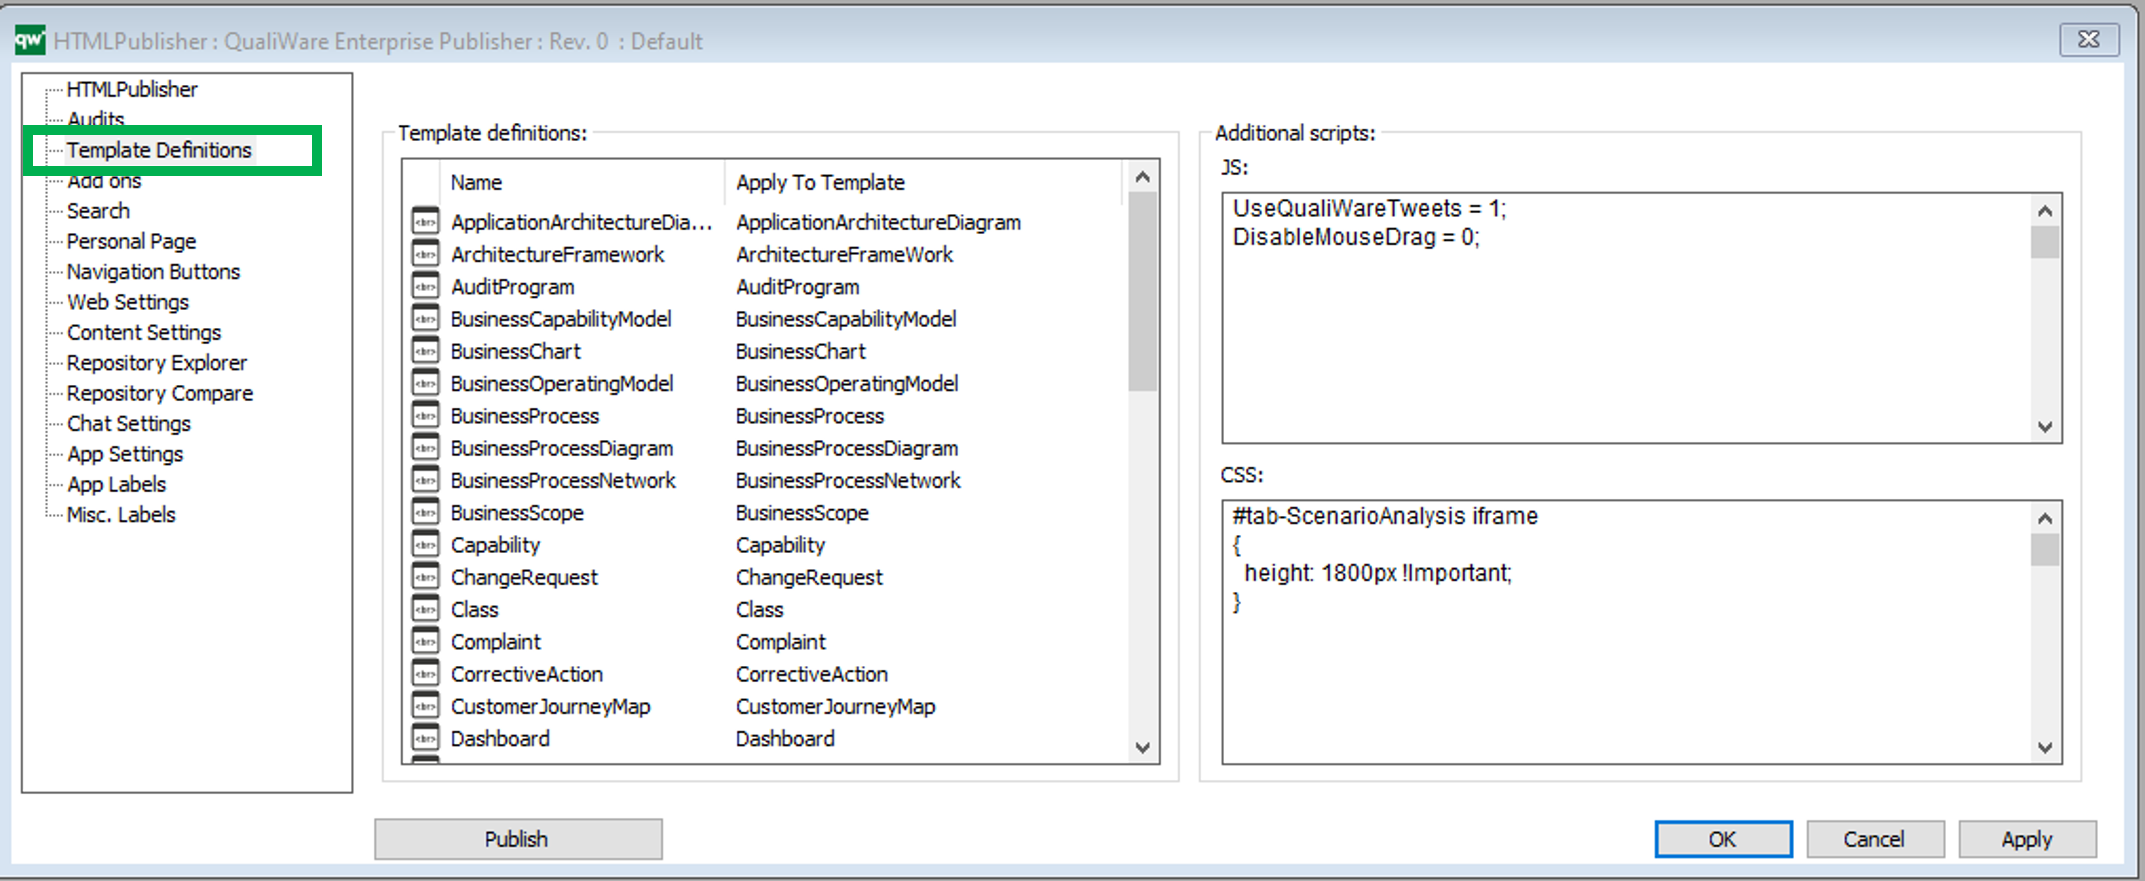
  • The Template Definitions tab includes the Template Definitions with HTML-settings for the selected templates, and thereby the “look and feel” for how the selected templates is presented on the web

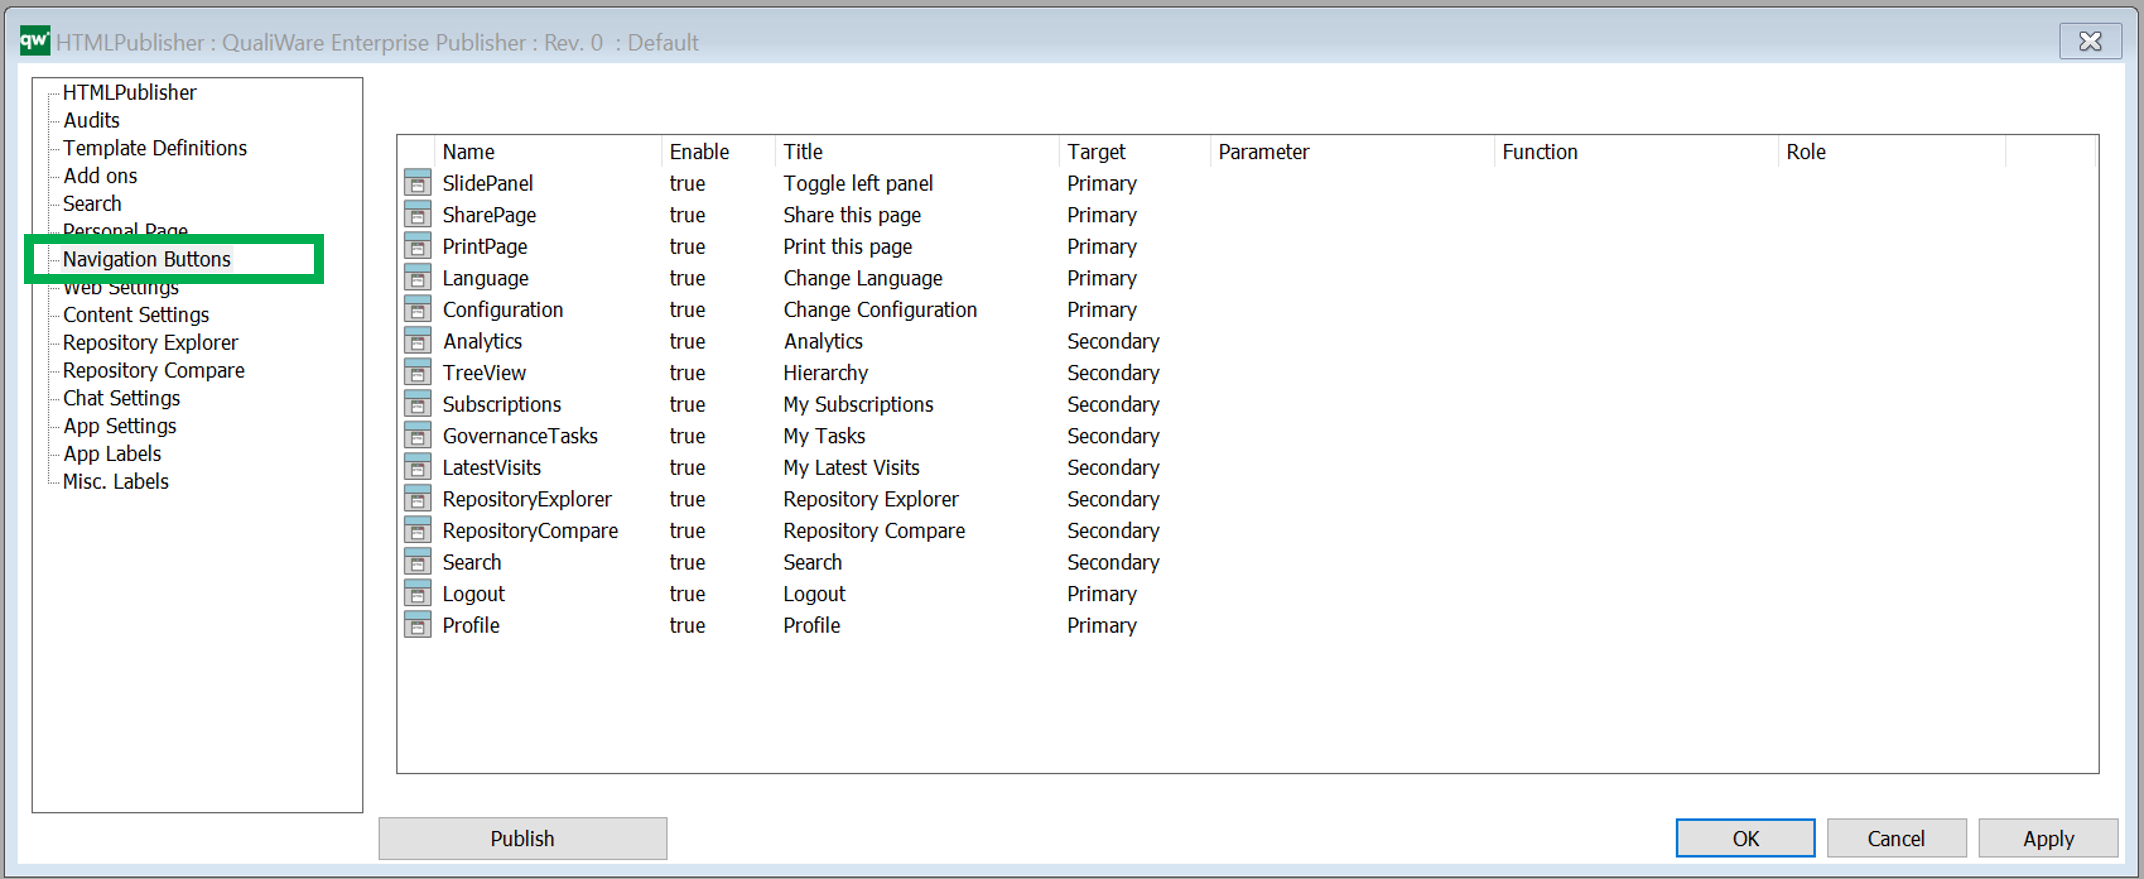
  • Available Navigation Buttons on in the Top right menu

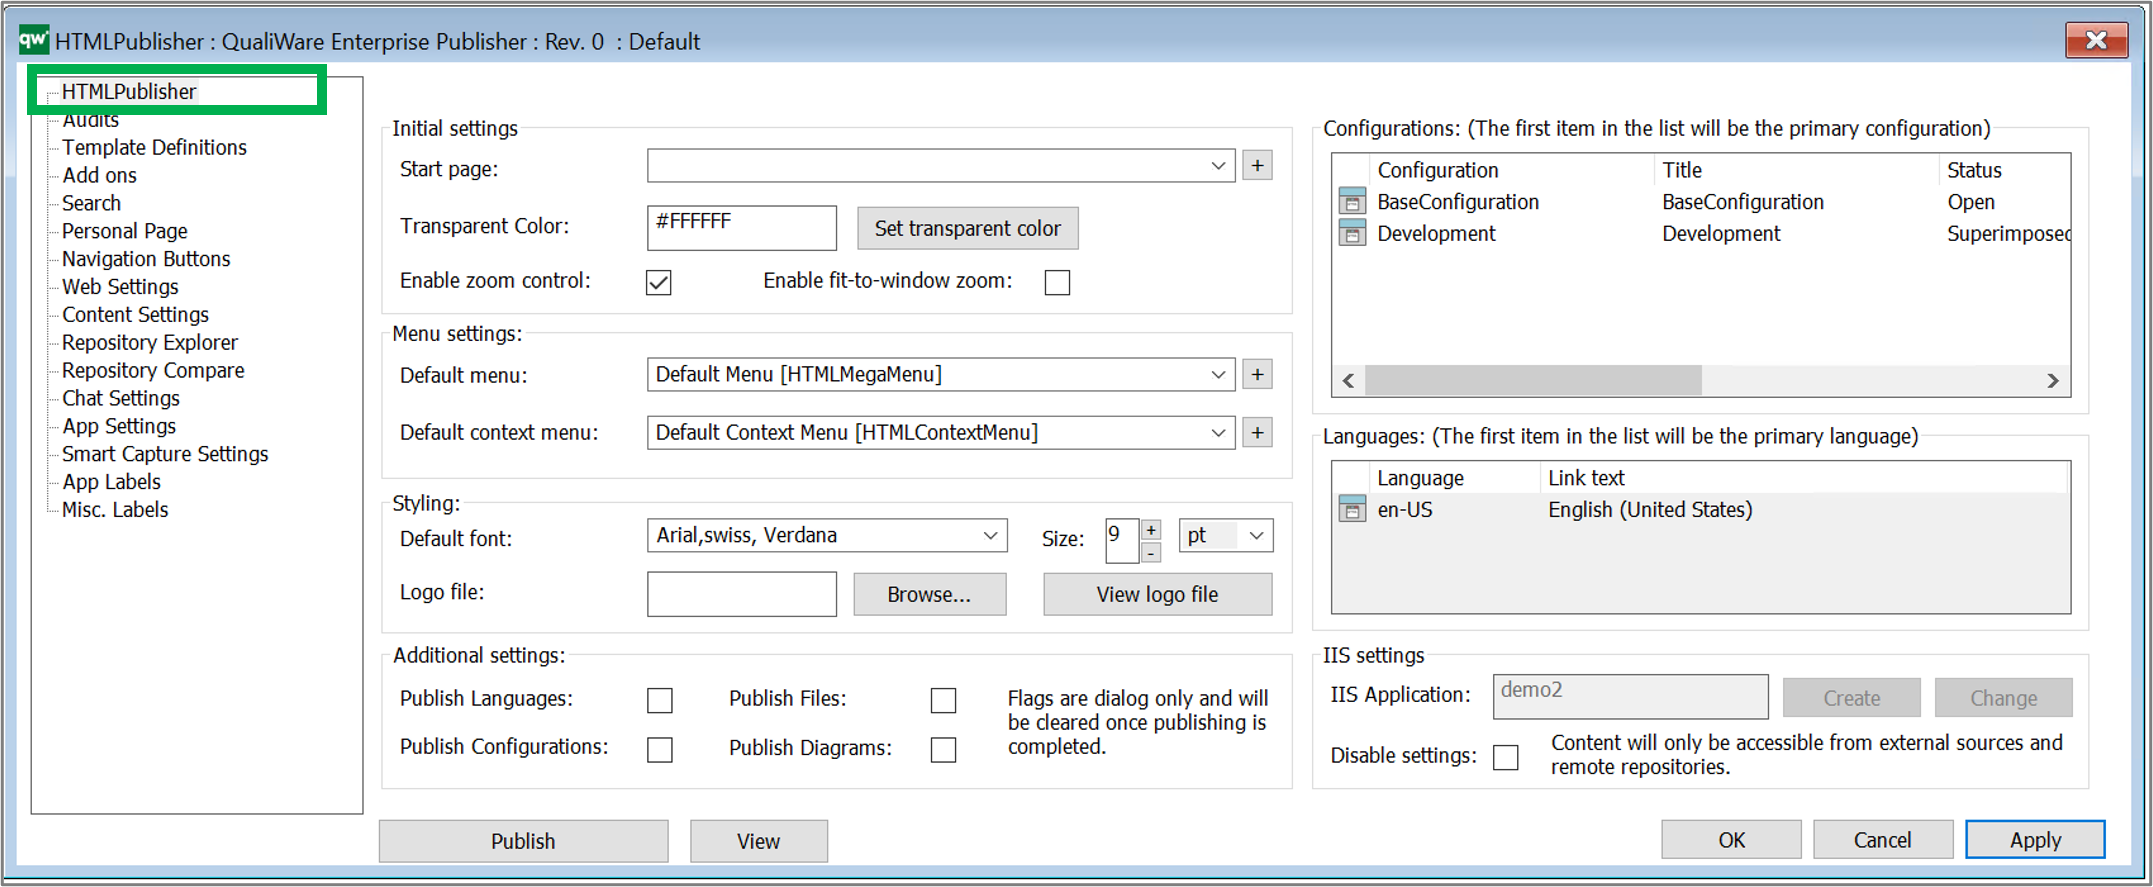
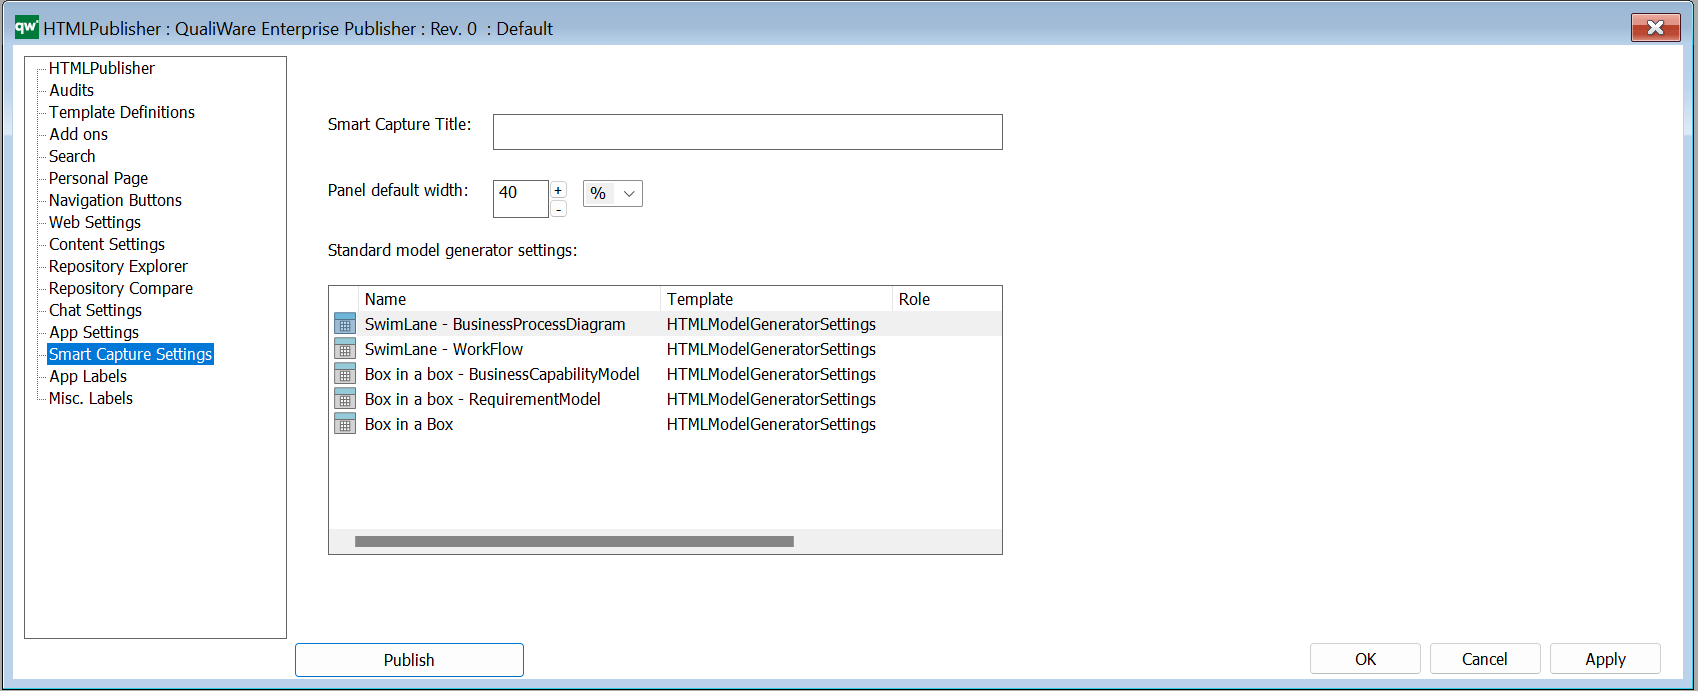
The Model Generator Settings for the table to model feature in the web-modeler (introduced in QualiWare 10.8) is setup through Smart Capture Settings tab:

HTML Embedded Content

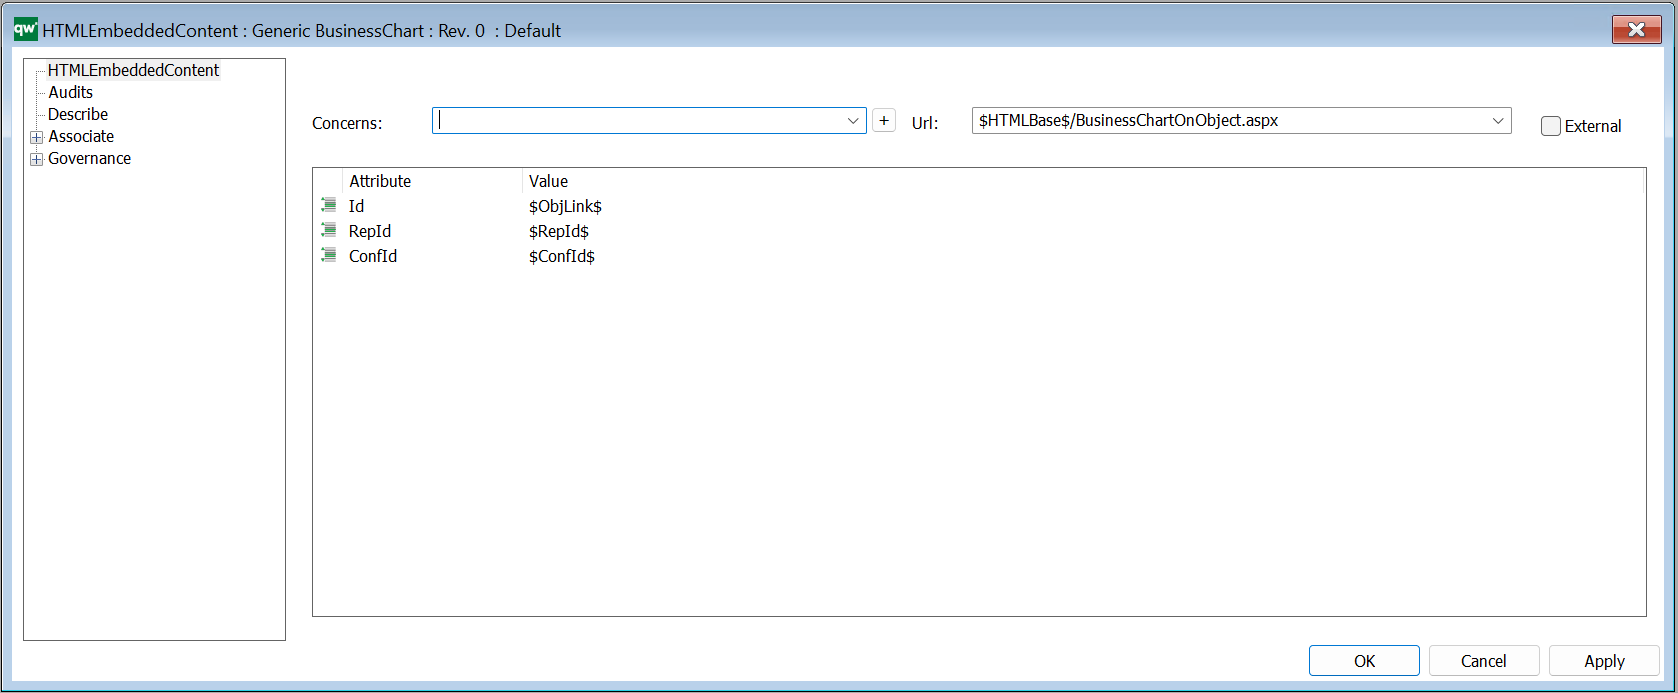
The HTMLEmbeddedContent template is used to embed content on a web page. This content could be e.g. a BusinessChart or a QRV. Inserting a BusinessChart allows for showing statistics related to the current object.


Concerns: The object that contains information about what should be shown.

Url: The URL can be to a file that can use the attributes specified to display content in a special way. E.g. there is a .aspx file that specifies how a BusinessChart is shown.

External: If the content comes from an external source, this should be checked.

Attributes: The attributes to be used by the URL. This can e.g. be the repository ID, configuration ID or object ID.


HTML Content Tab

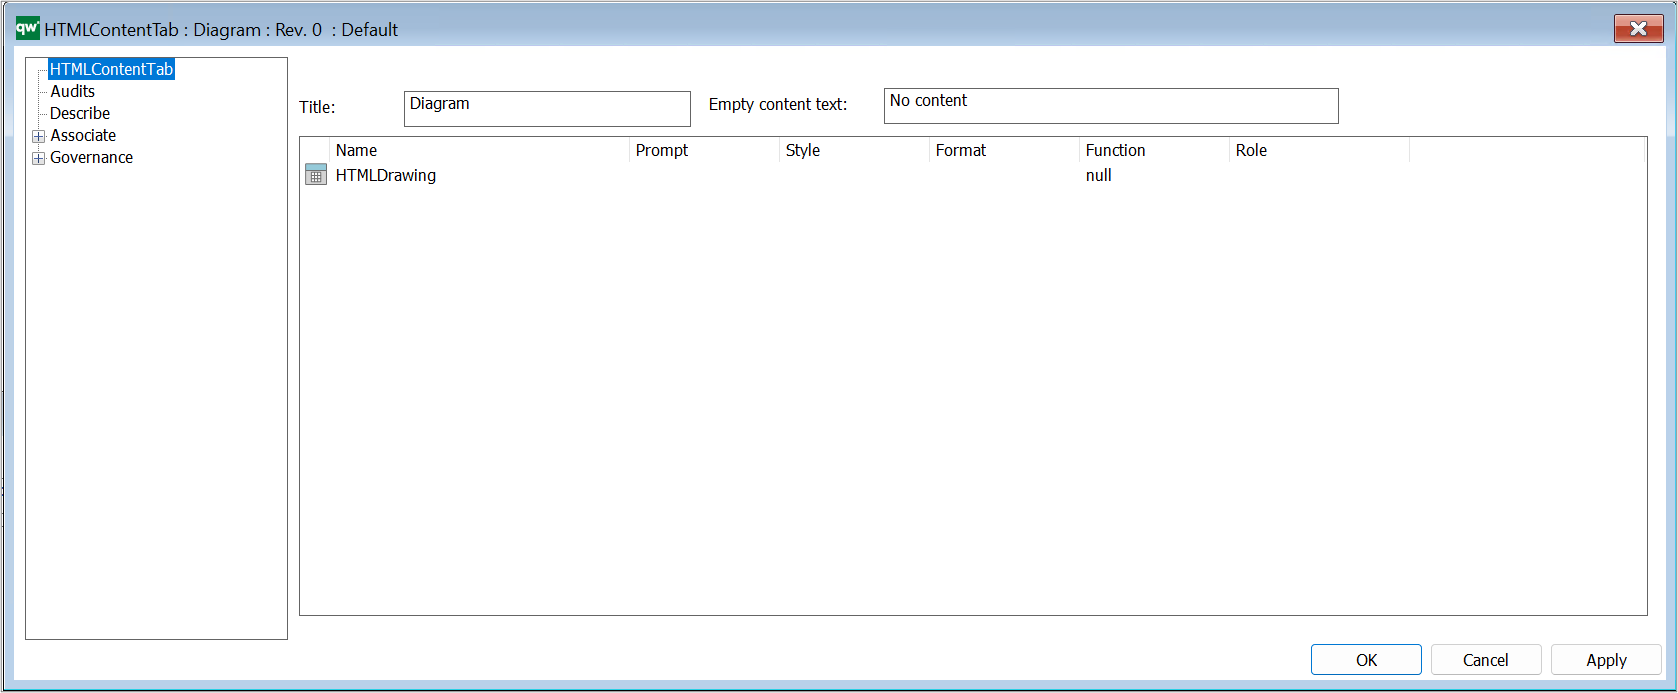
A HTMLContentTab is used to set up content in tab format. Content tabs are used in the HTMLTemplateDefinition, to create dedicated tabs with different types of content (in the Center tab in the Diagram Workspace – Classic Layout).

Title: This will be shown as the title of the tab. If nothing is specified, the name of the HTMLContentTab object will be shown on the tab.

Empty content text: If there is no content to show inside the tab, then this text will be shown.

Content field: This defines the content of the tab. It is possible to either specify a list of attributes to show or to link to other objects that defines the content.

Content field

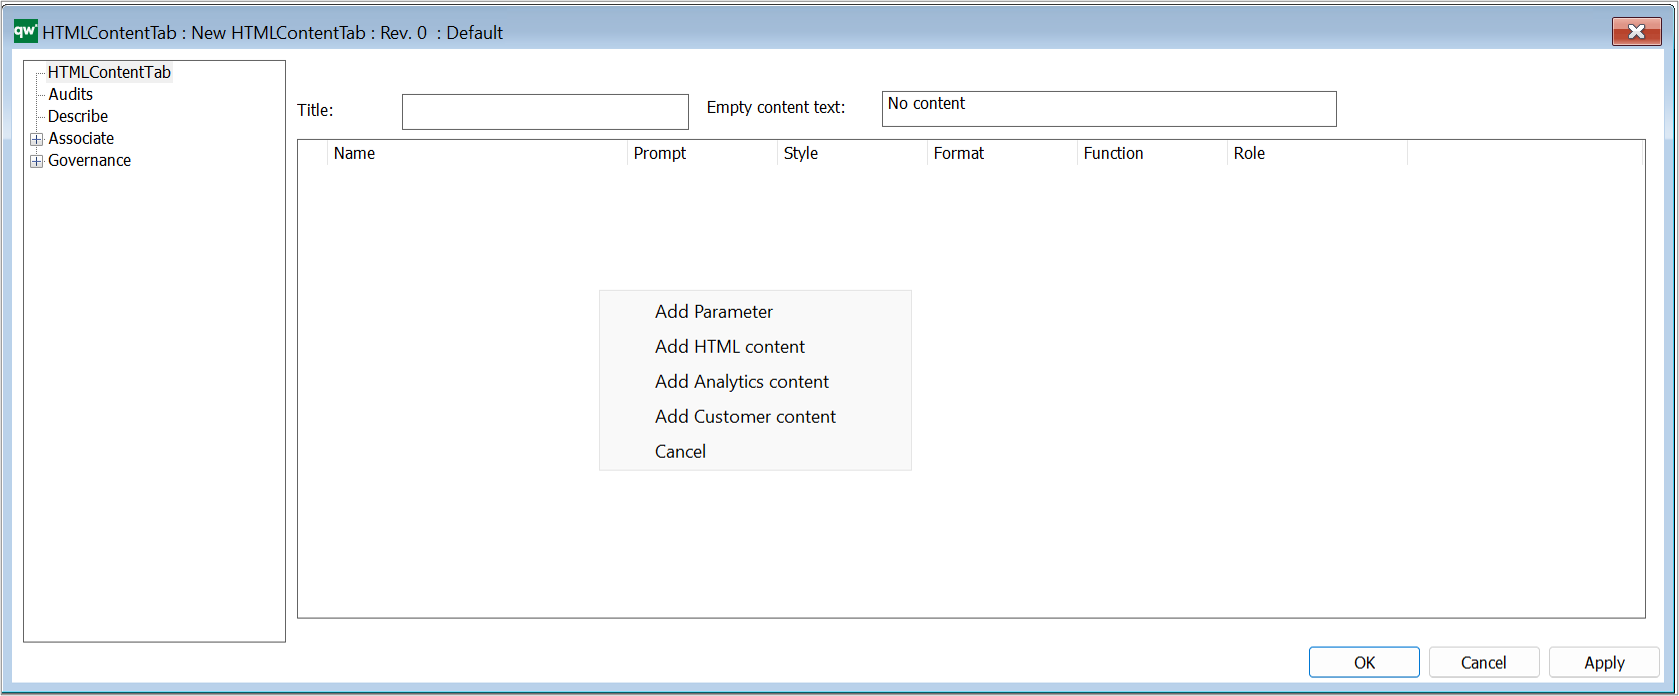
There are a few different ways to specify the content of the tab, right click in the box to get the available options:

  • Add Parameter : This will guide you through which parameters are possible to insert. First choose a template, and then it is possible to choose an attribute of that template.
  • Add HTML content: It is possible to insert a variarity of HTML content including:
  • Add Analytics content: It is possible to insert any of the following:
  • Add Customer content: This will insert a line you can configure.

HTML Content Box

A HTMLContentBox is a contained box that holds some information. It can be placed in a side panel or inside a tab.

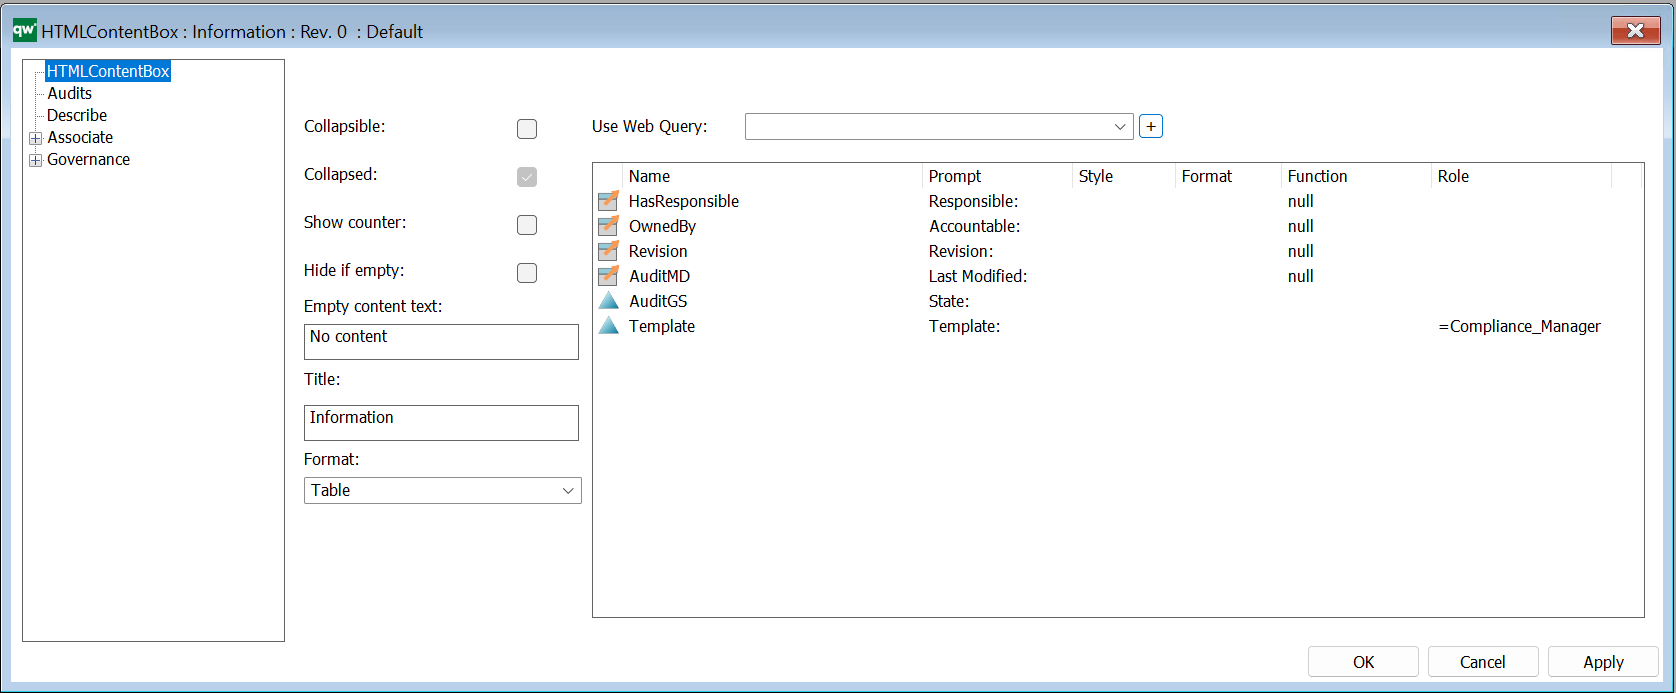
Collapsible: Defines if the box should be collapsible (Value: checked / unchecked)

Collapsed: Defines if the initial state of the box is collapsed.

Show counter: Defines if the box should display a counter to show how many links it contains. (Value: checked / unchecked)

Hide if empty: Defines if the box should be hidden if there is not content (Value: checked / unchecked)

Empty content text: If there is no content to show inside the box, then this text will be shown.

Title:  This will be shown on the title bar. If nothing is specified, the name of the HTMLContentBox object will be shown on the title bar.

Format: This defines how the information in the box should be shown. Values are Generic, List, Table.

Use Web Query: This defines how the information in the box should be shown. Values are Generic, List, Table.

Use a HTMLWebQuery to define a list of objects to show. This can e.g. be a list of all ExternalDocuments that are related to the current object in a specific way.

Content field:  This defines the content of the box unless a web query is selected. It is possible to specify a list of attributes to show.

  • Name: The content to be displayed.
  • Prompt: A prompt that helps the user understand what the content is.
  • Style:
  • Format: The format of the content of the content box.
    • Values are: CheckList: displays content from the diagram as a checklist. It is possible to select/deselect individual items, and select/deselect all items.
    • Chart
    • Spreadsheet
    • Fieldset
    • Table: displays content in a table format.
    • List: displays content in list format.
    • Gauge
    • Embed
  • Function:
  • Role: You can add a repository role to configure who can see the information.

A HTMLContentBox in inserted in a HTMLTemplateDefintion, in the left or right sidepanel.

HTML Dialog Layout

Purpose: The purpose of the HTML Dialog Layout template is to enable the organization to tailor the objects Dialog Layout on the collaboration platform.

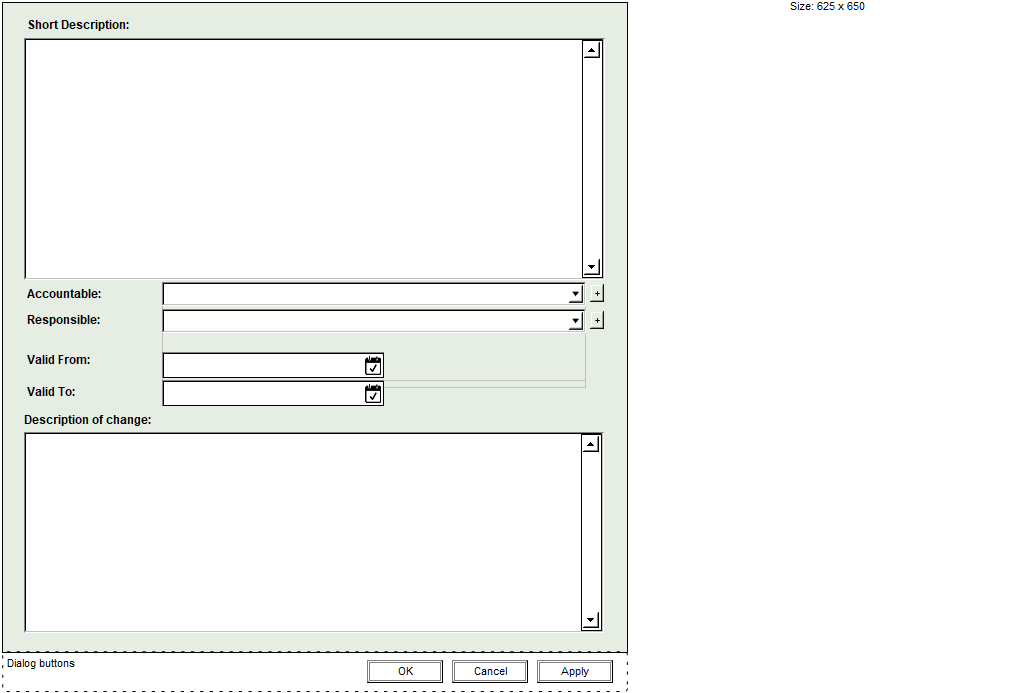
Core concerns: The HTML Dialog Layout template enables you to model HTML Dialog Layout, HTML Dialog Fields, HTML Dialog Groups and HTML Dialog Text. Using these elements, you can design the content of your dialogs. Below you can see an example of a Dialog Layout for a Business Process Network:

Relation to other templates: The HTML Dialog Layout template is, like the other HTML templates, a tool for creating a fully tailored collaboration platform that meet the needs of the specific organization. As such it is related to HTML Mega Menu, Generic Query and Query Design.

Properties and metadata: The HTML Dialog Layout template can for example retain the following information:

  • A description
  • Audits (auto generated information regarding its current state)
  • Access rights (such as linking to roles with read/write rights)
  • Layout (such as dialog title and colors)
  • Sub-dialogs (shown as additional tabs in the dialog)

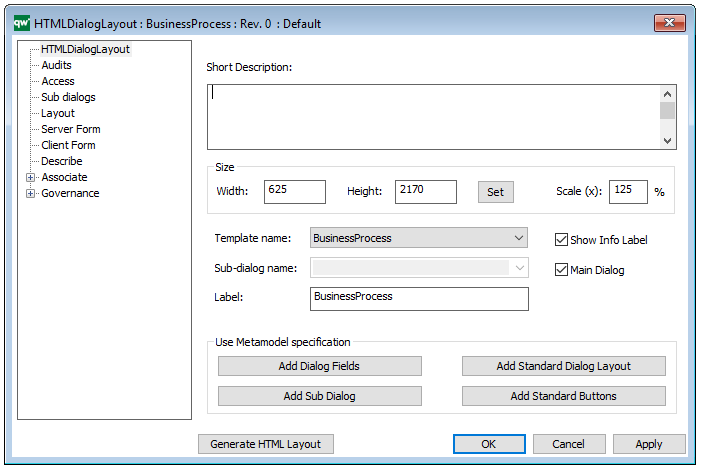
The above picture shows the properties dialogue window for the HTML Dialog Layout template, where you can view and edit the diagram’s properties in QualiWare Lifecycle Manager.

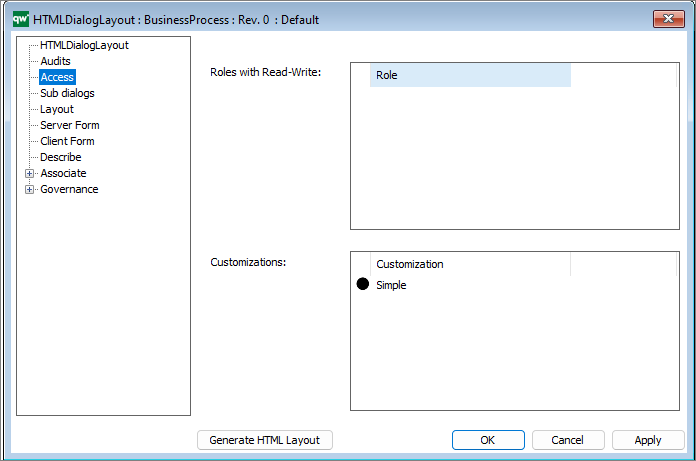
The access tab is used to specify which dialog description to use for any situation.

  • Roles with Read-Write: Role is used in the calculations of which HTMLDialogLayout is used when user triggers an action requiring a webform.
  • Customizations: Customization is used in the calculations of which HTMLDialogLayout is used when user triggers an action requiring a webform.

It is possible to set up multiple customization if needed.

From QualiWare 10.5 it is possible to have two versions of a form to edit objects from the web, a Simple and an Advanced form. If you specify the simple form, the advanced form will automatically be generated. The “advanced” form that has the full metamodel for our object (all tabs and all attributes). (see more details in the release note for QualiWare 10.5).

HTML Mega Menu

Purpose: The purpose of the HTML Mega Menu template is to enable the tailoring of the left menu on the collaboration platform.

Core concerns: The HTML Mega Menu template enables you to build the left menu using HTML Mega Menu Items, which can be layered. The example below shows how a menu looks in our modelling tool:

The screenshots below show how a menu can look on the collaboration platform and how the sub-menus are shown:

The left menu can be configured for differently for diffrent roles. The left menu can be modelled in 3 levels:

The HTMLMegaMenu is composed of HTML Mega Menu Items.

The Mega Menu is published to the Web via the HTML Publisher.

Relation to other templates: The HTML Mega Menu is related to the other HTML templates such as Generic Query, HTML Dialog Layout and Query Design.


Properties and metadata: The HTML Mega Menu template can for example retain the following information:

  • A description of the diagram
  • Audits (auto generated information regarding its current state and access rights)
  • Menu settings
  • Text settings

The above picture shows the properties dialogue window for the HTML Mega Menu template, where you can view and edit the diagram’s properties in QualiWare Lifecycle Manager.

Query Design

Purpose: The purpose of the Query Design template is to enable easy design of Generic Queries.

Core concerns: The Query Design template enables you to model Object Queries and Relation Queries into Generic Queries. When creating a Query Design, a Generic Query will be generated automatically and appear graphically on the diagram as a white triangle in a green circle – see the model below:

Relation to other templates: The Query Design template is used to generate Generic Query templates which can be used in creating Report Definitions, Spreadsheets and HTMLQueryResultViews.

Properties and Metadata: The Query Design Template can for example rentain the following information:

  • A description
  • Audits (auto generated information regarding its current state and access rights)
  • Query filter (with wizard for filter options)

The above pictures show the properties dialogue window for the Query Design Template where you can view and edit the diagram’s properties in QualiWare Lifecycle Manager

You can see an example of a Query Design in the QualiTube sections, where there is a video on Composity Query Design.